The Enable Cost Overrides command or the enables you to override individual Cost Summary values for a part or assembly.
This command is available from the Scenario menu and from an icon ( ) on the tool bar.
When you select this command, a check box is displayed next to every cost value. Those that are editable have a checkbox with black border; plain checkboxes without a black border indicate values that cannot be overridden.
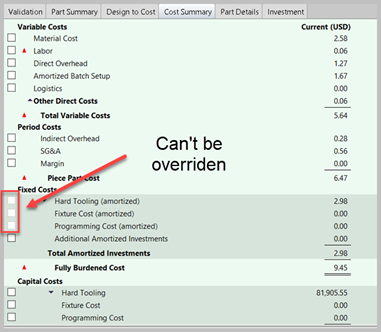
In general, you cannot override amortized values, but you can override the Capital Costs fields, and these values are amortized and reflected in the Fixed Costs fields.
-
Checking a specific check box opens the corresponding cost value for editing. You can override one or more values.
-
The cost value that has been checked for manual costing is no longer affected by changes to the component’s GCDs, non-geometric cost drivers, or Digital Factory data. However, if you disable cost overrides, aPriori discards the manually specified values, re-evaluates the CAD geometry and computes the cost values for the component.
-
You can use cost overrides for cost values that can be calculated by aPriori as well as for those that aPriori does not consider. For example, the material used to fabricate a part may require a special vendor-supplied finish or processing that is not reflected in the cost of the material stock specified in the Digital Factory. In this case, you can override the material cost for this part to reflect the cost of material with the required finish. Alternatively, you may wish to override the material unit cost, which is used to compute the total material cost, using the Material Selection window. For more information, see Changing material unit cost .
You can also use cost overrides to include the logistic cost to fabricate a component, such as internal or external shipping and handling, since by default, aPriori does not compute logistics costs but does provide a Logistics field in the cost taxonomy.
Enable and enter cost summary overrides
-
Click the
icon or select Scenario > Enable Cost Overrides. In the Cost Summary table, you see check boxes for the editable cost values.
-
Select a check box for each cost value that you want to edit. The cost value field becomes editable.
-
Enter a new value, then press Enter or move to another field. The cost totals associated with the value automatically re-calculate.
-
You can enter a note about the purpose or contents of the override in the Comment window that appears. After you have entered a comment for a cost override value, a small red triangle appears in the upper right of the cell. You can click on that triangle to view or edit the comment in the future.
-
Click the Save button.
Disabling cost summary overrides
-
Click the
 button or select Scenario > Enable Cost Overrides. aPriori discards the manually specified values re-evaluates the CAD geometry and computes the cost values for the component.
-
Click the Save button.
Total cost summary overrides
Select Scenario > Manually Cost to enable you to specify all cost summary values for a part or assembly.
-
When you select this command, a checkbox is displayed next to every editable cost value in the Cost Summary tab. All check boxes are checked and disabled indicating that all costs are specified manually and are not affected by changes to the components GCDs, non-geometric cost drivers, or Digital Factory data.
-
If you disable manual costing, aPriori discards the manually specified values re-evaluates the CAD geometry, and computes the cost values for the component.
-
Manually costed components are typically used when the cost for the component is not determined by its geometry or production facility. For example, you may design a CAD model for a part that is sourced from a supplier. In this case, the cost for the part is determined by the supplier and manually entered the aP Pro.
While the GCDs and Manufacturing Process information do not impact the cost for a manually costed component, they can impact the process level costs when that component is used in an assembly.
Create a manually costed component
-
Open a component (part or assembly).
-
Select Scenario > Manually Costed. Editable fields in the Cost Outputs pane change color.
-
For each field you want to edit, enter a new value and press Enter or move to another field. The cost totals associated with the value automatically re-calculate.
-
Click the Save button.
Convert a manually costed part to aPriori costed
-
Open a manually costed part or assembly.
-
Select Scenario > Manually Costed. aPriori discards the manually specified values, re-evaluates the CAD geometry and computes the cost values for the component.
-
Click the Save button.
Precedence of production input overrides
aPriori enables you to set and override production inputs in several ways. Production inputs include settings such as Process Group, Digital Factory, Material, Annual Volume, and Batch Size.
The following is the precedence aPriori follows for production inputs, in descending order:
-
4: User Override, if specified. For example, manually entering a value in the Cost Guide (see Analyze Components with the Cost Guide), or providing a value on the input spreadsheet or via the UI for Bulk Costing (see Bulk Costing and Analysis). User overrides always win.
-
3: CAD Property value, if provided. For more information, see Costing using CAD properties.
-
2: Preference value from Tools > User Preferences > Default Production Inputs… For more information, see One Click Costing™ .
-
1: Site or Digital Factory default, if specified. This used if none of the above apply.