aPriori Professional 2022 R1 SP1 includes these usability enhancements:
- Sizing Attributes for Spreadsheet Report Images
- Usability Enhancements
- Copy and Paste Keyboard Shortcuts for Rollup and Assembly Data
Anti-aliasing image processing
View smoother edges in 3D model thumbnails.
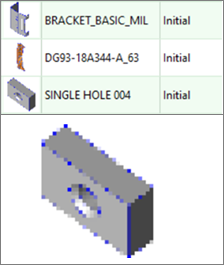
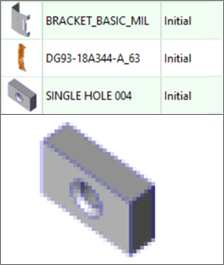
When displaying thumbnail images of parts and assemblies in various dialogs and spreadsheet reports, aPriori Professional now performs anti-aliasing image processing techniques that render edges more smoothly and make it easier to see details of the models. For example, this figure shows the Scenario Search dialog as rendered in previous releases.
While this figure shows the same dialog in 2022 R1 SP1.
Sizing Attributes for Spreadsheet Report Images
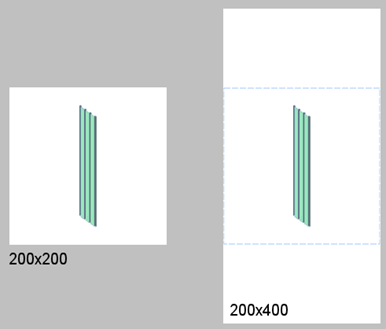
Specify the size of images in spreadsheet reports.
You can now specify the size of images that are displayed in spreadsheet reports. The <reports> element in the report definition file provides these attributes for control the width and height of the image:
-
thumbnailWidth(default: 184*) – Image width in pixels -
thumbnailHeight(default: 184*) – Image height pixels
If only the width or height is specified, aPriori generates a square thumbnail, using the given width or height for both dimensions. This figure shows the difference in image display for different height values.
For more information, see Part images and nesting diagrams in a report.(aPriori Professional User Guide).
Image Control Attributes and Improved Default Display for Nesting Diagrams
Specify the size of nesting diagrams in spreadsheet reports.
aPriori Professional 2022 R1 SP1 provides better default display of Nesting diagrams in the out-of-the-box spreadsheet reports and also includes more display control options for report authors.
Previously, the text underneath the nesting diagram, which describes coil material and dimensions, could be truncated or an extra black border could be displayed on the right-hand side of the image. These issues, tended to affect scenarios involving sheet metal strip-nesting, for example Progressive Die and Transfer Die processes, more often than other processes. Now, the default display settings for nesting diagrams prevents these issues from occurring.
This release also provides new spreadsheet report attributes, as shown in this figure, that allow report authors to control the:
-
image size –
nestingthumbnailWidth,nestingthumbnailHeight -
image trim –
nestingthumbnailTrim -
font size used in the image –
nestingthumbnailFontSize -
thumbnail gutter –
nestingthumbnailGutter

For more information, see Part images and nesting diagrams in a report.(aPriori Professional User Guide).
Copy and Paste Keyboard Shortcuts for Rollup and Assembly Data
Quickly and easily copy and paste selected data from a Rollup or Assembly Details table.
Previously you could use the Copy Table option in the Edit menu to copy and paste only the entire contents of a Rollup or Assembly Details table into an external document, such as a spreadsheet or a text editor. Now you can copy and paste selected data from a Rollup or Assembly Details table by using standard mouse and keyboard shortcuts. To do so:
-
Select one or more rows in the Rollup by using mouse Click, Ctrl+Click, or Shift+Click actions.
-
Copy the data by using either the Ctrl+C keyboard shortcut or by selecting Copy from the right-mouse menu.
-
Paste the copied data into the document editor by using Ctrl+V or by selecting Paste from the right-mouse menu.