Machining Enhancements
The newest version (CMV 370) of the Machining manufacturing process model includes multiple enhancements related to improving rough milling assumptions and estimates and the visibility of these assumptions. Additionally, for expert users, aP Pro 2025 R1 SP3 provides a consolidated display of operations, tools, and cutting parameters used on all machined GCDs.
- Improved Estimates and Cut Depths for Enlarged Pocket GCDs in 2-Model Machining
- Centralized Display of Machining Operation Details
- Improved Face-Milling Tool Size Selection
- Improved Side-Milling Tool Size Selections for Slot GCDs
- Improved Cut Depth and Cycle Time Estimates for Rough Milling of Holes
- Improved Estimates and Cut Depths for Enlarged Pocket GCDs in 2-Model Machining
Comprehensive Display of Milling Cutting Assumptions and Results
The Machining manufacturing process model (CMV 370) now displays standard cutting assumptions and outputs for all rough-milling and bulk-milling operations across a wide range of GCDs,. This enables users to validate cycle time calculations and the inputs to those calculations and override assumptions if desired.
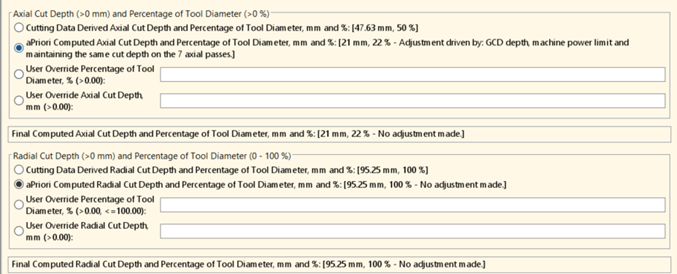
In the latest version of the Machining process model (CMV 370), aPriori now provides consistent information about cut depths, cutting speed, and feed rates selected for rough-milling, slot-milling, and bulk milling operations across a wide range of GCDs. These are displayed by right-clicking on the GCD in the Manufacturing Process pane and selecting Process Setup Options… In particular, compensations made to cut depths and cutting speeds derived from standard cutting data tables are now consistently displayed as the “Final Computed” value. In the example below, axial cut depth was adjusted in order to maintain a consistent cut depth across multiple passes. The Axial Cut Depth process setup option shows the available methods of determining that value and the chosen method. The Final Computed Axial Cut Depth value is displayed below it for clarity.
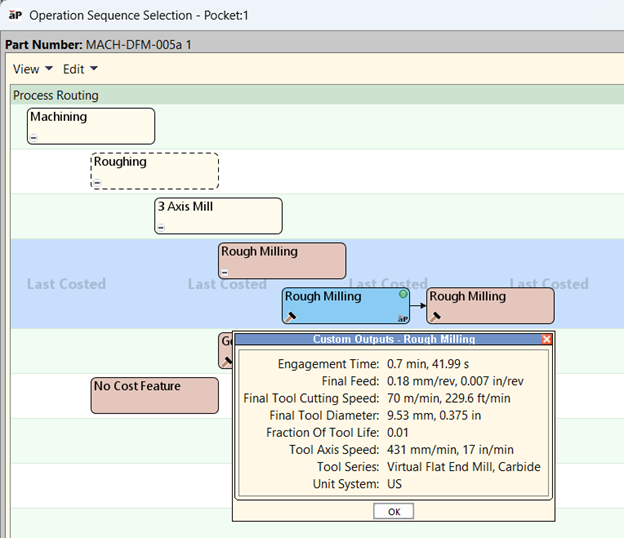
Other assumptions and outputs now also are provided consistently for each operation and GCD type, including tool diameter, tool series, feed rate, and cutting speed. These are displayed both in the Process Setup Options dialogs and captured as custom outputs so they are available for reporting purposes. To inspect the custom outputs, right-click the GCD of interest, select Edit Operation…, and then right-click the desired operation (for example. Rough Milling) and select Custom Outputs….
This rich information allows users who are interrogating the cycle time of specific operations to understand the assumptions, override them if desired, and validate the results.
Centralized Display of Machining Operation Details
Manufacturing process groups that include primary or secondary machining now provide a Machining Details dialog which provides a comprehensive view of the operation assignment, tool selection, and cutting parameter decisions determined by aPriori, making it easy for expert users to review these outputs for all machined GCDs in one central location.
Previously, to inspect this type of information it was necessary to navigate to each GCD, select Edit Operation from the right-mouse menu, and then select Custom Outputs from the relevant node in the operation’s routing sequence.
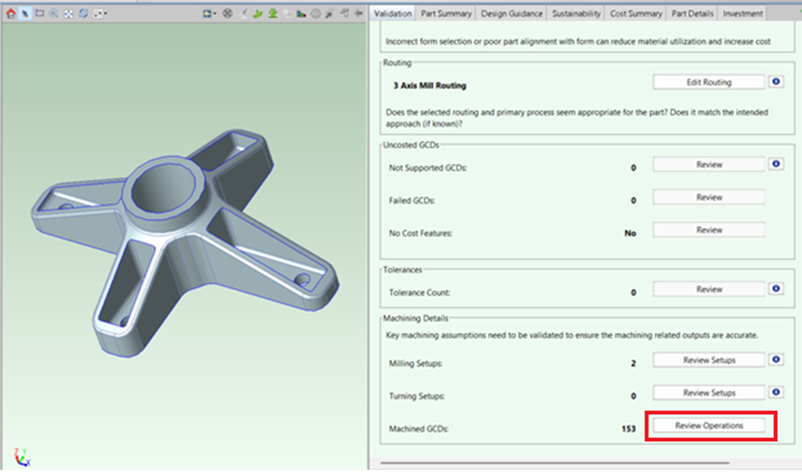
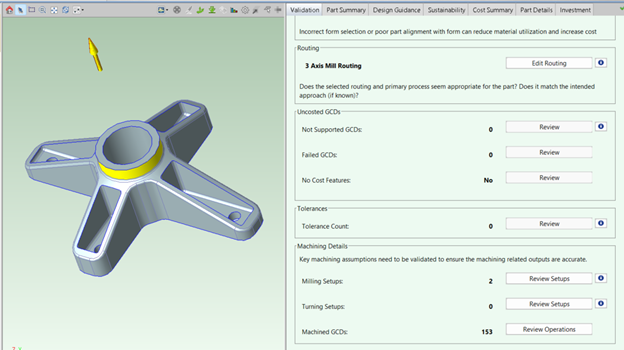
Now, users can go to the Validation tab, locate the Machined GCDs: row and select the Review Operations button, as shown below.
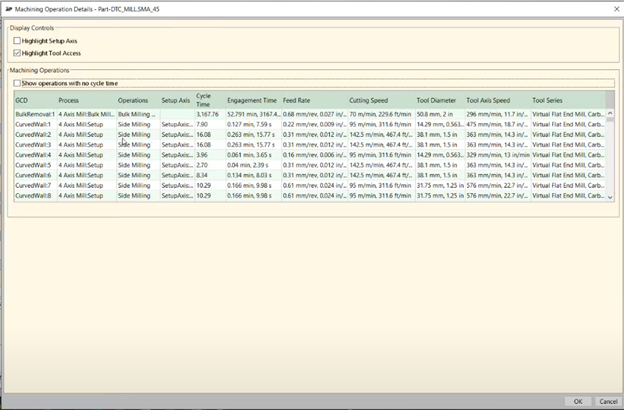
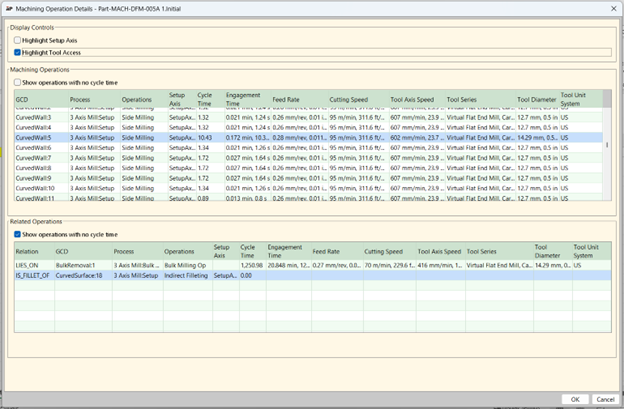
The Machining Operations Details dialog will appear. Each GCD that is machined will be included in the upper Machining Operations table, as shown below. Key information such as the selected Operation, the selected Tool Series and Tool Diameter, Cutting Speed and Feed Rate, and operation Cycle Time is provided. Note this dialog is large as it displays a lot of information. aPriori recommends using a second monitor if possible so that the dialog can be displayed without obscuring the main aP Pro window.
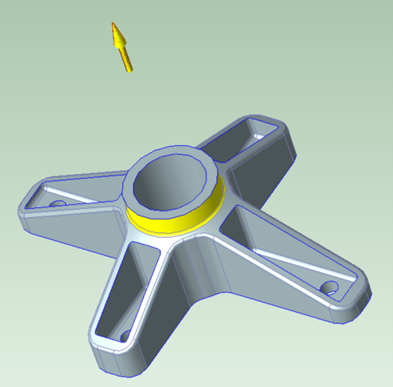
Consider, for example, a GCD such as CurvedWall:5. You can see from the Machining Operations table that this surface is machined with a Side Milling operation using a tool diameter of 0.563 inches, or 9/16 inches. When you select that row in the table, the surface is highlighted in the Viewer. If the Highlight Tool Access option is selected (checked), an arrow indicating the direction from which the tool approaches also is displayed.
This visualization helps you confirm that the assigned operation is appropriate for the surface. If desired, you can inspect GCD properties, such as the height and diameter of the wall, in order to validate the tool series and tool size.
Selecting a GCD in the top table also will display related GCDs in the lower table. For example, the Relation column shows that CurvedSurface:18 is a fillet of CurvedWall:18, and is assigned an Indirect Filleting operation. When you select that row, both surfaces are displayed in the Viewer.
A checkbox option, Show operations with no cycle time, enables you to display or hide operations that have no additional associated cycle time. For example, CurvedSurface:18 above has no additional cycle time because it is made “indirectly” by the corner radius of the tool that is used to side-mill CurvedWall:5. If you want to inspect the operations assigned to each surface, leave this option checked. If you want to view just cutting parameters and reduce the number of rows in the table, you can uncheck this option.
Note that the Manufacturing Operation Details dialog will be available with an upgrade to aP Pro 2025 R1 SP3 and does not require upgrading your manufacturing process model. However, some of the data fields displayed in the dialog, for a subset of GCDs, were made available only in the latest Machining process model version (CMV 370), as described in the section Comprehensive Display of Milling Cutting Assumptions and Results. If you do not upgrade your manufacturing process models, then some cells of the table will be empty. For example, for Pocket GCDs, the Feed Rate and Cutting Speed will not be displayed in the table.
Improved Face-Milling Tool Size Selection
The Machining process model (CMV 370) corrects some issues in which aPriori selected a Flat End Mill or Face Mill tool that was larger than is generally available in practice or larger than was appropriate for the part size.
This release corrects both the following:
-
Previously, in some cases, aPriori selected an End Mill that was larger than the upper tool size limit specified in the lookup table tblOperationSize (38.1 mm by default). Now a Face Mill tool will be selected instead.
-
Previously, in some cases, aPriori selected a Facing tool diameter that was very large compared to the overall part size (for example, almost 80% of the part width). Now, Facing tool diameters will be constrained based on part size and length-to-width aspect ratio, according to the following heuristic:
Length / Width Maximum Facing Tool Diameter <= 4
12% of (Part Width + Part Height)
> 10
40% of (Part Width + Part Height)
> 4 and <= 10
Interpolate between 12% and 40% of (Part Width + Part Height)
As a result of these changes, smaller facing tools now will be chosen for some part surfaces, compared to previous releases, and facing operation cycle times will increase. More rarely, a larger tool may be selected, due to the fact that aPriori limits the total number of distinct tool diameters used for all the part's face-milled surfaces. In some cases, the selected process routing may change, because the previous routing may no longer have the lowest cost (due to increased cycle time caused by decreased tool diameter).
Improved Side-Milling Tool Size Selections for Slot GCDs
The latest version of the Machining process model (CMV 370) corrects an occasional issue in which the side-milling tool selected to finish-mill the walls of a slot was larger than some internal corner radii of the slot.
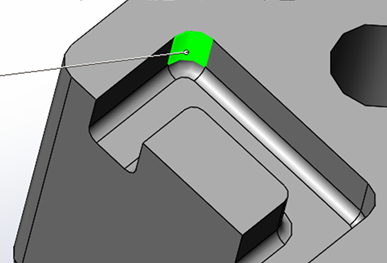
For example, the slot pictured below, a side-milling tool may previously have been selected with a radius larger than the radius of the green highlighted surface. This release fixes the problem.
As a result of this change, smaller side-milling tools now will be chosen for some Slot GCDs, compared to previous releases, and side-milling operation cycle times will increase. However, the impact is modest overall—in a large test set, only about `10% of parts were impacted by this change, and the largest observed increase in total part cycle time was 3.4%.
Improved Cut Depth and Cycle Time Estimates for Rough Milling of Holes
Previously, aPriori erroneously used a radial cut depth of 1 (equal to the tool radius) when rough milling large-diameter SimpleHole GCDs. This is corrected in the latest release of the Machining manufacturing process model (CMV 370).
Now lower cut depths are determined from our standard milling cutting data tables, considering factors such as the tool diameter, tool type, tool series, and material cut code. Now in most cases, a cut depth of 50% of tool radius now is selected. As a result of this change, cycle time estimates will increase for SimpleHole Rough Milling operations by close to 100%.
Improved Estimates and Cut Depths for Enlarged Pocket GCDs in 2-Model Machining
The latest Machining manufacturing process model (CMV 370) was updated to improve the estimates for rough-milling pocket features that are present in a cast or forged part but then enlarged by machining in the finished part.
Previously, for enlarged pockets with angled (tapered) walls , aPriori sometimes selected overly large rough-milling tools and/or overly large cut depths that didn’t properly reflect that the pocket is simply being enlarged not fully machined and that only a relatively small depth of material along the pocket walls and floor needs to be removed.
As a result of this change, compared to a previous release, aPriori now may select smaller tools and smaller axial and radial cut depths to enlarge pocket GCDs in the 2-Model Machining process group, resulting in larger cycle time and cost estimates.
