When you first open and cost a component, aP Pro creates an initial scenario for that component (shown with (Initial)) on the scenario tab.
Tip: To change the default name that aPriori uses for initial scenarios, select Tools > User Preferences > Default Scenario Name.
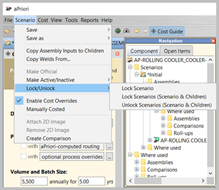
You can use these Scenario menu options to work on the currently-open scenario:
|
Action |
Description |
|---|---|
|
Save |
Save changes to the current scenario. See Save Scenario Changes. |
|
Save as |
Create a copy of the current scenario. See Save a New Scenario |
|
Copy Assembly Inputs to Children |
Copy selected values such as Digital Factory, annual volume, or batch size to each of the children in the assembly. See Copy Assembly Inputs to Children. |
|
Copy Welds From |
(Assemblies only) Choose another assembly with similar geometry, and copy virtual welds from that assembly. See Add Virtual Welds. |
|
Make Official |
Set the current scenario as the official scenario. See Official Scenarios. |
|
Make Active/Inactive > |
Make scenario active or inactive. See Make Scenarios Active / Inactive |
|
Lock/Unlock |
Lock or unlock scenario. See Lock and Unlock Scenarios. |
|
Enable Cost Overrides |
Displays checkboxes next to line items in the Cost Summary view that enable you to enter your values for costing. See Part Details Overrides. |
|
Manually Costed |
Displays checkboxes next to every editable cost value. In addition, all checkboxes are checked and disabled, indicating that all costs are specified manually and are not affected by changes to the components GCDs, non-geometric cost drivers, or Digital Factory data. See Total cost summary overrides. |
|
Attach 2D Image |
Associate a graphics file with a virtual component. |
|
Remove 2D Image |
Disassociates an image that was associated with a virtual component. |
|
Create Comparison |
Creates a comparison summary view starting with the currently selected scenario. See Compare Scenarios. |
Scenario Menu Options
Save Scenario Changes
After making changes to a scenario:
-
Ensure that aPriori has analyzed your scenario since your last change. Click Cost if necessary.
-
Select Scenario > Save > Scenario.
For assemblies and roll-ups, you can select:
-
Scenario > Save > Scenario & Children, to "deep save" the current scenario for both the assembly and all the assembly's subcomponents.
-
also Scenario > Save > All Scenarios & Children to "deep save" for all scenarios for both the assembly and all the assembly's subcomponents.
-
Save a New Scenario
To create a new scenario from an existing one:
-
In the relevant scenario tab, select Scenario > Save as > Scenario
For assemblies and roll-ups:
-
Select Scenario > Save as > Scenario & Children to create a new scenario, with copies of any subcomponents.
-
Select Scenario > Save as > Snapshot to make a copy of the current scenario and lock it and its children against further changes.
-
-
Enter a unique name for the scenario in the Name field, and optionally enter a description of your changes in the Description field.
-
Click OK to display the scenario in a new component scenario tab and the component’s Scenarios folder on the Navigation pane.
Official Scenarios
The official scenario for each component is the first scenario analyzed for that component, and opens by default when you open that component (see Opening a component in aPriori).
Note: By default, when you first cost a component, the official scenario is named "Initial".
To change the official scenario for a component, open the scenario, then select Scenario > Make Official.

Note: For snapshots, roll-ups, comparisons, or analyses, the initial scenario is always the official scenario.
Make Scenarios Active / Inactive
Active scenarios are automatically updated with CAD changes; inactive scenarios are not.
-
Select Make Active/Inactive > Make Active (Scenario) or Make Inactive (Scenario) to Specify whether the selected scenario is automatically updated with CAD changes.
-
Select Make Active/Inactive > Make Active (Scenario & Children) or Make Inactive (Scenario & Children) to specify whether the selected scenario and all its children are automatically updated with CAD changes.
Tip: See Active and Inactive Scenarios for more details.
Lock and Unlock Scenarios
During design, you can select to lock a scenario, to record that scenario at a specific stage, without allowing further changes (by users or by automatic CAD updates)
-
Select Scenario > Lock Scenario or Scenario > Unlock Scenario to allow or disallow changes to a scenario.
-
Select Lock Scenarios (Scenario & Children) or Unlock Scenarios (Scenario & Children) to allow or disallow changes to both the assembly and the assembly subcomponents. See Lock Scenarios in an Assembly.