Custom processes provide a way to represent and account for extra processing that isn’t included in a Digital Factory’s predefined routings.
To create then assign a custom process:
Tip: See also the Create a Custom Process aP Academy training course.
Create a Custom Process
-
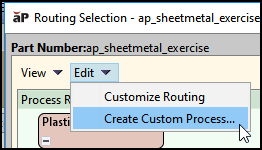
In the Manufacturing Process pane, click Edit > Routing Selection to open the Routing Selection editor.
-
Select Create Custom Process… to open the Custom Process/Operation window.
-
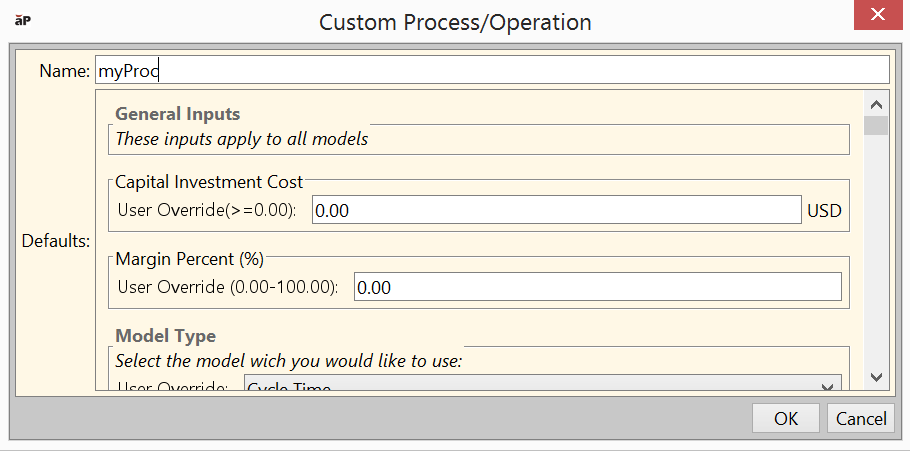
In the Name field, enter a name for your custom process.
-
Enter General Inputs: Capital Investment Cost and Margin Percent .
-
Select a Model Type, then enter the remaining inputs that are relevant to the Model Type you chose. See Enter Model Type Information.
Enter Model Type Information
There are two general categories of model type:
-
Cycle-time-based model types: Cycle Time, Cycle Time Per Length or Cycle Time Per Each
-
Cost-based model types: Cost Per Surface Area, Cost Per Mass, Cost Per Length, Cost Per Each
Cycle-time Model Information
For all cycle-time-based models, enter:
-
Labor Time (if you want to override labor time as calculated from cycle time)
-
Number of operators
-
Batch setup time
-
Labor rate
-
Overhead information (either overhead rates or machine and work center information for bottom-up overhead-rate calculation)
Also enter the following model-type-specific information:
-
Cycle Time model
-
Cycle Time enter the total cycle time required for a part.
-
-
Cycle Time Per Length model
-
Cycle TimePer Length: Enter a time per unit length.
-
Length: Enter the length that should drive cycle time, or else specify that it should be driven by the part length.
-
-
Cycle Time Per Each model
-
Cycle Time Per Occurrence: Enter the cycle time per feature, for some cost-driving feature of parts, or enter the cycle time per item or operation for some item or operation associated with part manufacture.
-
Number of Occurrences: Enter the number of occurrences of the feature, item, or operation for a single part.
-
Cost-based Model Information
For cost-based models, enter:
-
Cost Per Surface Area model
-
Surface Area: Enter a surface area or specify that the model should use the part’s surface area.
-
Surface Area Affected: Enter the percentage of the specified surface area that should drive the cost of the part.
-
Surface Area Rate: Enter a cost per unit area.
-
-
Cost Per Mass model
-
Part Mass: Enter a mass or specify that the model should use the part’s mass.
-
Mass Affected: Enter the percentage of the specified mass that should drive the cost of the part.
-
Mass Rate: Enter a cost per unit mass.
-
-
Cost Per Length model
-
Length: Enter a length or specify that the model should use the part’s length.
-
Length Affected: Enter the percentage of the specified length that should drive the cost of the part.
-
Length Rate: Enter a cost per unit length.
-
-
Cost Per Each model
-
Cost Per Occurrence: Enter the cost per feature for some cost-driving feature of parts, or enter the cycle time per item or operation for some item or operation associated with part manufacture.
-
Number of Occurrences: Enter the number of occurrences of the feature, item, or operation for a single part.
-
Cycle-time-based models calculate overhead costs and rates as described in the Cost Model Guide Direct and Indirect Overhead.
They also use standard formulas for labor and batch setup costs per part:
Labor Cost = (Cycle Time * Number of Operators * Labor Rate) / Final Yield
Amortized Batch Setup = (Batch Setup Time * (Labor Rate + Direct Overhead Rate)) / Batch Size
-
Labor Time Standard for the custom process is assumed to be 1. Labor handling time is assumed to be 0.
-
Yields are calculated as described for the current process group in the Cost Model Guide. Good Part Yield for the custom process is assumed to be 1.
-
Cost-based models categorize costs (excluding capital investment and margin) under Additional Direct
Add a Custom Process to a Routing
To include the custom process in a routing,
-
In the Manufacturing Process pane, click Edit > Routing Selection to open the Routing Selection editor, showing the routing currently being used for the open part.
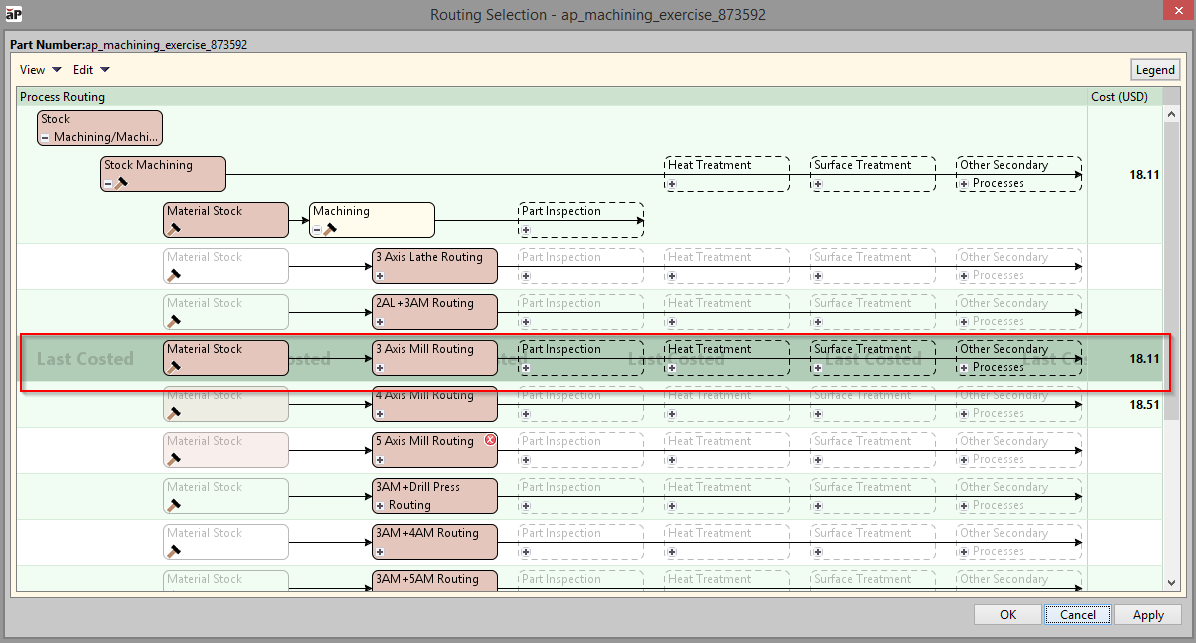
The routing that used for the most recent analysis is highlighted in green; aP Pro by default selects the routing that costs the least.
-
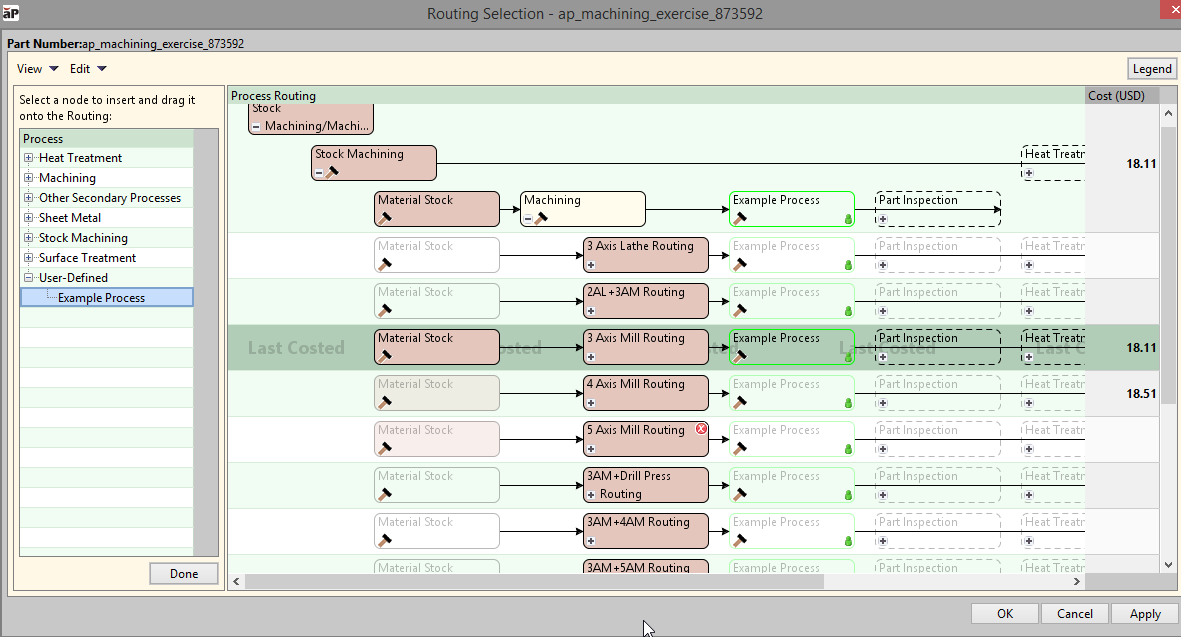
Select Edit > Customize Routing , then select an operation from a list and add it to the routing by dragging it into the routing tree on the right.
-
The process appear as a node on the tree, outlined in green with a user symbol in the bottom right of the node. (Icon is also green):
-
Click OK to apply the changes and exit, or Apply to save the changes and stay in the window.
Optionally, you can then modify the definition or inputs to the custom process by right clicking the node in the routing editor and selecting Process Setup Options. See Edit Process Setup Options.
Note: Custom processes created within one scenario are not available for reuse in other parts.