Using Self-Service User Management
By default, aPriori Cloud provides Self-Service User Management through a web interface available in aPriori Cloud Home for user administrators.
This section covers the following topics:
Accessing the Self-Service User Management Interface
Note: You must be a user administrator (APRIORI_USER_ADMIN) to access the User Management interface.
To access the Self-Service User Management interface:
-
Click your account icon in the top-right corner of aPriori Cloud Home and select User Management.
-
If required, use the search bar at the top-left of the screen to find any user in the system.
-
View the following information for each user:
-
Username
-
Email address
-
Family Name
-
Given Name
-
User Role
-
Job Title
-
Status (Active / Inactive)
-
Created At (date and time)
-
Updated At (date and time)
-
Actions
-
Adding Users
Note: You must be a user administrator (APRIORI_USER_ADMIN) to add users.
To add a new user:
-
Access the User Management screen (see Accessing the Self-Service User Management Interface).
-
Click Add User at the top-right of the screen.
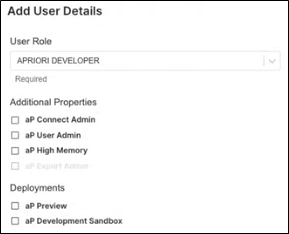
The Add User Details pop-up window appears.
-
Click inside the User Role box.
-
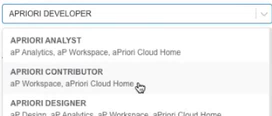
Select a customer-assigned role for the user from the drop-down list. To help you make your selection, the applications and capabilities of each role are displayed under the name of each role. For details, see Customer-Assigned User Roles.
-
If required, select Additional Properties for the user. The options available are dependent on the User Role selected. For details, see Optional Roles.
-
If required, select Deployments for the user. The options available are dependent on the User Role selected. For details, see Optional Roles.
-
Click Next.
-
Enter details for the user’s profile. The following fields are available (* indicates a required field):
-
Username*
-
Email*
-
Given Name*
-
Family Name*
-
Name prefix
-
Name suffix
-
Job title
-
Department
-
Town or City
-
County
-
Country
-
Time Zone*
-
Office Phone Country Code
-
Office Phone Number
Important: Ensure that you have entered the values for the required (*) fields correctly as you cannot edit the fields subsequently.
You can return to the previous screen by clicking the Previous button or cancel your changes by clicking the Cancel button.
-
-
Click Finish.
You can now view the new user’s details on the User Management screen. aPriori automation will also automatically assign an aPriori license to the added user based on the user’s assigned role if an available license of the appropriate license type exists.
Updating Users
Note: You must be a user administrator (APRIORI_USER_ADMIN) to update users.
Important: A user administrator cannot update their own enablements. Instead, another user administrator must make the required changes. However a user administrator can update their own profile details, as described below.
To update an existing user:
-
Access the User Management screen (see Accessing the Self-Service User Management Interface).
-
Use the search bar to find the user you want to update.
-
In the Actions column, click the three dots.
-
Select Edit.
-
In the Edit User Details pop-up window, click inside the User Role box.
-
If required, select a new customer-assigned role for the user from the drop-down list. To help you make your selection, the applications and capabilities of each role are displayed under the name of each role. For details, see Customer-Assigned User Roles.
-
If required, select Additional Properties for the user. The options available are dependent on the User Role selected. For details, see Optional Roles.
-
If required, select Deployments for the user. The options available are dependent on the User Role selected. For details, see Optional Roles.
-
Click Next.
-
If required, update the user’s profile. Note that you cannot update the required (*) fields. For details, see Adding Users.
You can return to the previous screen by clicking the Previous button or cancel your changes by clicking the Cancel button.
-
Click Finish.
You can now view the updated details on the User Management screen.
Deleting Users
Note: You must be a user administrator (APRIORI_USER_ADMIN) to delete users.
Caution: You cannot undo deleting a user. Note also that this is a ‘soft-delete’ operation as some data must be retained to meet audit and compliance requirements.
To delete a user:
-
Access the User Management screen (see Accessing the Self-Service User Management Interface).
-
Use the search bar to find the user you want to delete.
-
In the Actions column, click the three dots.
-
Select Delete.
-
A Confirm pop-up window appears, informing you that the action cannot be undone and asking if you are sure you want to proceed. If you are sure you want to delete the user, click Yes. Otherwise, click No.
If you clicked Yes, the user is marked as Inactive. They will no longer be able to log in to aPriori applications.


