Digital Factory Administration Enhancements
aP Pro 2024 R1 SP3 contains several enhancements that enable users to use spreadsheet-based workflows for entering or updating key material fields that are used to establish a material’s costs based on a company’s buying power and purchase volumes, and/or the material’s relationship or link to another material. Customers now can use the powerful table-editing controls of Microsoft Excel to efficiently populate the appropriate values for multiple materials, material types, and/or process groups offline. The material updates then can be applied in bulk by importing them into aP Pro.
For more information see:
-
Use Spreadsheets to Link Custom Materials to Source Materials
-
Use Spreadsheets to Efficiently Edit Material Cost Factors in Bulk
Use Spreadsheets to Link Custom Materials to Source Materials
In aP Pro 2024 R1 SP3, you can link a custom material to a source material by using a spreadsheet. Previously, you could link materials only through the Digital Factory Manager user interface.
Follow the steps below to use a spreadsheet to add a custom material and link it to a source material. Please note the proper use of generic materials as source.
-
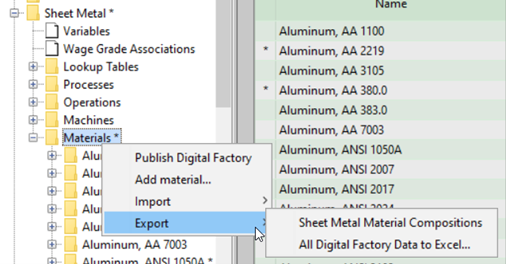
Export materials information to Excel: right click a chosen process group’s Materials folder, and choose either one of the export options.
-
Open the spreadsheet that has been exported, and navigate to the materials table worksheet if needed.
-
Insert a row for the new custom material.
-
Enter the name of the process group in the Process Group column, enter the name of the new material in the Name column, and enter the name of the material you want to link as its source in the Source Name column.

The image above shows the addition of the linked material Steel, Cold Worked, AISI 1010_Custom.
-
If you leave the Inherit Source Stocks field blank (or enter TRUE), aPriori will add all source material stocks to your custom material.
If you enter FALSE, your custom material will use only virtual stocks.
-
Repeat steps 3 through 5 for each material you want to add and link to a source material. Optionally, you can also apply overrides to any new material to add custom information; in this case this custom information will not inherit from the source material. Subsequent changes to the source material will not affect any overrides.

The image above shows the addition of another linked custom material, Steel, Cold Worked, AISI 1010_Custom01, and and an override to its Scrap Cost Percent value. Changing this override unlinks the Scrap Cost Percent field from the source material.
-
Save spreadsheet and close.
-
Import by right clicking the chosen process group’s Materials folder, and choosing one of the import options. Choose the same import method as the export method you used in step 1.
When the import is complete, each custom material is populated with the source material information, including stocks if required.
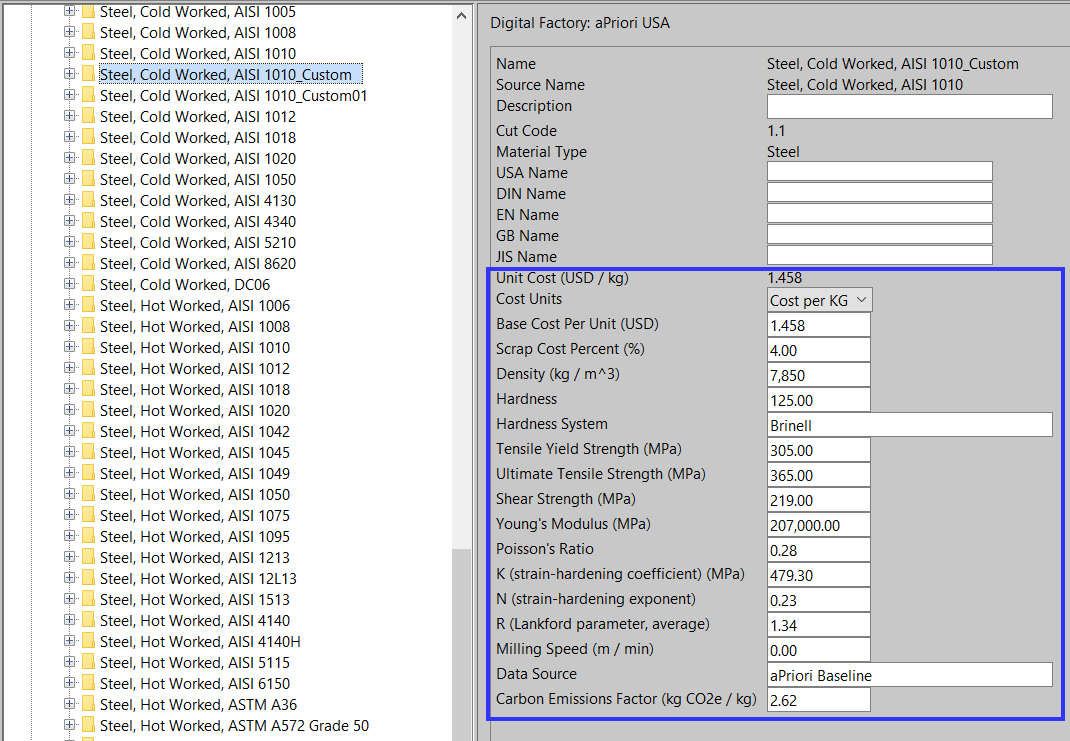
In this example, Steel, Cold Worked, AISI 1010_Custom and Steel, Cold Worked, AISI 1010_Custom01 are added to the Digital Factory and linked to Steel, Cold Worked, AISI 1010, except for the Scrap Cost Percent field of Steel, Cold Worked, AISI 1010_Custom01, which is unlinked and contains the specified override:

Note the following requirements:
-
The source material referenced in the spreadsheet must already exist in your aPriori database. It cannot be defined earlier in the same spreadsheet
-
This workflow is possible only when you are adding a new custom material. You cannot edit the source material for an existing custom material using a spreadsheet. If the spreadsheet contains an updated source material name, that field is ignored upon import.
Important: Once you have imported your changes, do not import the same spreadsheet again without first re-exporting to it. Spreadsheet rows for new materials contain blank fields, which, upon import, will be populated in the Digital Factory based on the source material. After import, these blank fields in the spreadsheet are no longer associated with a new material (since the material now exists in the Digital Factory), and so the blank fields are considered to be overrides. If you re-import without first re-exporting, the blank fields will be populated with null values in the Digital Factory, overwriting existing data.
Important: When aPriori imports materials from a spreadsheet, if it detects duplicate (non-unique) alternative material names, these duplicate names are not saved to the Digital Factory and no alert or warning is issued. The import of all other data silently proceeds. See Unique Alternative Material Names Enforced for Spreadsheet Imports.
Note: The only way to change the source material that a custom material is linked to is by using the Digital Factory Manage OR by deleting the material and re-adding it as a new material using the spreadsheet.
Unique Alternative Material Names Enforced for Spreadsheet Imports
aPriori now enforces that a material’s alternative names are unique, regardless of how the material is entered into aPriori.
In aP Pro 2024 R1 SP2, aPriori introduced a requirement that the “alternative name” fields (USA Name, DIN Name, EN Name, GB Name, and JIS Name) must be unique for each custom material. This uniqueness check was enforced when a user interactively added or edited a material using the Materials table of the Digital Factory Manager. See Unique Alternative Names are Now Required for Custom Materials for more information.
In aP Pro 2024 R1SP3, this requirement for unique alternative names also will be enforced when materials are imported into the Digital Factory from an Excel spreadsheet.
Important: When aPriori imports materials from a spreadsheet, if it detects duplicate (non-unique) alternative material names, these duplicate names are not saved to the Digital Factory and no alert or warning is issued. The import of all other data silently proceeds.
Use Spreadsheets to Efficiently Edit Material Cost Factors in Bulk
In aP Pro 2024 R1 SP3, you can edit material factors by using a spreadsheet. This new capability allows you to change multiple adjustment factors and purchase volumes at the material type, process group, and/or material level in a single import. Previously, you were required to enter each value separately in the Digital Factory Manager’s Material Factors table.
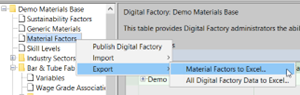
To open the Material Factors spreadsheet, right click Material Factors in the Digital Factory Manager navigation pane and select Export > Material Factors to Excel.
aPriori exports the material factors table from your Digital Factory to the spreadsheet, including all information regarding material types, process groups, materials, and material stocks.
Note: You can also access the material factors spreadsheet when you export all Digital Factory data: right click Material Factors and select Export > All Digital Factory Data to Excel. Open the exported file <digital-factory-name>.xls (the file that is not specific to a process group). Select the Material Factors tab.
The top section of the spreadsheet is related to material types. If you add an adjustment factor or purchase factor in this section, it applies to all materials across all process groups.
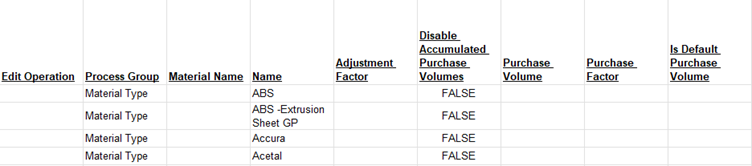
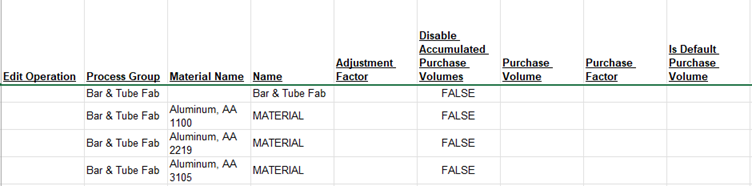
Below this, the spreadsheet has a section for each process group and its corresponding materials. The first row of each process group section displays the name of the process group in both the Process Group and Name columns. In this row you can set process group level factors, which apply to all materials that do not have their factors entered as outlined in the next paragraph.
Below the first row of a process group section, there is a row for each of the process group’s materials. Each of these rows has MATERIAL in the Name column. If you enter a factor on a specific material row, the factor is used to calculate the material’s cost. Materials with no entries default to the process group level factors.
For more information, see:
Adding Adjustment Factors
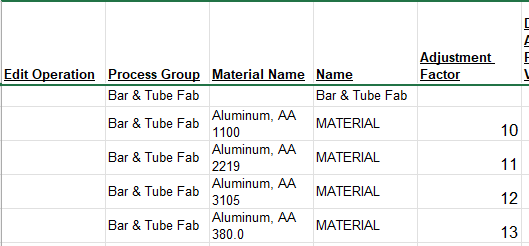
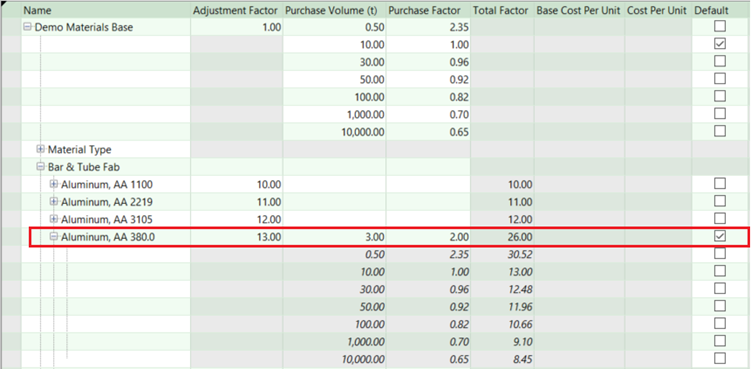
To add new adjustment factor information, enter the desired value in the Adjustment Factor column, in the same row that the process group or material is listed in. In the example below, adjustment factor values of 10, 11, 12, and 13 were added for the first four aluminum materials.
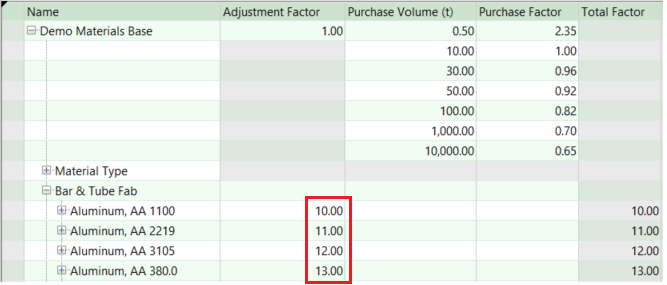
Once the modified spreadsheet is imported back into the Digital Factory, the new values are displayed in the Digital Factory Manager’s Material Factors table.
Adding Purchase Volumes and Purchase Factors
To add new purchase factor information, add an extra row in the spreadsheet below the entity to which the purchase factor information corresponds. This entity can be a material type, a process group, or an individual material.
For example, to add a purchase factor to the material Aluminum, AA 380.0, Insert a row below Aluminum, AA 380.0, and do the following in the new row:
-
Set Is Default Purchase Volume to TRUE or FALSE.
TRUE sets this new information as the default for scenarios to which this entity applies. (The spreadsheet column Default Purchase Volume corresponds to the Default checkbox in the Digital Factory Manager’s Material Factors table—see How Material Factors table is used during costing) .
FALSE or blank does not set this new information as the default.
-
Set purchaseVolume to a purchase volume in metric tonnes (3 in the image below)
-
Set purchaseFactor to the factor be applied (2 in the image below).
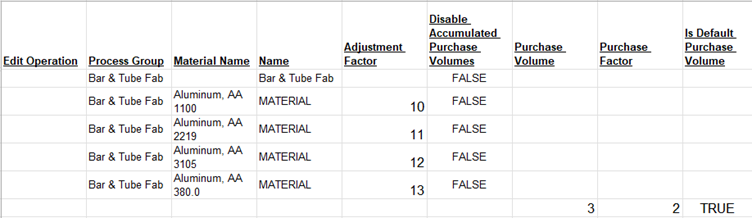
Once you import these changes, the Material Factors table displays the updated Purchase Factor as well as the Total Factor computed from that value.
Deleting Factor Values
To delete a factor value that is no longer wanted, set the Edit Operation field (in the first column) to delete.
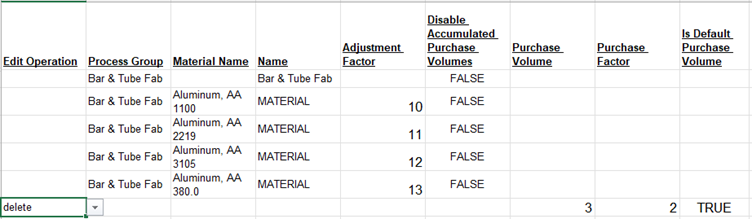
Important: Deleting a row from the spreadsheet does not cause modification of the Digital Factory upon import. With the spreadsheet, the only way to delete a factor that exists in the Digital Factory is to set the Edit Operation column to Delete for the corresponding spreadsheet row.