Assigning Materials
Follow these steps to assign materials:
1 Perform an initial costing. The initial costing uses default materials and sizes in a default configuration. In the steps below, you check the default values and change them if necessary.
2 Set the layer material layer configuration, if necessary.
The current layer configuration is shown by the setup option Layer Material Type Configuration in the Material Stock node of the Process Options Editor.

The default configuration shown in the example above consists of a 2-ply core sandwiched between 2 solo copper sheets. If the default is not the desired configuration, you can change it using the setup option. See Layer Material Configuration for more information.
Note: If you change the layer material configuration, re-cost the part to generate new defaults for insulating materials thicknesses and to update Computed Board Thickness.
3 Set the panel size, if necessary. This specifies the length and width of all copper and insulating materials in which individual circuit boards will be nested.
The current panel size is shown by the setup option PCB Panel Size in the Material Stock node of the Process Options Editor.

The default panel size shown in the example above 24” by 24”. If the default is not the desired size, you can change it using the setup option.
4 Set target board thickness, if necessary. This is an estimate of board thickness that is used to guide aPriori’s selection of default thicknesses for the board’s insulating materials. It is extracted from the Gerber files, if available.
Note that aPriori calculates the final board thickness by summing the thicknesses of each of the material layers. It uses this Computed Board Thickness rather than the target board thickness to determine machine feasibility for various processes.
There is no need to set the target board thickness if you plan to set the thicknesses for all insulating materials. Target board thickness affects only the default thicknesses of the insulating materials.
The current target board thickness is shown by the setup option Target Board Thickness in the Material Stock node of the Process Options Editor.

The default target board thickness shown in the example above 1.544mm. If the default is not the desired thickness, you can change it using the setup option. Change the target board thickness only if you want to rely on the default thicknesses for either prepreg or core insulating material.
Note: If you change the target board thickness, re-cost the part to generate new defaults for insulating materials thicknesses and to update Computed Board Thickness.
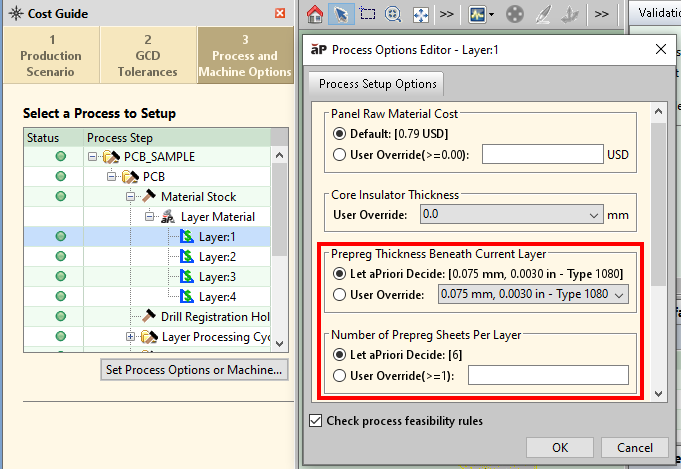
5 For each Layer GCD, set the thickness, if necessary. By default, the thickness of each copper layer is extracted from the Gerber files, if available; otherwise, it is assumed, by default, to be the value of the cost model variable defaultCopperLayerWeight (1oz in starting point Digital Factories).
The current thickness for a given Layer GCD is shown by the setup option Copper Weight in the node for that Layer GCD under Material Stock > Layer Material in the Process Options Editor. Note that it shows thickness by weight of a standard sheet of raw material; the corresponding thicknesses are listed in the lookup table tblCopperWeightThickness.

If the default is not the desired thickness, you can change it in the Geometric Cost Drivers pane.

Note that changing the thickness of one or more copper layers can affect the default thicknesses of insulating materials.
Note: if you change copper thicknesses, re-cost the part to generate new defaults for insulating materials thicknesses and to update Computed Board Thickness.
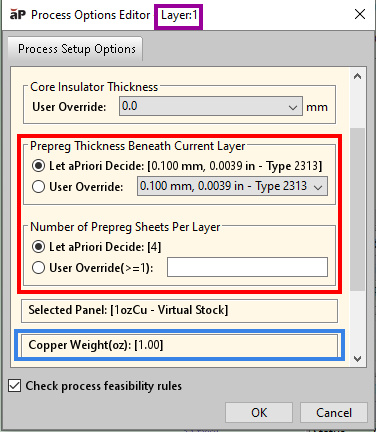
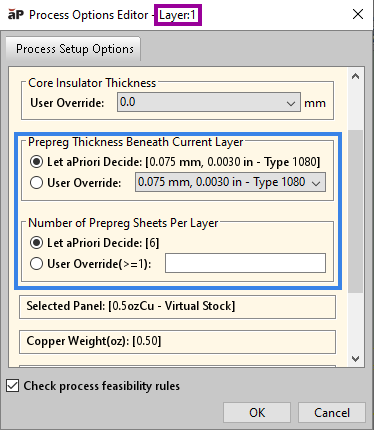
For the sample scenario used above, if you change the Material Thickness of Layer:1 and Layer:4 (the two solo CU layers) from 1.0oz to 0.5oz, the prepreg beneath Layer:1 and Layer:3 changes from 4 layers of 0.10mm to 6 layers of 0.075mm.
Before the change (values in blue boxes will be changed by the user; values in red boxes will change as a result, after re-costing):


After the change (values in blue boxes were changed by the user; values in red boxes changed as a result, after re-costing):


6 For each layer with a core directly below it (that is, for each 2PT layer), override the core insulator thickness if necessary.
The current thickness of the core insulator below a given Layer GCD is shown by the setup option Core Insulator Thickness in the node for that Layer GCD under Material Stock > Layer Material in the Process Options Editor.

If the default is not the desired thickness, you can change it using the setup option.
Note that changing the thickness of a core insulator affects only Computed Board Thickness; it does not affect the thicknesses of other core insulators or prepreg.
Note: re-cost the part to update Computed Board Thickness.
For the sample scenario used above, if you change Core Insulator Thickness from 0.51mm to 0.36mm, Computed Board Thickness changes from 1.586mm to 1.436mm.
Before the change (values in blue boxes will be changed by the user; values in red boxes will change as a result, after re-costing):


After the change (values in blue boxes were changed by the user; values in red boxes changed as a result, after re-costing):


7 For each layer with prepreg directly below it (that is each 2PB layer or CU layer except the board’s bottom layer), override the prepreg thickness and number of prepreg sheets, if necessary.
The following setup options show the current thickness of each sheet of prepreg beneath a given Layer GCD and the number of sheets of prepreg beneath a given Layer GCD:
• Prepreg Sheet Thickness Beneath Current Layer in the node for any Layer GCD under Material Stock > Layer Material in the Process Options Editor
• Number of Prepreg Sheets per Layer in the node for any Layer GCD under Material Stock > Layer Material in the Process Options Editor
If the default is not the desired thickness, you can change it using the setup options.
Note that changing these setup options for a given layer affects only Computed Board Thickness; it does not affect the thicknesses of core insulators or prepreg beneath other layers.
Note: re-cost the part to update Computed Board Thickness.
For the sample scenario used above, if you change prepreg thickness from 0.075mm to 0.120mm, and number of sheets of prepreg from 6 to 4, computed board thickness changes 1.436mm to 1.496mm.
Before the change (values in blue boxes will be changed by the user; values in red boxes will change as a result, after re-costing):


After the change:


