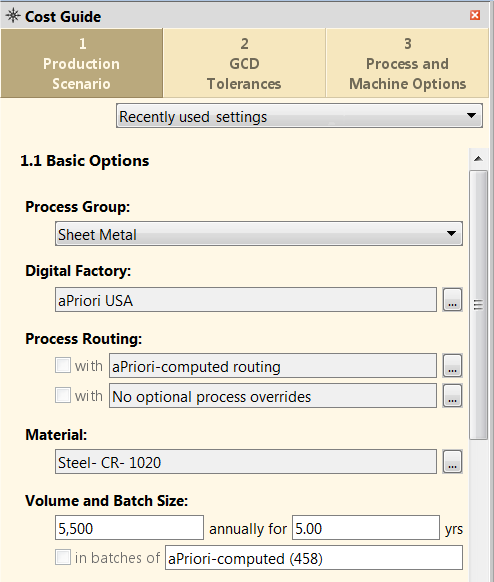
The first part of the Production Scenario tab is used to input basic information about your component for costing:
Recently used settings
If you have already costed other components, you can use input values from one of these components as a starting point for the current component:
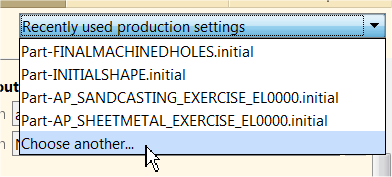
When you select a component, the Cost Guide is populated with all the input values used for that previous costing.
All routings and processes are copied, even if they do not apply to the new scenario. For example, if you copy from a scenario with 3-Axis Mill pinned, and 3-Axis Mill is not feasible for the new scenario, the routing is copied, but it fails costing.
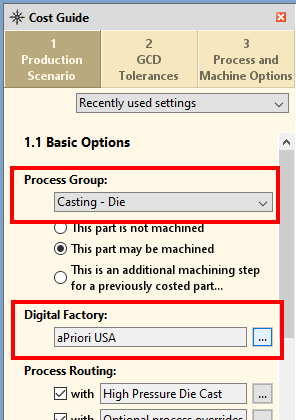
Process Group
The Process Group tells aP Pro what kind of component it is.
It is essential to provide this information. For example, if your component is a roto-molded plastic milk jug, and you leave the default Process Group setting as Sheet Metal, aP Pro will route the milk bottle through a sheet metal process, which will not produce good results.
Note: If you select Manually Costed, a Currency field appears, enabling you to change the displayed currency. Additional options may also appear if you select the Casting, Forging, or 2-Model Machining . See the Cost Model Guide for details.
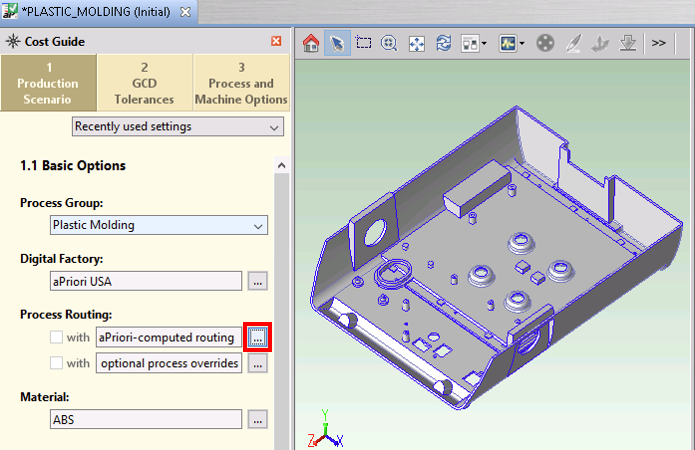
Digital Factory
The Digital Factory represents a virtual factory that defines production capabilities and related production cost factors such as available machines, materials, speeds and feeds, and labor rates, from one physical location.
aPriori provides a default set of Digital Factories, which typically are modified and associated to process groups by default by your Digital Factory Administrator. This default Digital Factory association for your component initially appears in the Production Scenario tab of the Cost Guide:
To override this default, click the ellipsis (...), then in the Digital Factory Selection window, select an item from the Primary Digital Factory dropdown list:

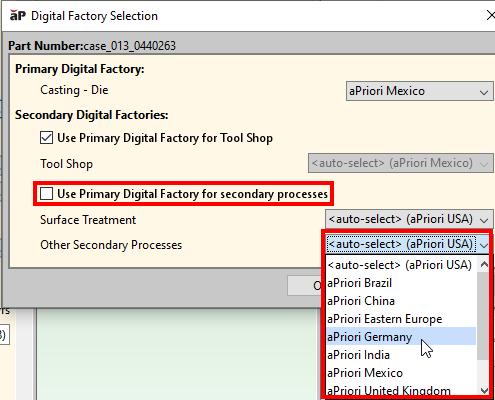
Select Digital Factories for Secondary Process Groups
By default, aP Pro uses the same Digital Factory for all your routing processes. If your routing includes one or more processes from secondary process groups, such as Surface Treatment, you can override the default by deselecting the Use Primary Digital Factory for secondary processes checkbox and, for each process group, do one of the following:
-
To use the default Digital Factory associated with a secondary process group, select <auto-select>:
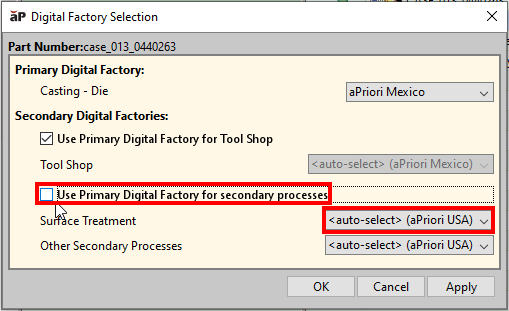
-
To specify a Digital Factory for a secondary process group, select a Digital Factory from the process group’s associated dropdown list.
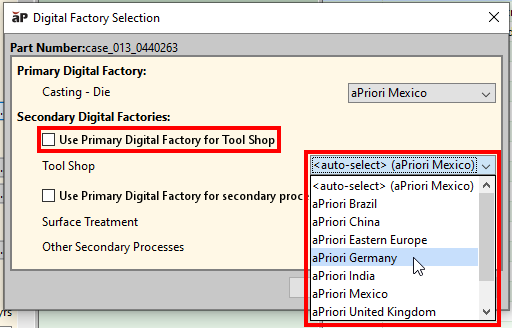
Selecting Tool Shop Data
By default, the Digital Factory aP Pro uses for a particular primary or secondary process group provides the full range of data to the cost model for that group, including materials, machine, and wage data, lookup tables, cost model variables, and tool shop data. Tool shop data includes some or all the information about materials and costs for expendable and/or hard tooling.
You can override this default and specify a different Digital Factory that provides tool shop data to all the process groups in your routing.
For example, aPriori Mexico is the primary Digital Factory, but you want aPriori Germany to provide tool shop data to the primary process group as well as to any secondary process groups. To do this, deselect the Use Primary Digital Factory for Tool Shop checkbox and select a Digital Factory from the Tool Shop dropdown list.
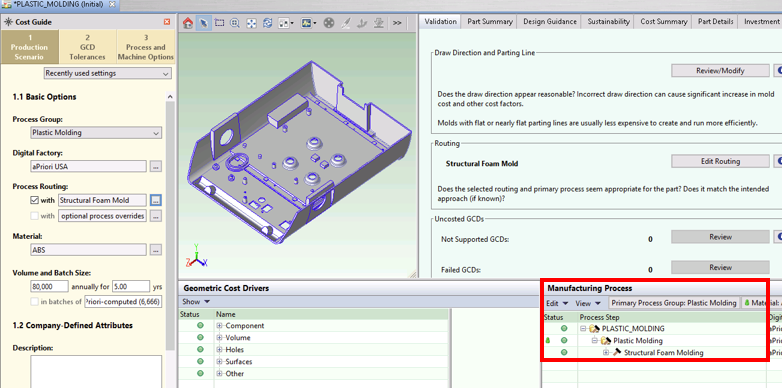
Process Routing
Process routing defines the manufacturing processes needed to create a component. Components may have multiple possible routings and costs. For example, a cast component may be created by either sand-casting, die-casting, or permanent-mold casting routings.
You can use the Cost Guide to apply a routing and add processes to a routing, before analysis.
Tip: You can also change routing after analysis - see Edit a Process Routing.
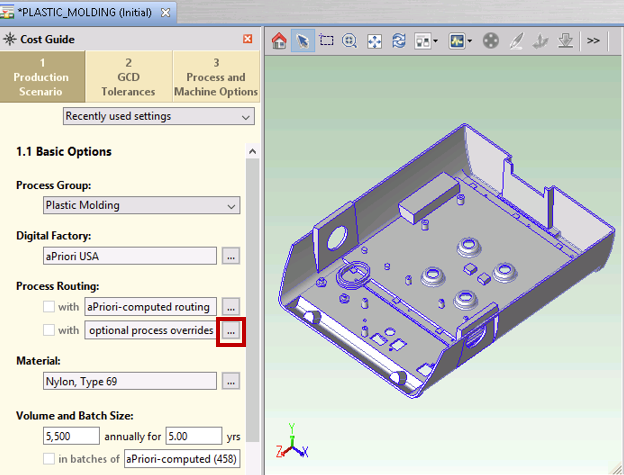
Apply a Routing
By default, aP Pro analyzes all possible routing options, determines which are feasible from a manufacturing perspective, then choose the most cost-effective one. You can override this choice and apply a different routing; for example, if you know specific constraints that make a different routing necessary
To apply a different routing:
-
Click ... next to aPriori-computed routing in the Process Routing section.
The Routing Selection window appears.
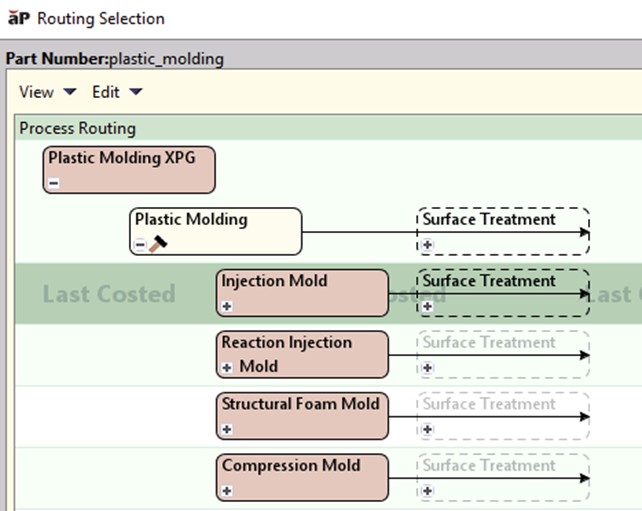
The Process Group setting in the Cost Guide determines which processes are shown. This example shows the routing choices for the Plastic Molding process group: Injection Mold, Reaction Injection Mold, and Structural Foam Mold.
-
Click in the horizontal area containing the routing you want to choose, and click OK.

The selected routing is shown in the Process Routing section.
Add Secondary Processes
You can add secondary processes such as heat or surface treatments after the main work on the component has been completed.
To add secondary processes:
-
Click ... next to optional process overrides in the Process Routing section.
-
In the Include or Exclude Secondary Treatments window, select a process to add, click Include, and click OK.
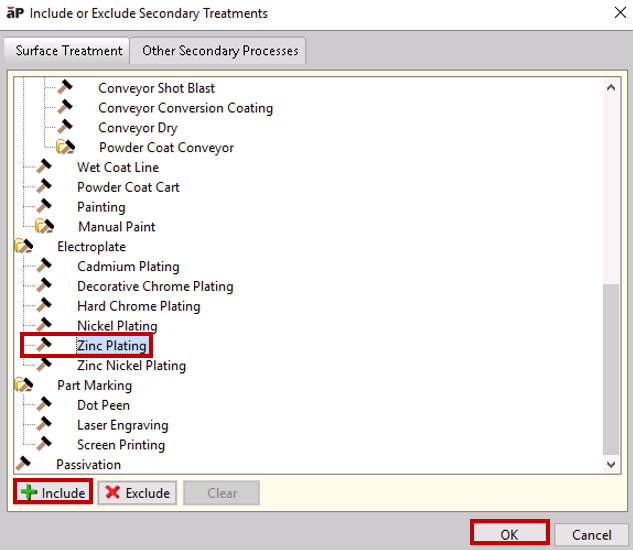
This window shows a tab for each secondary process group supported by the primary process group. For example, the Plastic Molding primary process group supports the secondary process groups Surface Treatment and Other Secondary Processes.
Tip: You can also add and edit secondary processes after initial analysis - see Add Secondary Processes.
Material
To select the component material, click the ellipsis (...) next the Material field in the Cost Guide:
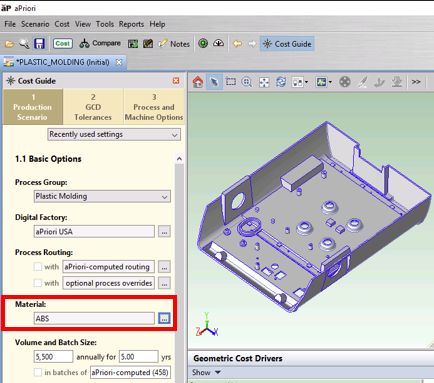
Use the Material Selection window to override the default material composition chosen by aPriori.
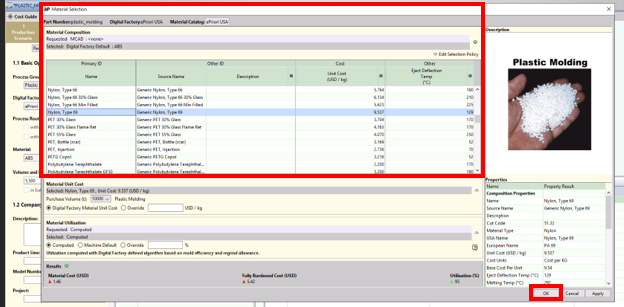
See View and Edit a Material for more details.
Volume and Batch Size
Set values for volume and years: how many units of this component do you expect to produce annually, and for how many years.
-
The batch size value is typically the expected monthly rate and is usually calculated as volume/12.
-
The batch value is used in many of the calculations shown in each of the process group chapters. You can either have aP Pro automatically calculate the batch value or specify it yourself if the field is enabled via preferences. You can set default values for all these settings through Tools > Preferences, see Set User Preferences.
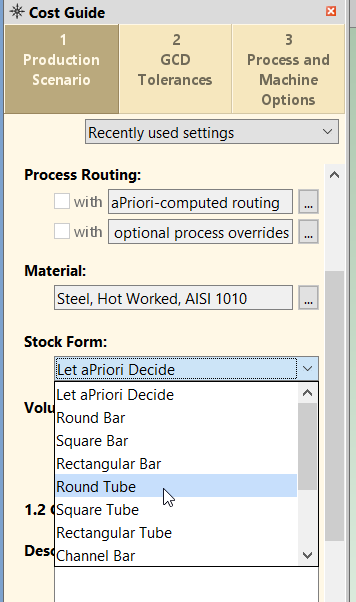
Stock Form
For process groups that support stock forms (Bar & Tube Fab, Multi-Spindle Machining, and Stock Machining), you can either direct aPriori to analyze part geometry and automatically choose a stock form, or you can manually select a stock form. In either case, aPriori automatically determines how the part is aligned relative to the stock axis.
By default, aP Pro chooses a stock form automatically.
You can specify a stock form to use with the Stock Form field of the Cost Guide's Production Scenario tab:
You can also specify a stock form using the Stock Form and Alignment tool from the Component Viewer. See Define Stock Form and Alignment.