Release Notes
aP Design Release Notes provide information about new features, enhancements, and resolved issues. If you encounter any issues, please review the Troubleshooting section in the aPriori Support knowledge base.
Tip: For details of aP Pro changes, see the aP Pro Release Notes.
 Jan 27, 2025
|
Functional Area |
Changes |
|---|---|
|
Notice |
DFM Enhancements: The 2025 R1 SP3 release introduces a new severity based DFM guidance framework within selected process groups. DFM issues are now classified as Critical, Major, or Minor, enabling users to more readily identify and address the most significant manufacturability risks. The framework also supports configuration of issue types and severity thresholds so that organizations can align guidance with their internal design standards. This enhanced guidance is now available in updated versions of the following models: Additional process groups will adopt this framework in future releases. |
|
Prioritized DFM Feedback |
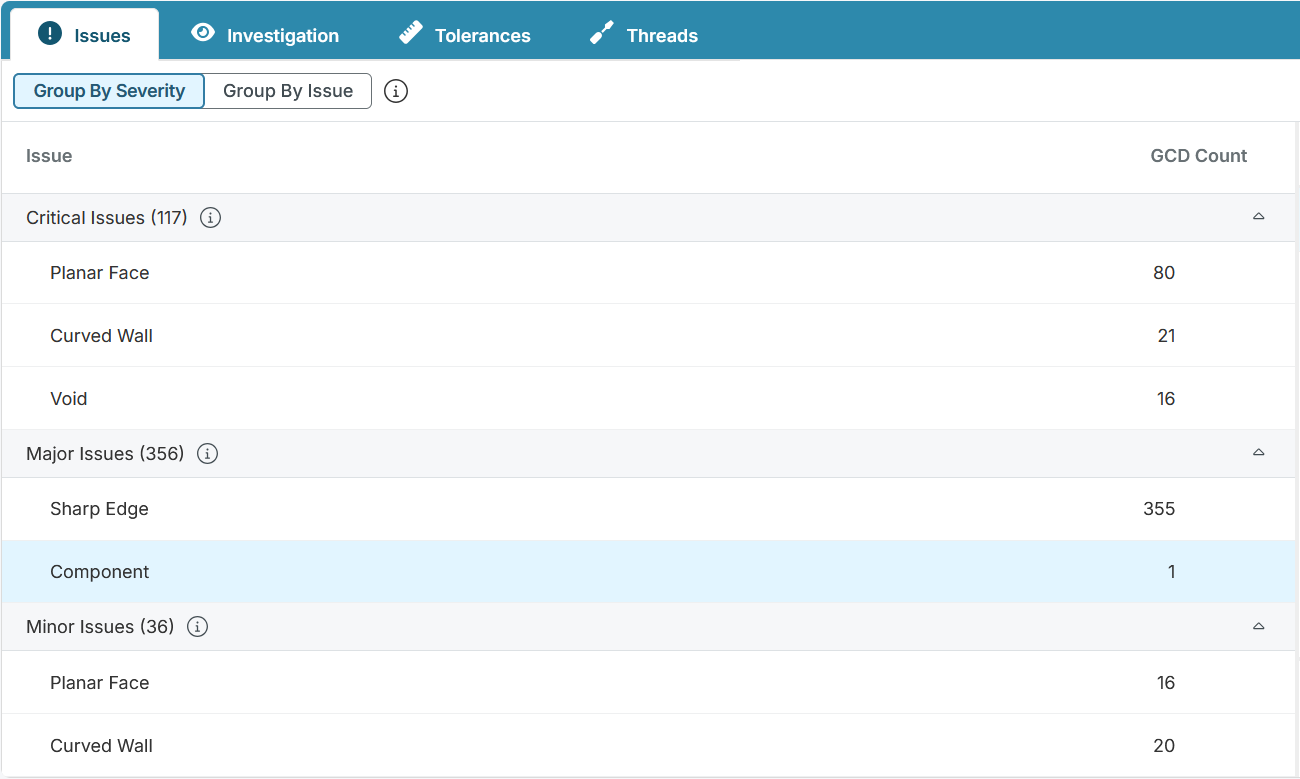
Prioritized Guidance: DFM messages in aP Design are now grouped by severity. The Design Guidance drawer presents each issue type within its assigned classification, allowing users to focus first on the most impactful manufacturability issues while gaining clearer insight into overall risk: Similar to aP Pro, issues that do not have an associated manufacturability score will appear in an Unclassified section. Users also have the option to toggle sorting by issue type, providing a layout consistent with the ordering used prior to this enhancement. See Examine Design Issues. More Efficient Message Structure:These enhancements also improve how issues are organized and navigated within the Design Guidance drawer. Users now experience a more streamlined drill down structure that significantly reduces the number of manual expansions required to reach the underlying root issue. Comparisons: DFM impact now appears within scenario comparisons in aP Design.
|
 Nov 25, 2025
|
Functional Area |
Changes |
|---|---|
|
Notice |
Reduced Digital Factory Synch Times (aP Pro): An improvement in aP Pro 25-1-3-0 reduces Digital Factory synch (update) times for customers using aPriori's cloud applications. See the aP Pro 25-1-3-0 release notes for more information. |
 Nov 4, 2025
|
Functional Area |
Changes |
|---|---|
|
User Experience Enhancements |
Add to Project: Users can now add parts directly to projects within aP Design, improving organization and workflow efficiency. See Work with Projects for more information. |
|
Performance |
Application Load Improvements: Users will now see improved application loading times of up to 70%. Engineers now benefit from a faster, more organized, and secure aP Design user experience. |
 Sept 24, 2025
|
Functional Area |
Changes |
|---|---|
|
User Experience Enhancements |
Material Selection: The Material Selector now shows default stock Unit Cost and Emission Factor values for Bar & Tube Fab, Forging and Stock Machining process groups. Previously, no values were displayed. See Edit Materials. Cad Disconnected Alert: In the Evaluate view, this alert’s color and message have been updated to better reflect the status and capability of a scenario in this state. See Scenario State Information. |
|
Performance |
CAD Import/load: This update improves performance when opening new models, significantly reducing the time it takes to display the model on screen and complete the first costing. |
|
Visualization Improvements |
Note, Visualization improvements apply only to scenarios analyzed after this update. Reanalyze scenarios to use the new functionality. Improvements to slide and lifter bundle visualization: Previously, surfaces that were not manufactured with the Bundle could be highlighted, now only the geometry manufactured by the Bundle is highlighted. The improved visualization gives better context for the manufacturing assumptions and allow end users an easier path to understand what features are driving the need for bundles. Color change for volumetric GCDs to allow easier visualization: This enhancement changes the way volumetric/drawable GCDs are highlighted in the 3D Viewer. They now appear in a color slightly different from selection color, making them easier to distinguish. Labels for assembly components: A new toolbar button in the 3D Viewer allows users to toggle component labels on or off, making assemblies easier to navigate and understand. Ram direction visualization: The 3D Viewer tools now provide an additional option to highlight the ram direction in sheet metal components. |
|
Plug-ins |
Creo: The aPriori 2025 R1 SP2 version of the Creo plugin fixes an issue with exporting Family Table CAD models to aP Design. Previously, aPriori exported Family Table parts and assemblies as .prt and .asm files, respectively. This allowed upload of the files to aP Design, but it did not allow the files to be used in the assembly image or assembly cost simulation. In this release the issue is resolved, with the plugin exporting to the expected Creo instance accelerator file formats (with .xpr and .xas extensions), allowing the files to be used as standalone components or components within an assembly. See the 2025 R1 SP2 Platform and CAD Support Updates for more info. |
 Aug 20, 2025
|
Functional Area |
Changes |
|---|---|
|
User Experience Enhancements |
Clearer Scenario States: We’ve made improvements to reduce confusion around scenario state icons in Evaluate mode. Based on user feedback and observations, the previous icons and tooltips have been replaced with clearer, more intuitive indicators:
This update helps ensure you can quickly recognize scenario conditions and take the right action without unnecessary guesswork. For details, see Scenario State Information. |
 Jun 24, 2025
|
Functional Area |
Changes |
||||
|---|---|---|---|---|---|
|
Material Flow Visualization and Thickness Visualization |
Available with upgrade to version 7.1.0.0 (Single Tenant). Two new features available this June will significantly enhance how design engineers interact with and analyze CAD models: Material Flow Visualization and Thickness Visualization. Material Flow Visualization: Gain insight into how material moves through your part during manufacturing. This feature allows engineers to:
By seeing how material fills the mold, engineers can make smarter, faster decisions that reduce costly iterations and improve part quality. See Flow Appraisal under Viewer Toolbar. Thickness Visualization for Plastic and Casting Process Groups: Understanding wall thickness is critical for structural integrity and manufacturability. With this new visualization tool, you can:
This feature empowers engineers to catch issues early, reduce rework, and ensure parts are both strong and manufacturable. See Thickness Analysis under Viewer Toolbar. |
||||
|
User Experience Enhancements |
Project Link in Scenario Cards: Scenario cards in the Evaluate tab now display a link to the associated project in aP Workspace (when applicable), allowing users to identify and access related projects quickly. See View Scenario Info and Work with aP Design and aP Workspace. Additional UI Improvements: Refinements across the interface provide a smoother and more responsive experience during the analysis of assembly components. |
||||
|
Visualization Improvements |
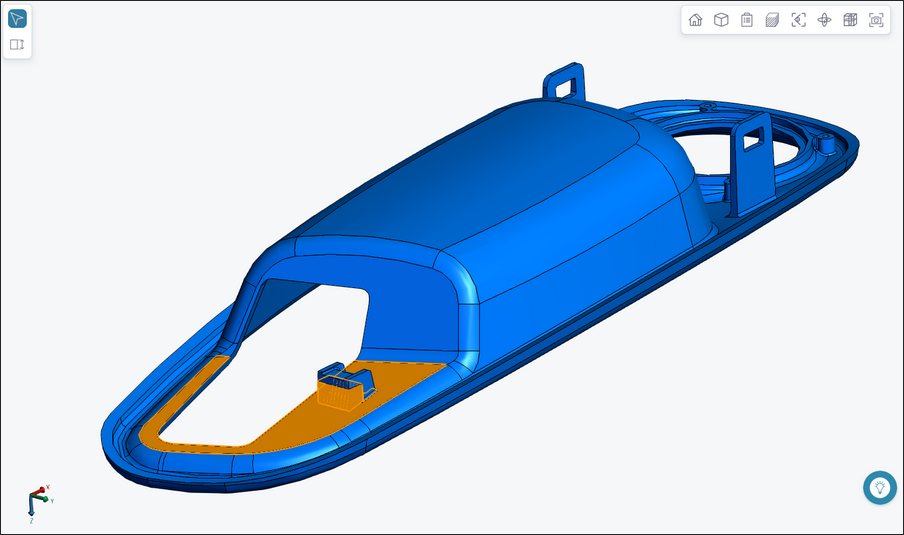
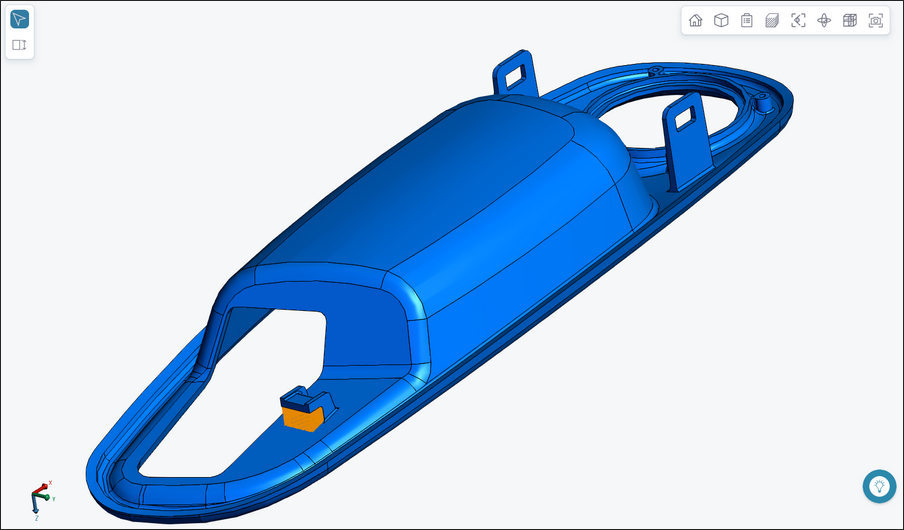
This update provides multiple improvements to how parts are displayed in the 3D Viewer. Visualization improvements apply only to scenarios analyzed after this update. Reanalyze existing scenarios to use the new functionality. Units and Unit Type: The measurement tool now displays the correct units and unit type. Before, it displayed all measurements in mm even when the value was in another unit type. Performance: Viewer performance is significantly improved, allowing you to view scenarios with large numbers of selected GCDs faster. Geometric Features: Improved visualization of geometric features reduces visual noise and improves interpretation of what aPriori has extracted as geometric cost drivers. This is especially noticeable for features such as voids, rings, slots, pockets, and axigrooves (gears and splines), The Viewer no longer displays child surfaces, highlights the volume in the user-defined highlighting color in all draw modes, and improves the visibility of the color by making the highlighting lines thinner. See an example of before and after below:
Solid Draw Modes: The 3D Viewer now respects the Solid draw mode when features are highlighted. Previously, highlighted features were always visible regardless of the orientation of the part (even when they were obscured from the user’s point of view), making visualization of complex features confusing. Now, Solid mode shows features that are visible in the displayed orientation, while Transparent mode shows features independently from the orientation of the model. Labels: GCD labels now consistently point to a surface of the selected GCD, making it easier to find features like large holes. Previously, for volumetric GCDs, the label pointed to the center of mass, such as the center of a hole or pocket. The positioning of the labels has also improved, with labels generally located closer to the model to reduce the need to zoom out to see them. |
 Apr 30, 2025
Assemblies Enhancements
This update includes several improvements that make working with assembly scenarios more responsive, informative, and user-friendly.
-
Redesigned Cost Results Summary: The cost summary card has been updated for better clarity in both part and assembly scenarios. It's now easier to compare and interpret results at a glance. See Review Cost Results for details.
-
Stale Prediction Warnings: Assemblies now clearly indicate when a component has changed since the last analysis. A "Stale Prediction" alert appears in the Components card, and changed components are highlighted in the Assembly Explorer. This helps you quickly identify when a reanalysis is needed. See Work with Assemblies and Group Analyze Scenarios.
-
Auto-Updating Assembly Explorer: The Assembly Explorer table now refreshes automatically to reflect changed components, no more manual refresh (F5) needed.
Additional User Experience Enhancements
-
Live Formatting for Numeric Inputs: Numeric values now auto-format as you type, improving readability and reducing errors.
 Dec 11, 2024
New Features
This release (Version 1.18.0) provides the following enhancements.
Copy and Reuse Scenario Inputs
Streamline your iterative design process with the ability to copy and apply inputs from existing scenarios to new ones.
Why This Matters
When working iteratively, CAD models may evolve, but many inputs remain consistent. This new functionality lets you reuse those inputs, saving time and improving workflow efficiency.
How It Works
-
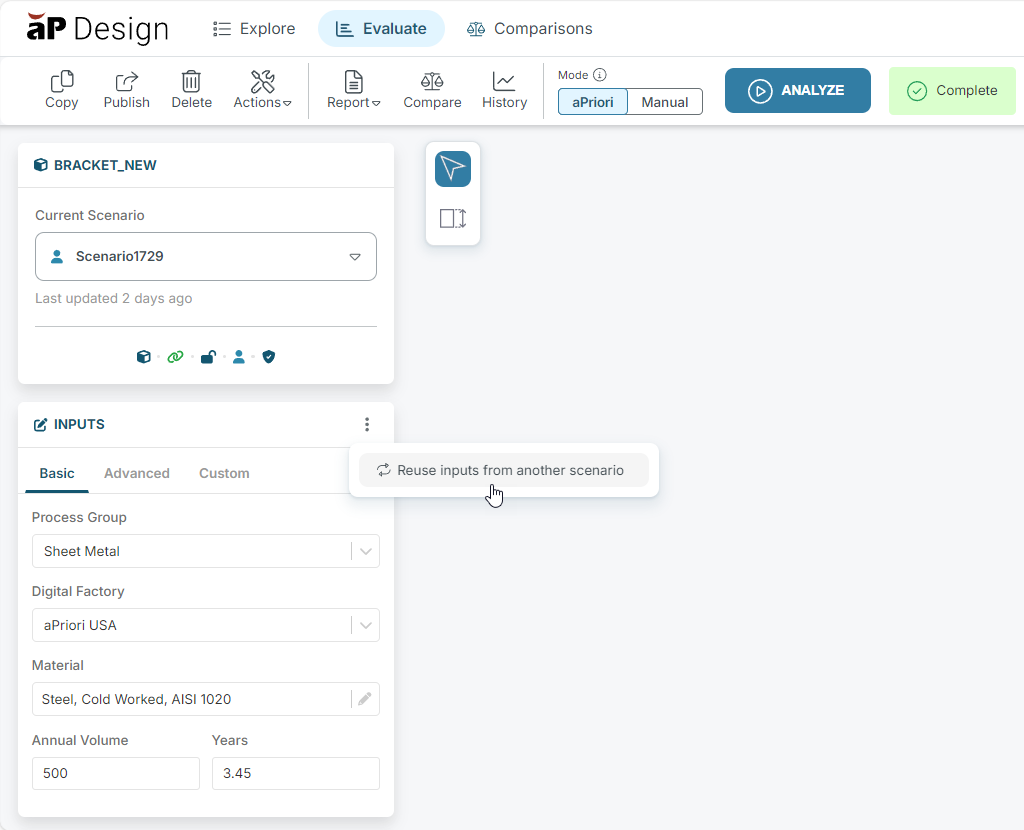
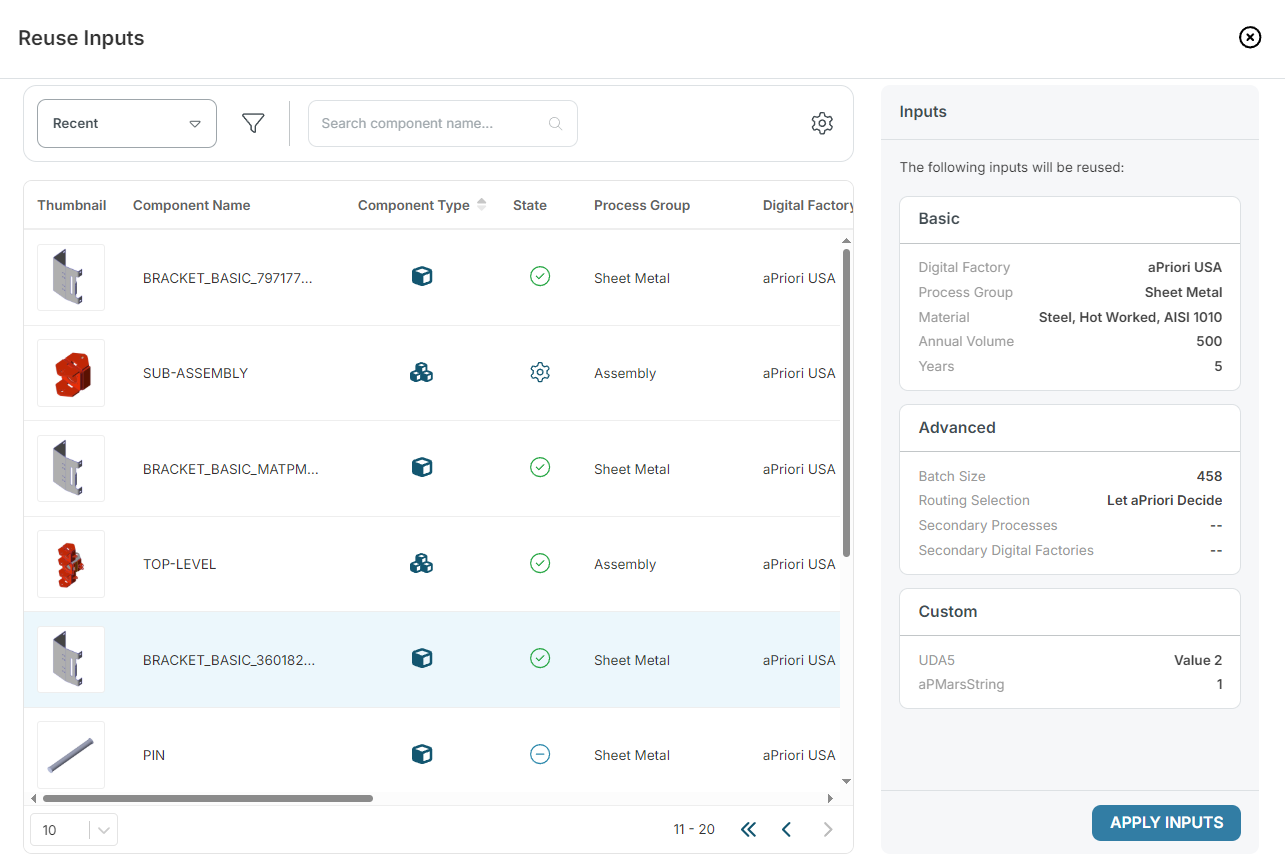
Locate scenarios: click the three vertical dots in the INPUTS panel and select Reuse inputs from another scenario.
-
Review inputs: select a scenario in the Reuse Inputs table to view a list of inputs available for reuse in the summary panel on the right. Any input that cannot be applied will not appear in the panel.
-
Apply eligible inputs: click Apply Inputs. You will receive a warning if eligible inputs fail to apply successfully.
Limitations
Currently, only inputs that are configurable in aP Design on a first analysis are eligible for copying. However aPriori is eager for feedback! Let us know what additional inputs you'd like to copy and we’ll prioritize expanding this feature in future updates.
Take advantage of this enhancement to refine scenarios faster and more effectively!
For more details, see Reuse Inputs from Another Scenario.
 Oct 23, 2024
New Features
This release (Version 1.17.0) provides the following enhancements.
Manual Costing for Assemblies
You can now provide costs manually for assemblies in the same way that you can for parts (see the Release Notes for aP Design 1.16.0 (Jul 31, 2024).
aP Design Docs Enhancements
We have re-designed and re-written the aP Design user docs, to make this content simpler and easier for you to access. Enhancements include:
-
A simpler navigation structure, so you can more easily access the help you need based on the tasks you perform.
-
A new Getting Started section targeted at new users, so you can more quickly adopt and use aP Design.
-
Rewritten content to be more user-oriented, to provide easier understanding for all areas.
 Jul 31, 2024
New Features
This release (Version 1.16.0) provides the following enhancements.
Provide Costs Manually
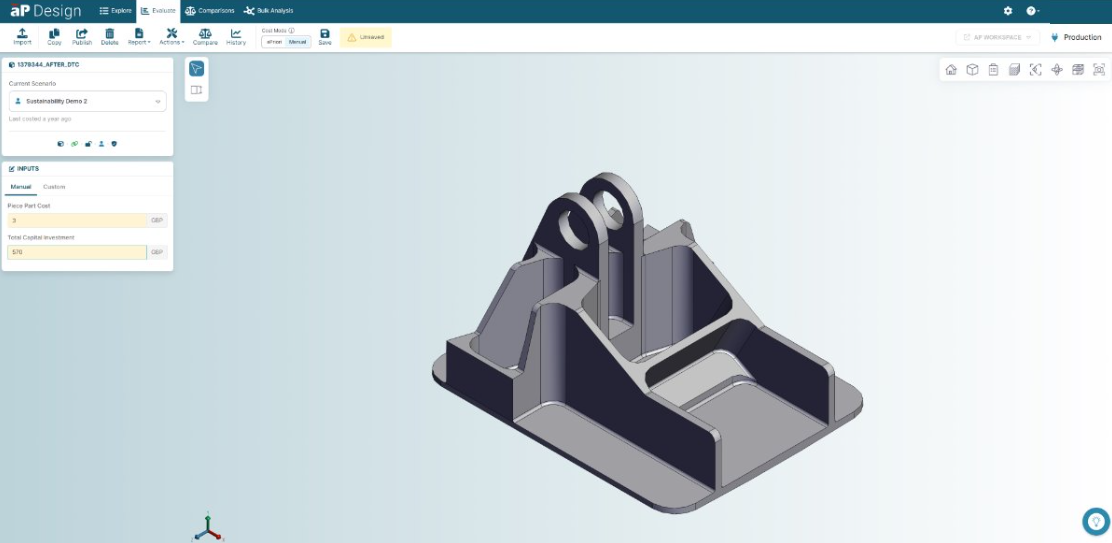
Design Engineers often need to incorporate standard hardware or specific components into their wider assemblies. Parts such as bolts, washers, gaskets, or existing stock, are common examples where the Piece Part Cost is known and is likely to vary from the aPriori estimate, given the manufacturing route or volume of procurement. Consequently, this release of aP Design allows you to enter Piece Part Cost and/or Total Capital Investment directly into a scenario.
Note: aP Design does not amortize Total Capital Investment when you use Manual cost mode, therefore Fully Burdened Cost will equate to Piece Part Cost.
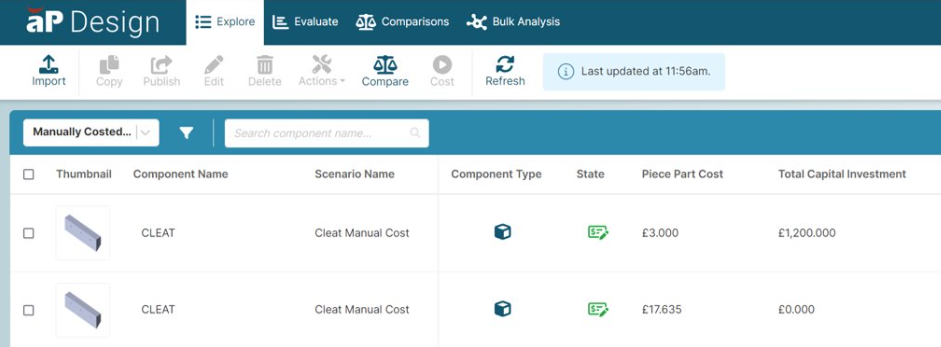
You can easily identify manually costed components within the Explore and Assembly Explorer tables using the ‘Manually Costed’ icon in the State column.
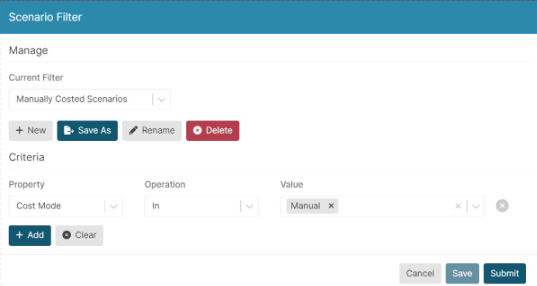
You can also add a custom filter for finding manually costed scenarios using the Cost Mode criteria property – the value can be either Manual or aPriori:
-
Manual: the scenario has been saved using manually-entered costs.
-
aPriori: the scenario has been costed using the aPriori cost engine to produce simulated results.
Convert a Previously Simulated Scenario to a Manually Costed Scenario
You can convert a previously simulated scenario to a manual scenario by selecting Manual on the Cost Mode toggle switch.
Access Manually Costed Scenarios from aP Pro
In aP Design, you can access scenarios that were manually costed in aP Pro. Likewise, in aP Pro, you can access scenarios that were manually costed in aP Design.
When opened in aP Design, scenarios originating in aP Pro render in the new layout, however no information is lost. You can still view and edit previous contributing costs, overrides, and so forth, in aP Pro.
Note: If a scenario was costed initially using aPriori mode and then switched to Manual mode, aP Design preserves certain parameters, for example the process group and digital factory.
For more information about manual costing, see the aP Design User Guide.
 Mar 27, 2024
New Features
This release (Version 1.15.0) provides the following enhancements.
Temporarily Hide Iterations from the History Plot
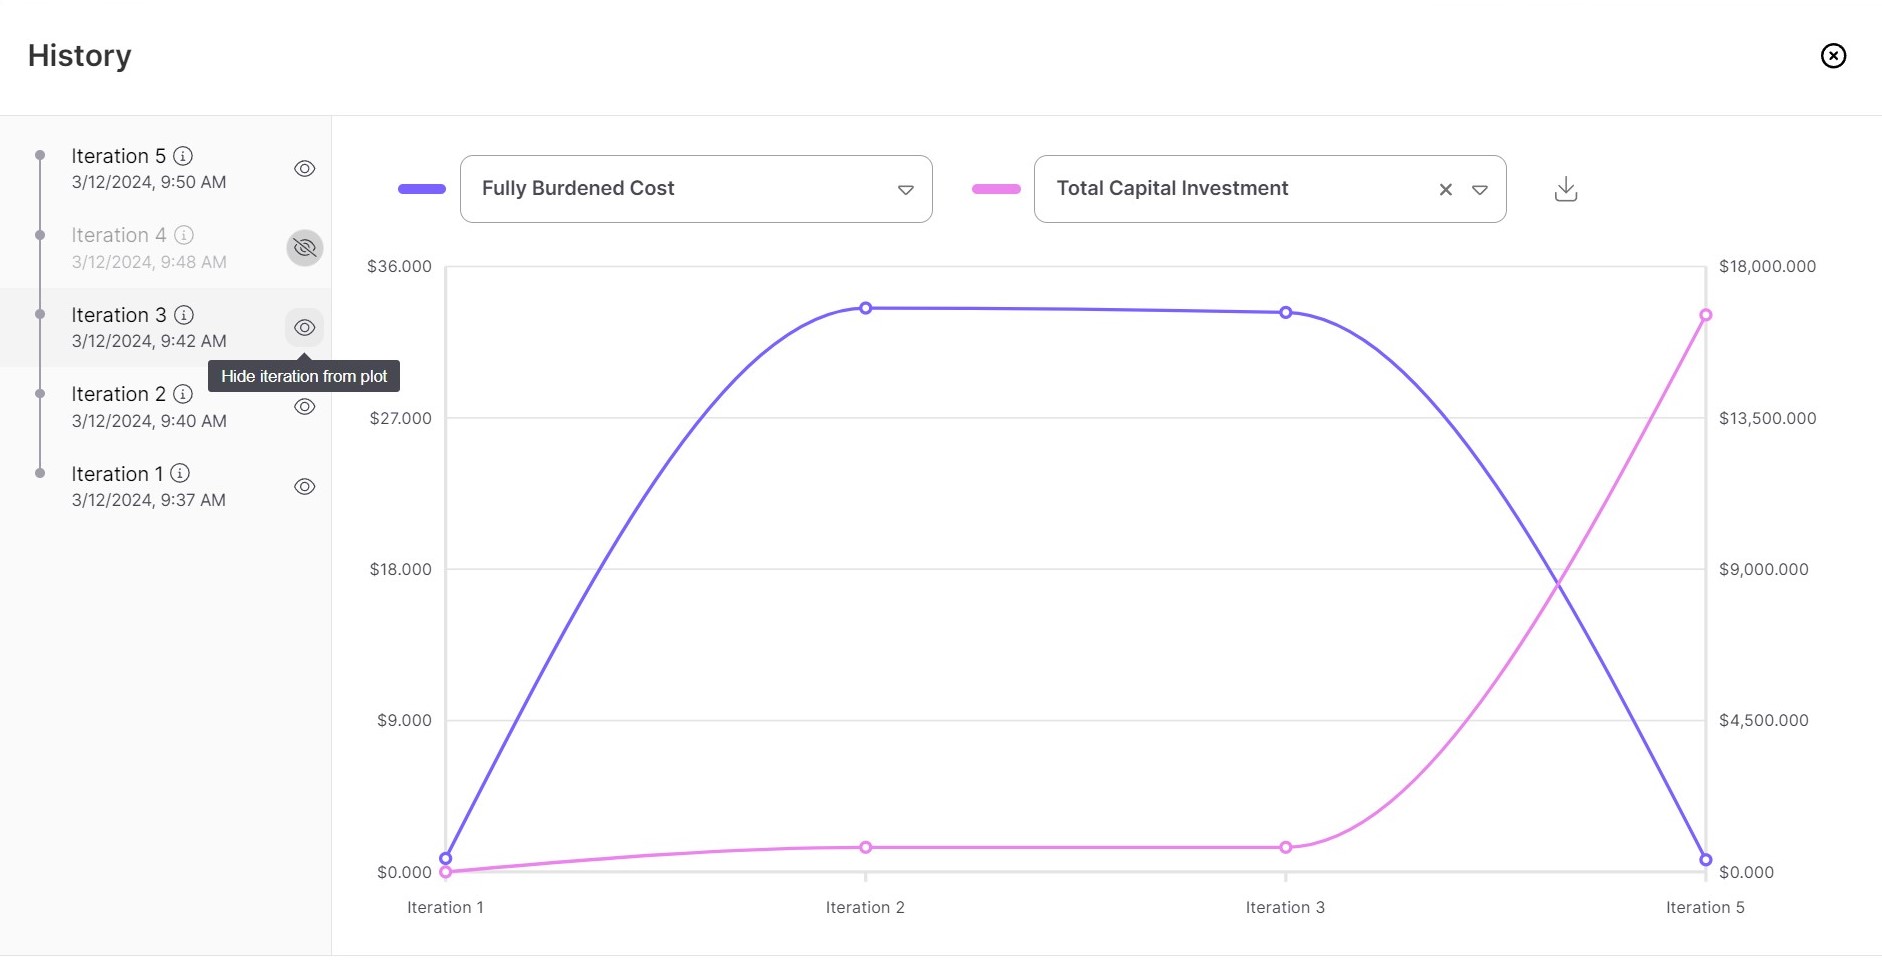
In this release, you can temporarily hide an iteration by selecting the Hide iteration from plot option. This is useful if you need to remove erroneous results or to craft a specific narrative.
Download History Data
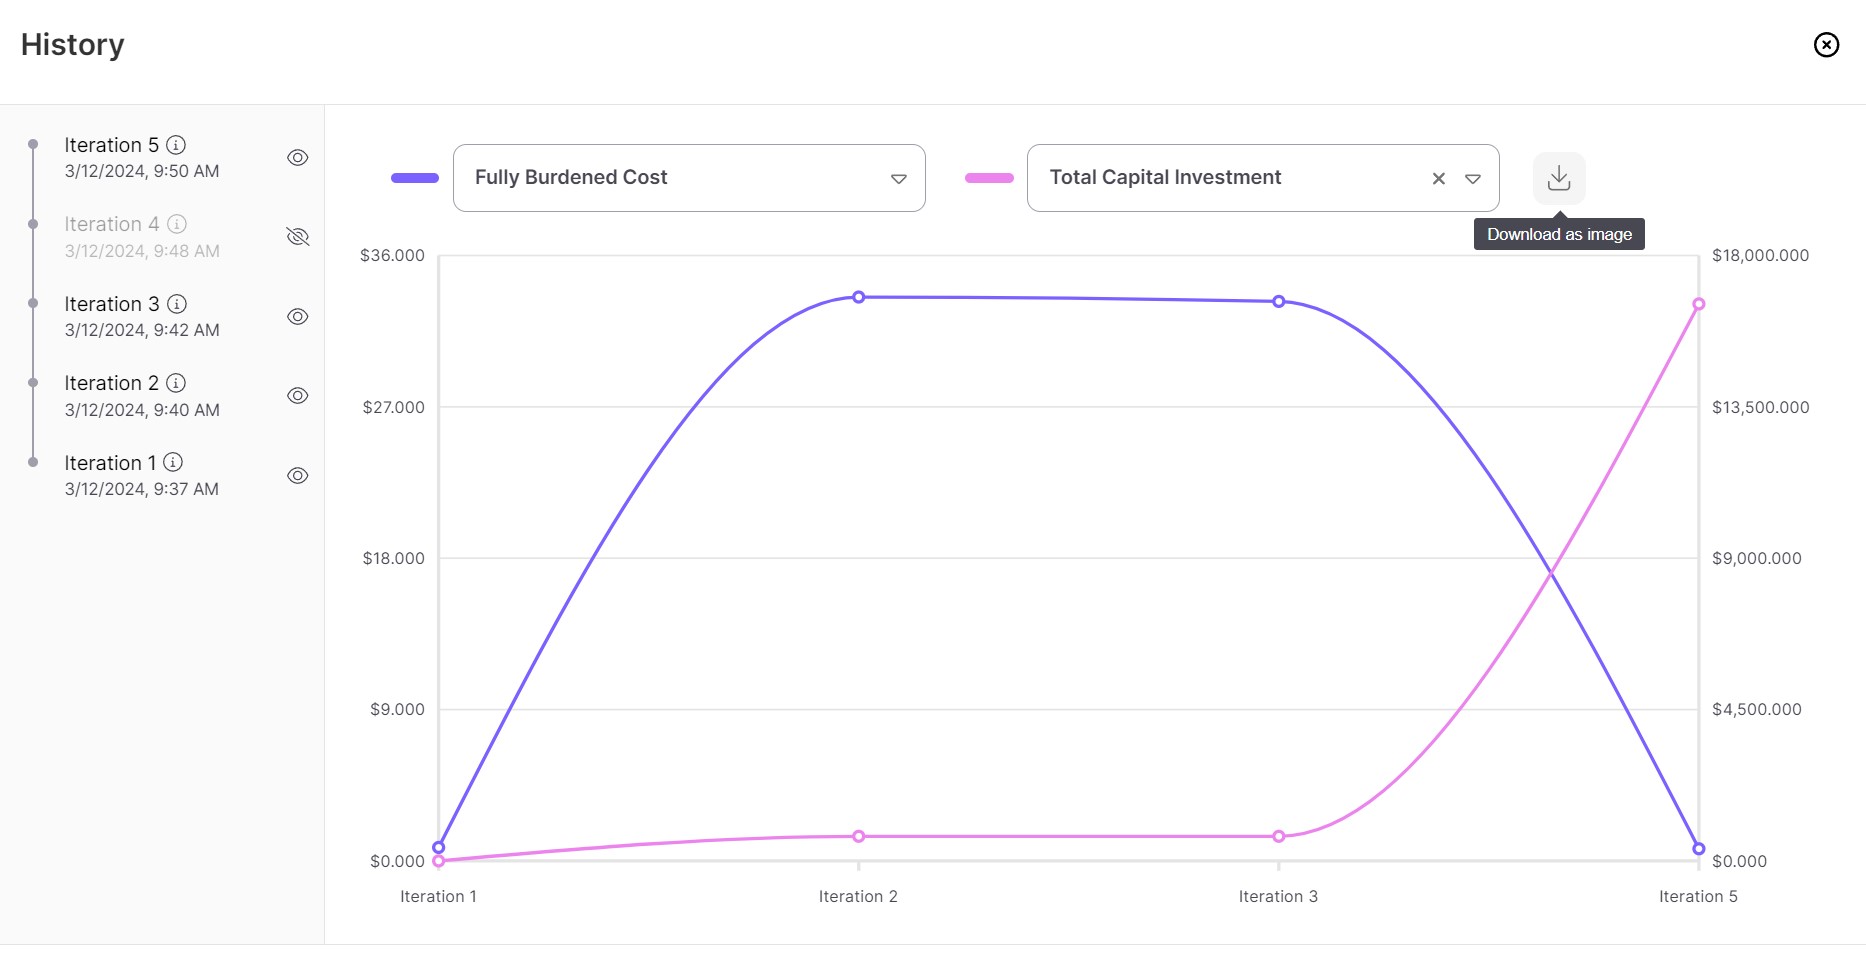
You can also download History data by selecting Download as image and, optionally, including the table data. This allows you to quickly and easily share a well-formatted export of the scenario history. You could use this in follow-up discussions in or outside of aP Design.
For more information about the History feature, see the aP Design User Guide.
 Jan 24, 2024
New Features
This release (Version 1.14.0) provides the following enhancement.
Improved Performance for the Explore View
In this release, the results shown in the Explore view table are cached, therefore as you navigate to the Evaluate or Compare view and back again, the results do not need to refresh. This greatly improves performance and usability.
Note: In this initial release, the table is cached only if it is on the first page of the results. This capability will be extended in upcoming aPriori Cloud releases.
The Explore view now also includes a time stamp indicating the last time the view was updated. This helps users avoid unnecessary refreshes.
One-Click Connection to aP Workspace from aP Design
In this release you can navigate directly from the Evaluate view in aP Design to the equivalent view in aP Workspace. You no longer have to search for the scenario in aP Workspace and you can navigate quickly in either direction.
Resolved Issues
The following issues are resolved in this release:
-
Search in both Explore and Evaluate views now shows CAD connected status correctly.
-
If the user does not have access, the search request will return quickly, avoiding long wait times.
-
Material selection will keep the user's selection and no longer change back to a Digital Factory default.
-
The selected main navigation tab stays selected even if the other page is still loading.
-
The occurrence of duplicate scenario rows in aP Design and aP Workspace is now fixed.
 Dec 6, 2023
New Features
This release (Version 1.12.0) provides the following enhancement.
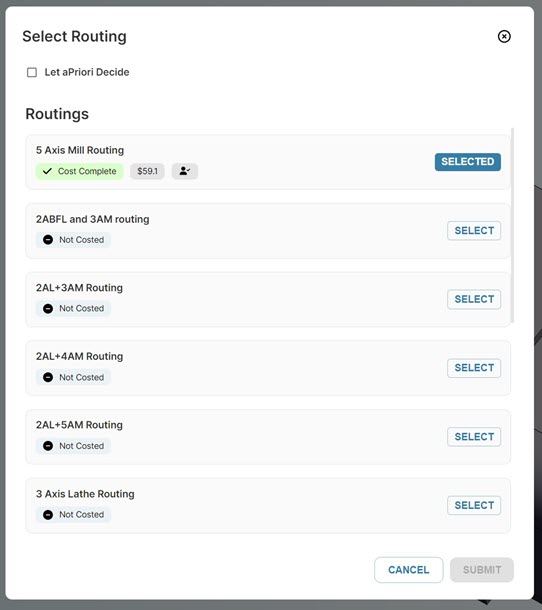
Pin a Routing Prior to Costing
When a scenario is submitted for costing, aP Design evaluates a number of routings that are available within the process group and, by default, suggests the most cost-effective, successful production route.
It is now possible to review and choose a specific routing option before (in addition to after) costing a scenario.
This provides several benefits:
-
When the production routing is already identified or determined, pinning that routing ensures that the guidance offered is intended to make the scenario manufacturable for that nominated route.
-
Pinning a specific routing enables aP Design to 'skip' costings of other options and return much faster results due to this 'focused costing'.
Note: You can revert to 'Let aPriori Decide' at any point, whereby aPriori will evaluate all routings again.
For more information about routings, see the aP Design User Guide.
 Nov 9, 2023
New Features
This release (Version 1.11.0) provides the following enhancement.
Advanced Scenario Switch
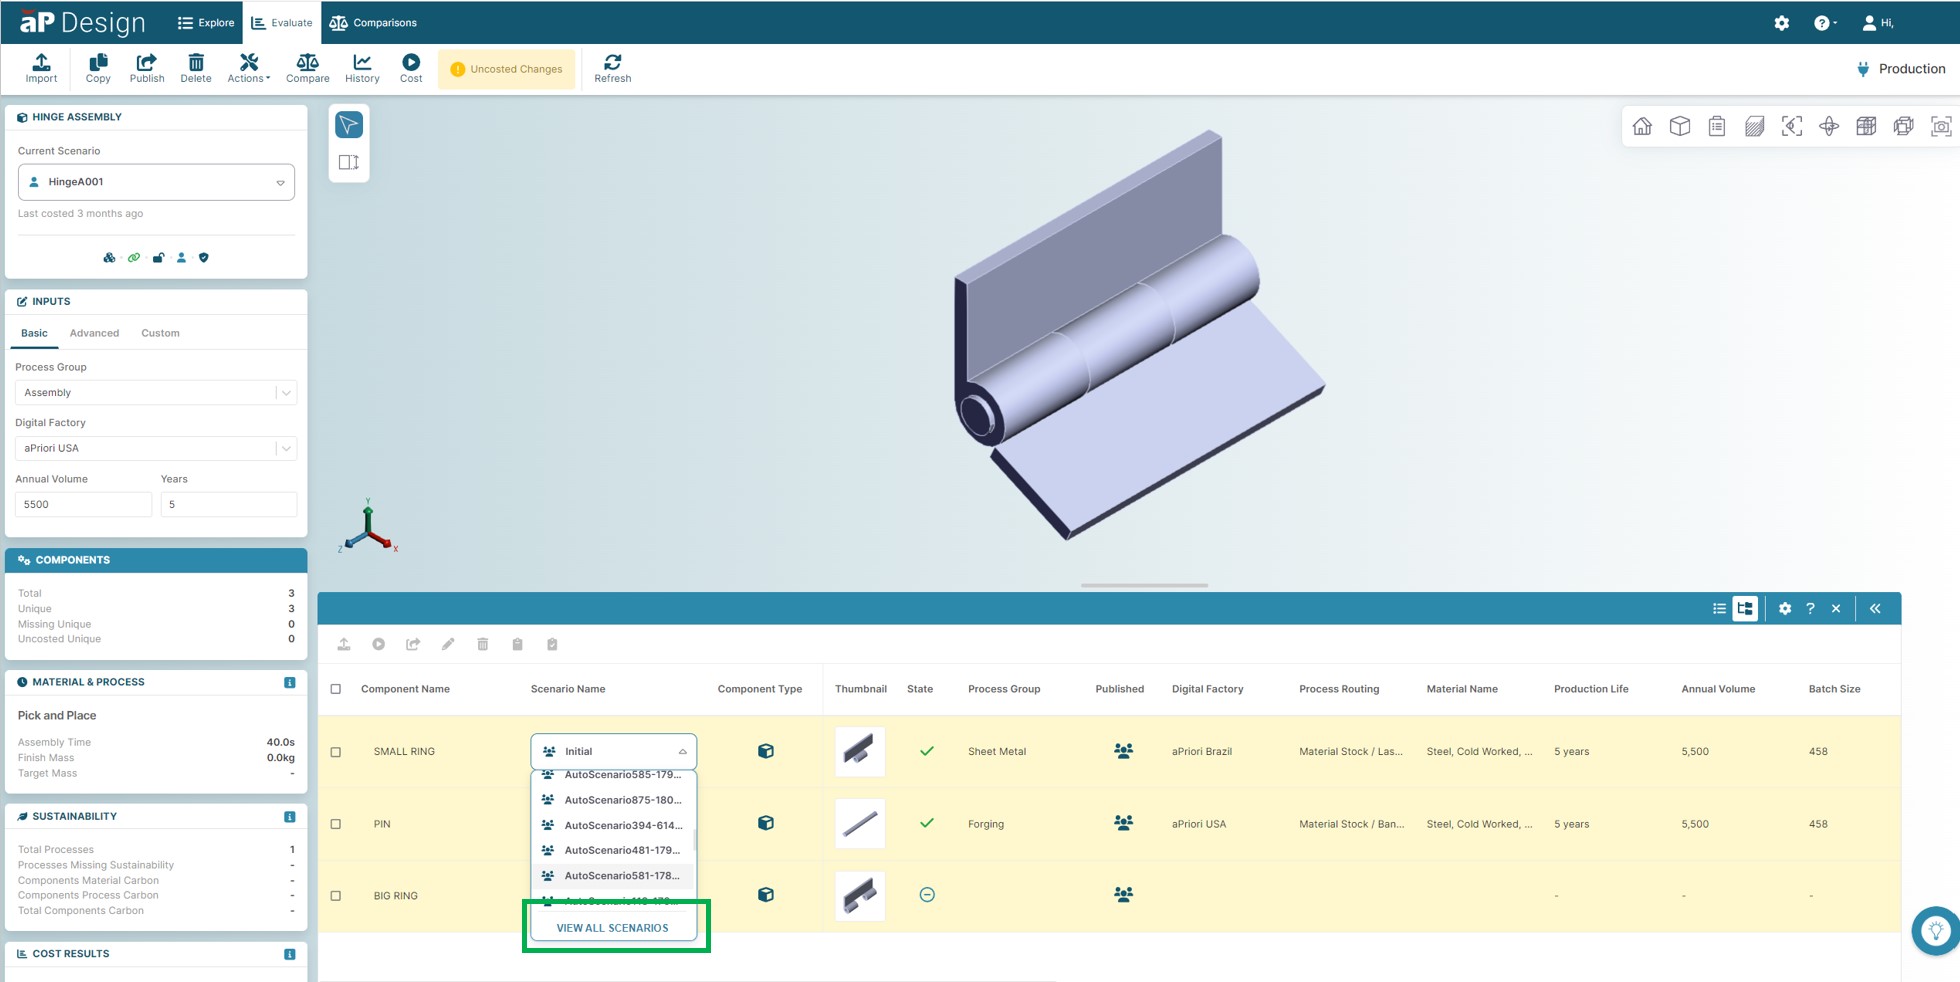
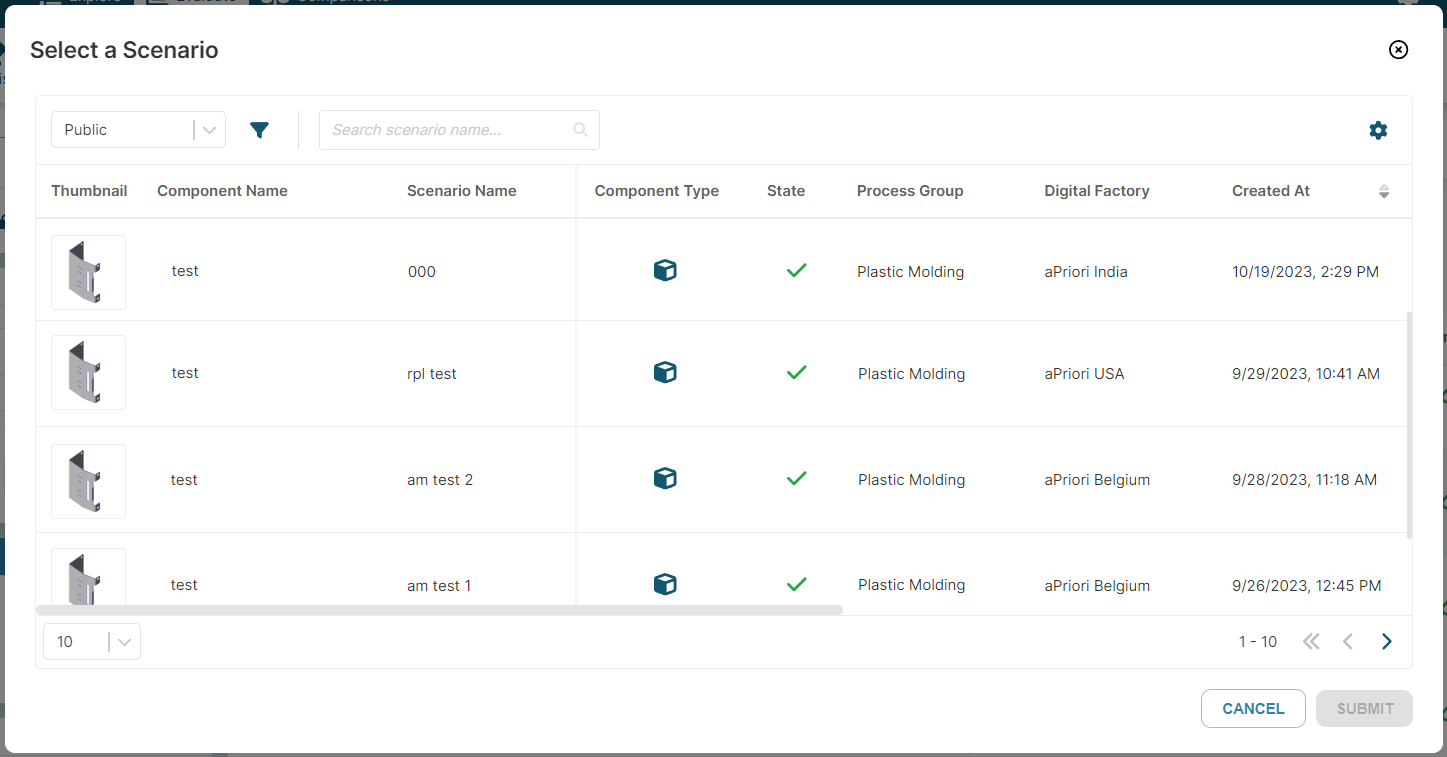
You can now expand the scenario switch drop-down list and select a View All Scenarios option to launch a detailed, customized view of every scenario that is eligible to be switched into an assembly.
You can fully configure the view to hide or show relevant parameters so that you can choose the right scenario. You can also use filters to refine the information displayed.
For more information about switching scenarios, see the aP Design User Guide.
 Nov 1, 2023
New Features
This release (Version 1.10.0) provides the following enhancement.
See the History of a Scenario
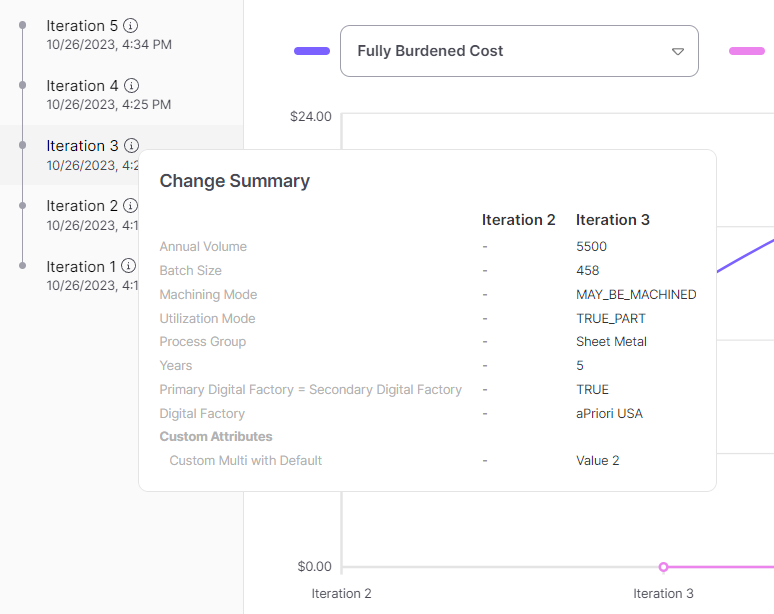
You can now see the history of a scenario and review how input changes have affected outputs in Cost, DFM, and Carbon. This is an excellent supplement to the concept selection process or the decision justification workflow.
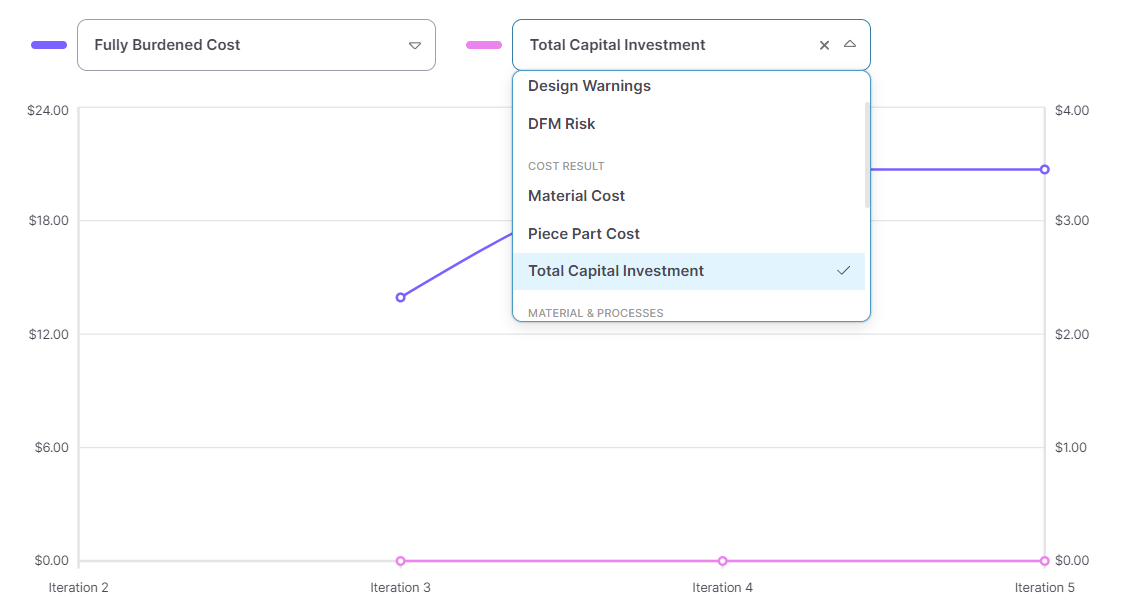
You can plot one output against another to visualize and explain trade-offs made during the refinement process. This is particularly useful for when you are presenting about decisions and direction in design reviews.
Scenario Iterations
Each time you make a change that is persisted in a scenario, aP Design creates an iteration. Actions such as Cost, Publish, or Update CAD File are some of the more obvious changes that provoke an iteration, but so can Assign actions or Status changes.
Open and Review the History Of a Scenario
Once you have opened the History dialog, you can refine the outputs plotted on the graph, including removing the secondary axis to focus on a particularly important output.
Some key combinations you might explore include, but are not limited to, the following:
-
Fully Burdened Cost versus Total Capital Investment
-
Total Cycle Time versus Total Capital Investment
-
Fully Burdened Cost versus Design Warnings
-
Piece Part Cost versus Total Carbon or Material Carbon
As iterations mount up, you can hover your cursor over the iteration history to remind yourself of the inputs that varied from iteration to iteration.
Limitations
aP Design 'flattens' scenario history once a scenario is published; this means that the change history is no longer visible. However, to preserve the iteration history for future reference, you can publish the scenario between each meaningful change and that will persist, even in the published view. This provides the benefit of being able to refine the public history somewhat, and so it can present a more intended history.
For more information about the History feature, see the aP Design User Guide.
 Oct 4, 2023
New Features
This release (Version 1.9.0) provides the following enhancements.
Generate Basic Log Files
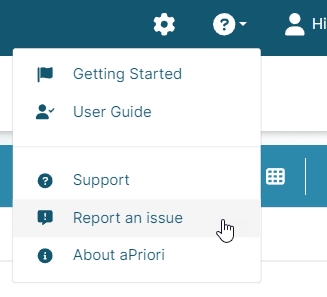
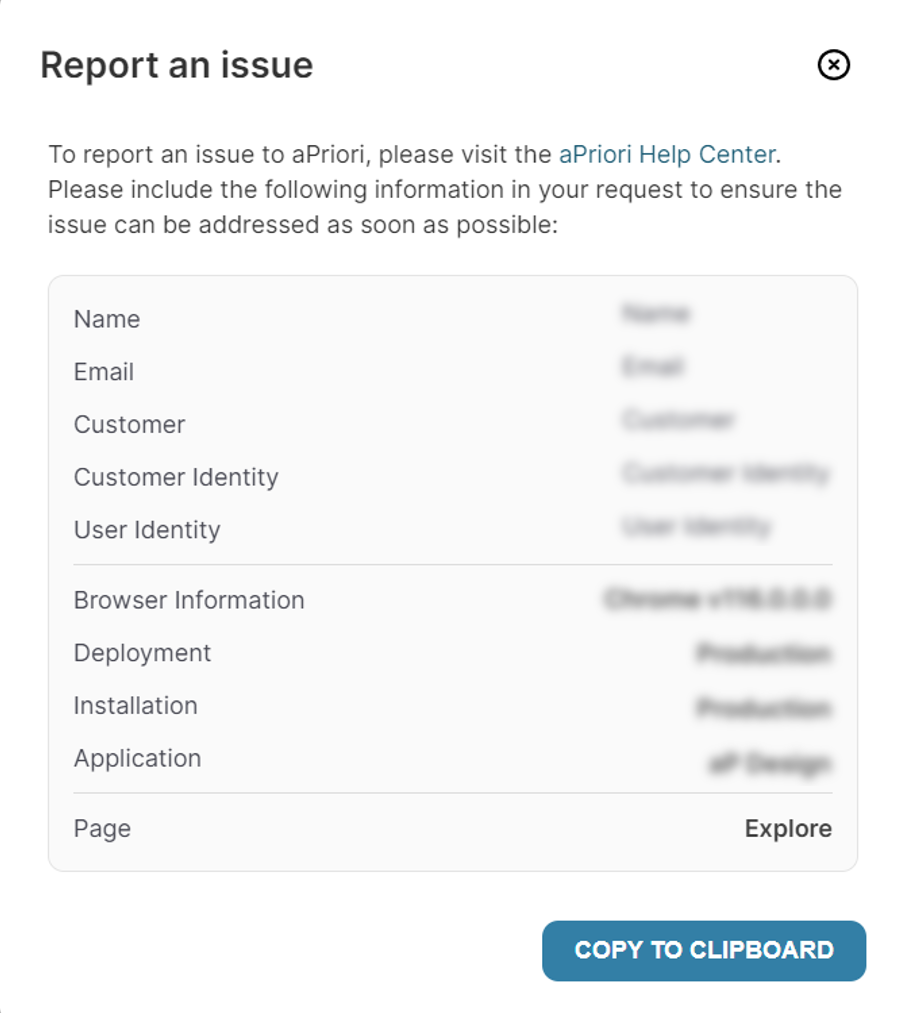
You can now easily generate, view, and copy the most effective information that enables aPriori Support to troubleshoot any issues accurately and efficiently.
You can review this information, copy it to the clipboard, and include it in any onward communications you have with aPriori Support. aP Design automatically displays the information in table format when you paste the clipboard content into an aPriori Support ticket.
For more information, see the aP Design User Guide.
Upgrading
As part of the fully managed aPriori Cloud Solution service, aPriori Customer Support manages cloud upgrades and provides upgrade schedules and testing windows to aPriori Cloud customers.
Minor updates, which do not typically require customer testing and validation, are automatic. For major updates and for minor updates that require upgrade testing and validation, aPriori provides customers with an Upgrade sandbox for a pre-defined time period. For more information about upgrade schedules and automated tooling that facilitates upgrades, please contact your account team.
aPriori Customer Support can help you to migrate scenario data, Digital Factories, and customized configurations for On-Premise deployments of the current or any prior aPriori release to a Cloud deployment of the current aPriori release. For more migration information, or to learn about production projects and use cases that are enabled by aPriori Cloud, please contact your aPriori account team lead, your aPriori Account Manager, or aPriori Customer Support.
 Sep 20, 2023
New Features
This release (Version 1.8.0) provides the following enhancements.
Comparison Workflow
The comparison workflow is an excellent way to evaluate design options or scenario changes against one another so that you can visualize and consider the pros and cons of each one. It is an effective tool to assist design selection or to support concept justification.
The following enhancements are aimed at improving the value and usefulness of the feature as a whole and enable recurring reviews of existing comparisons.
Create and Save Comparisons
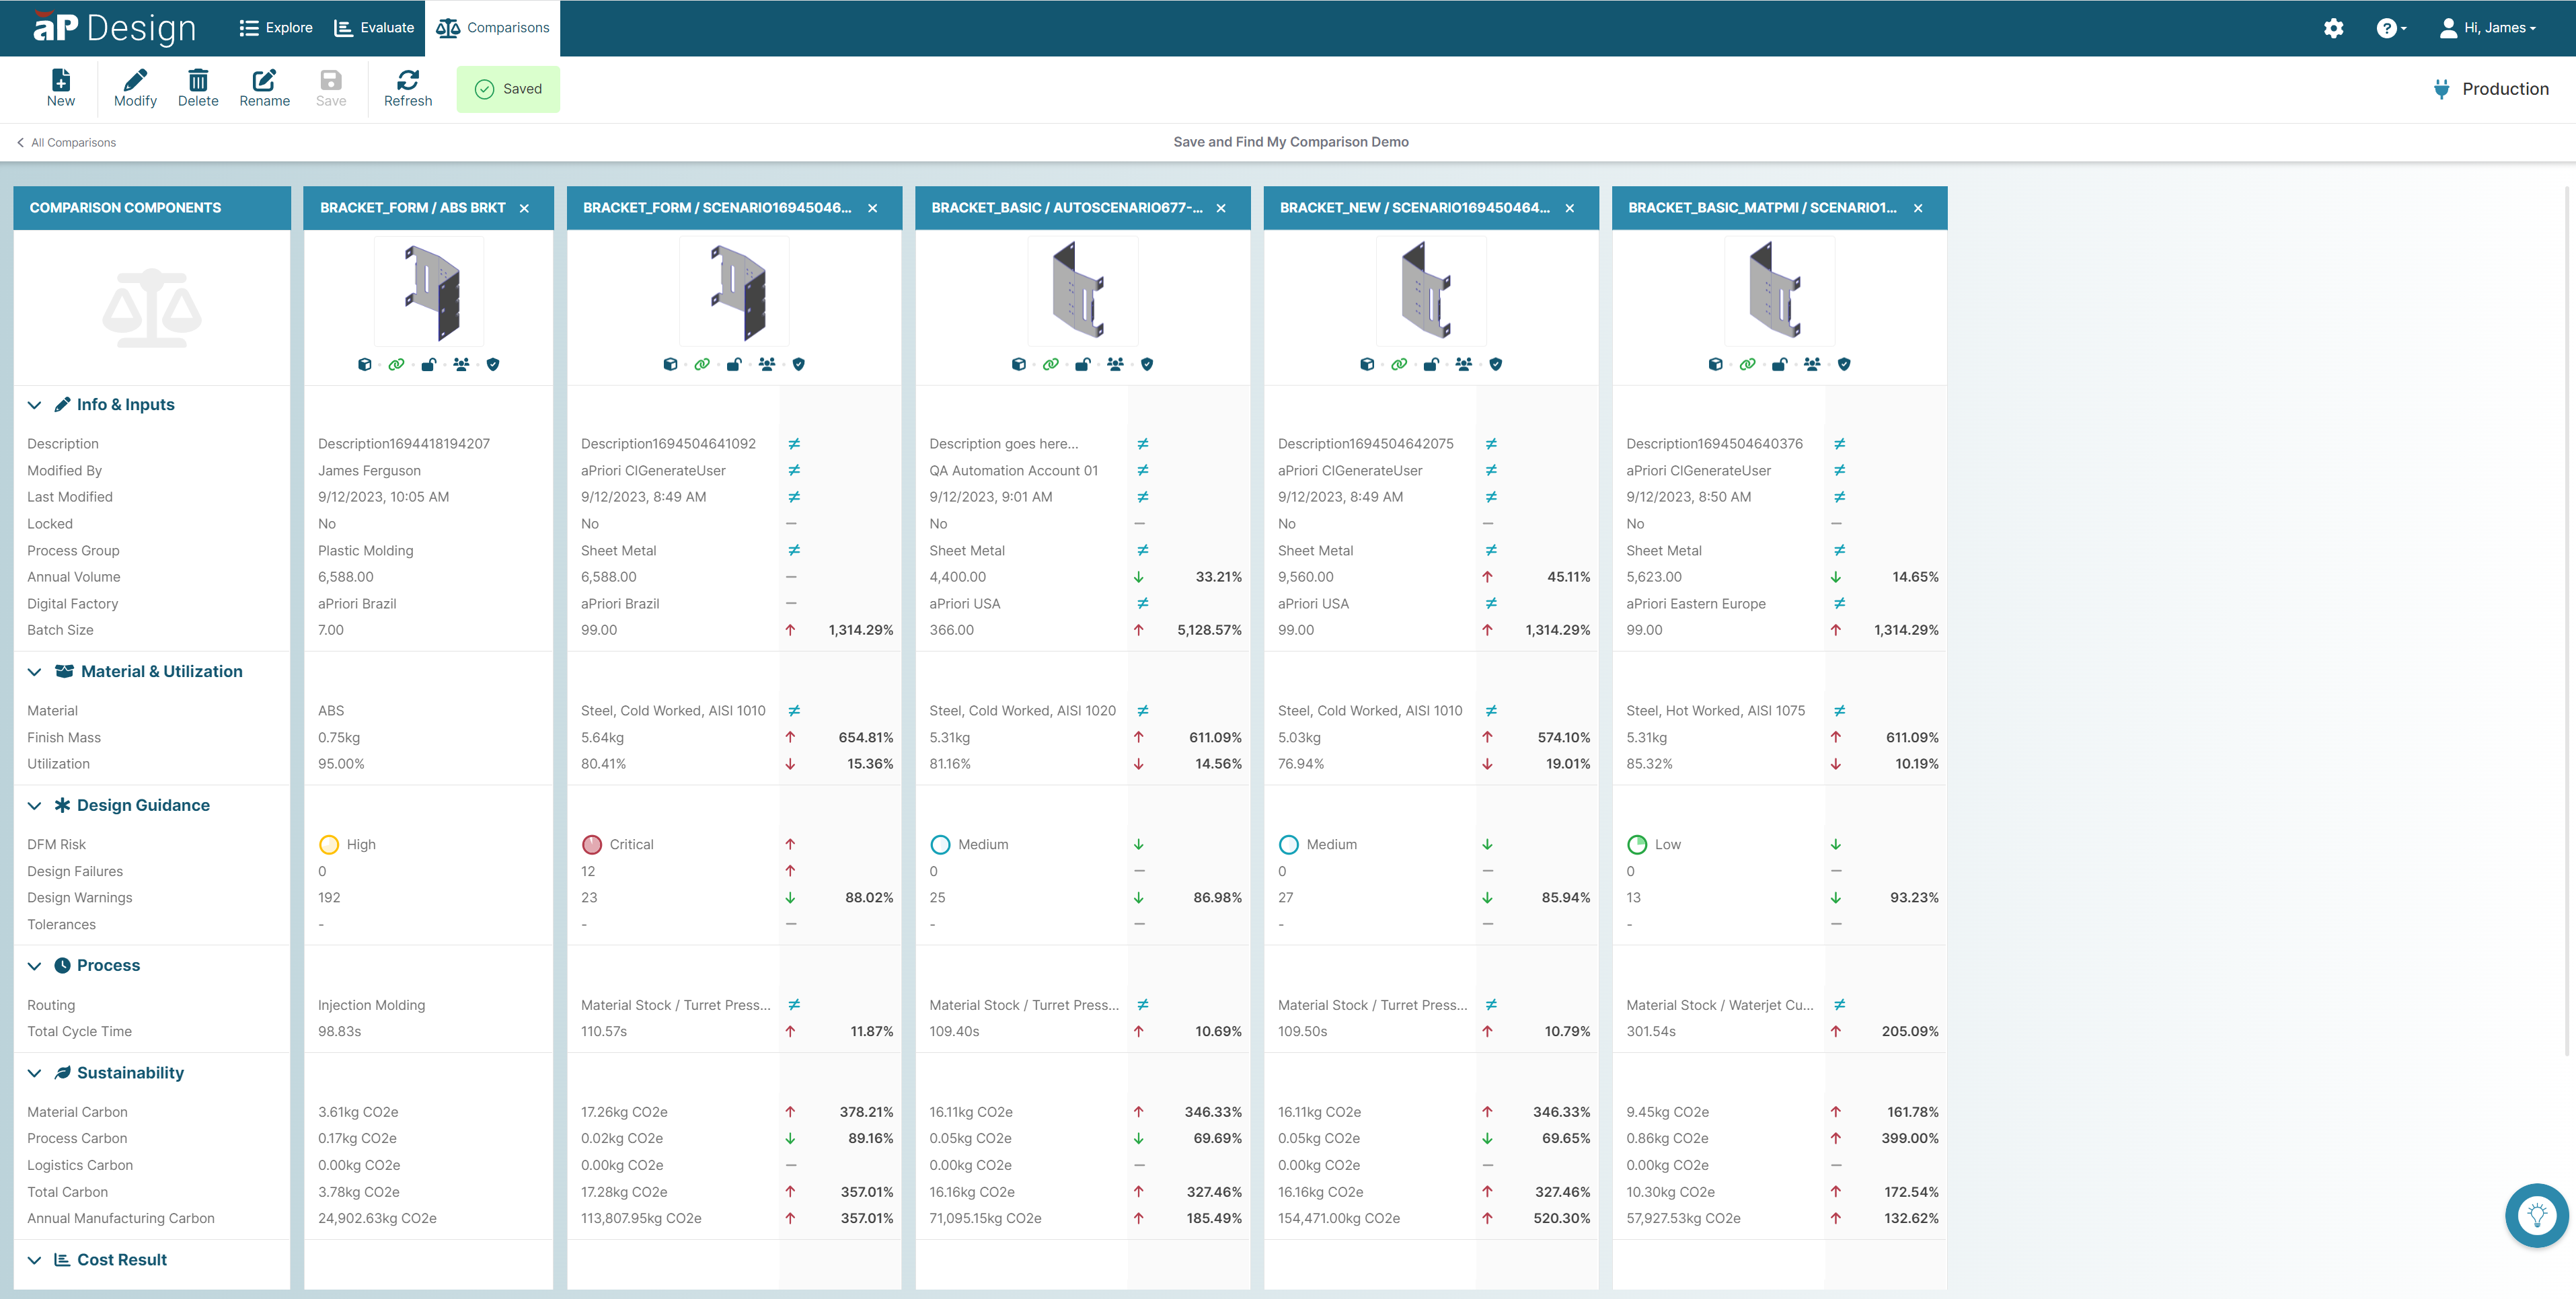
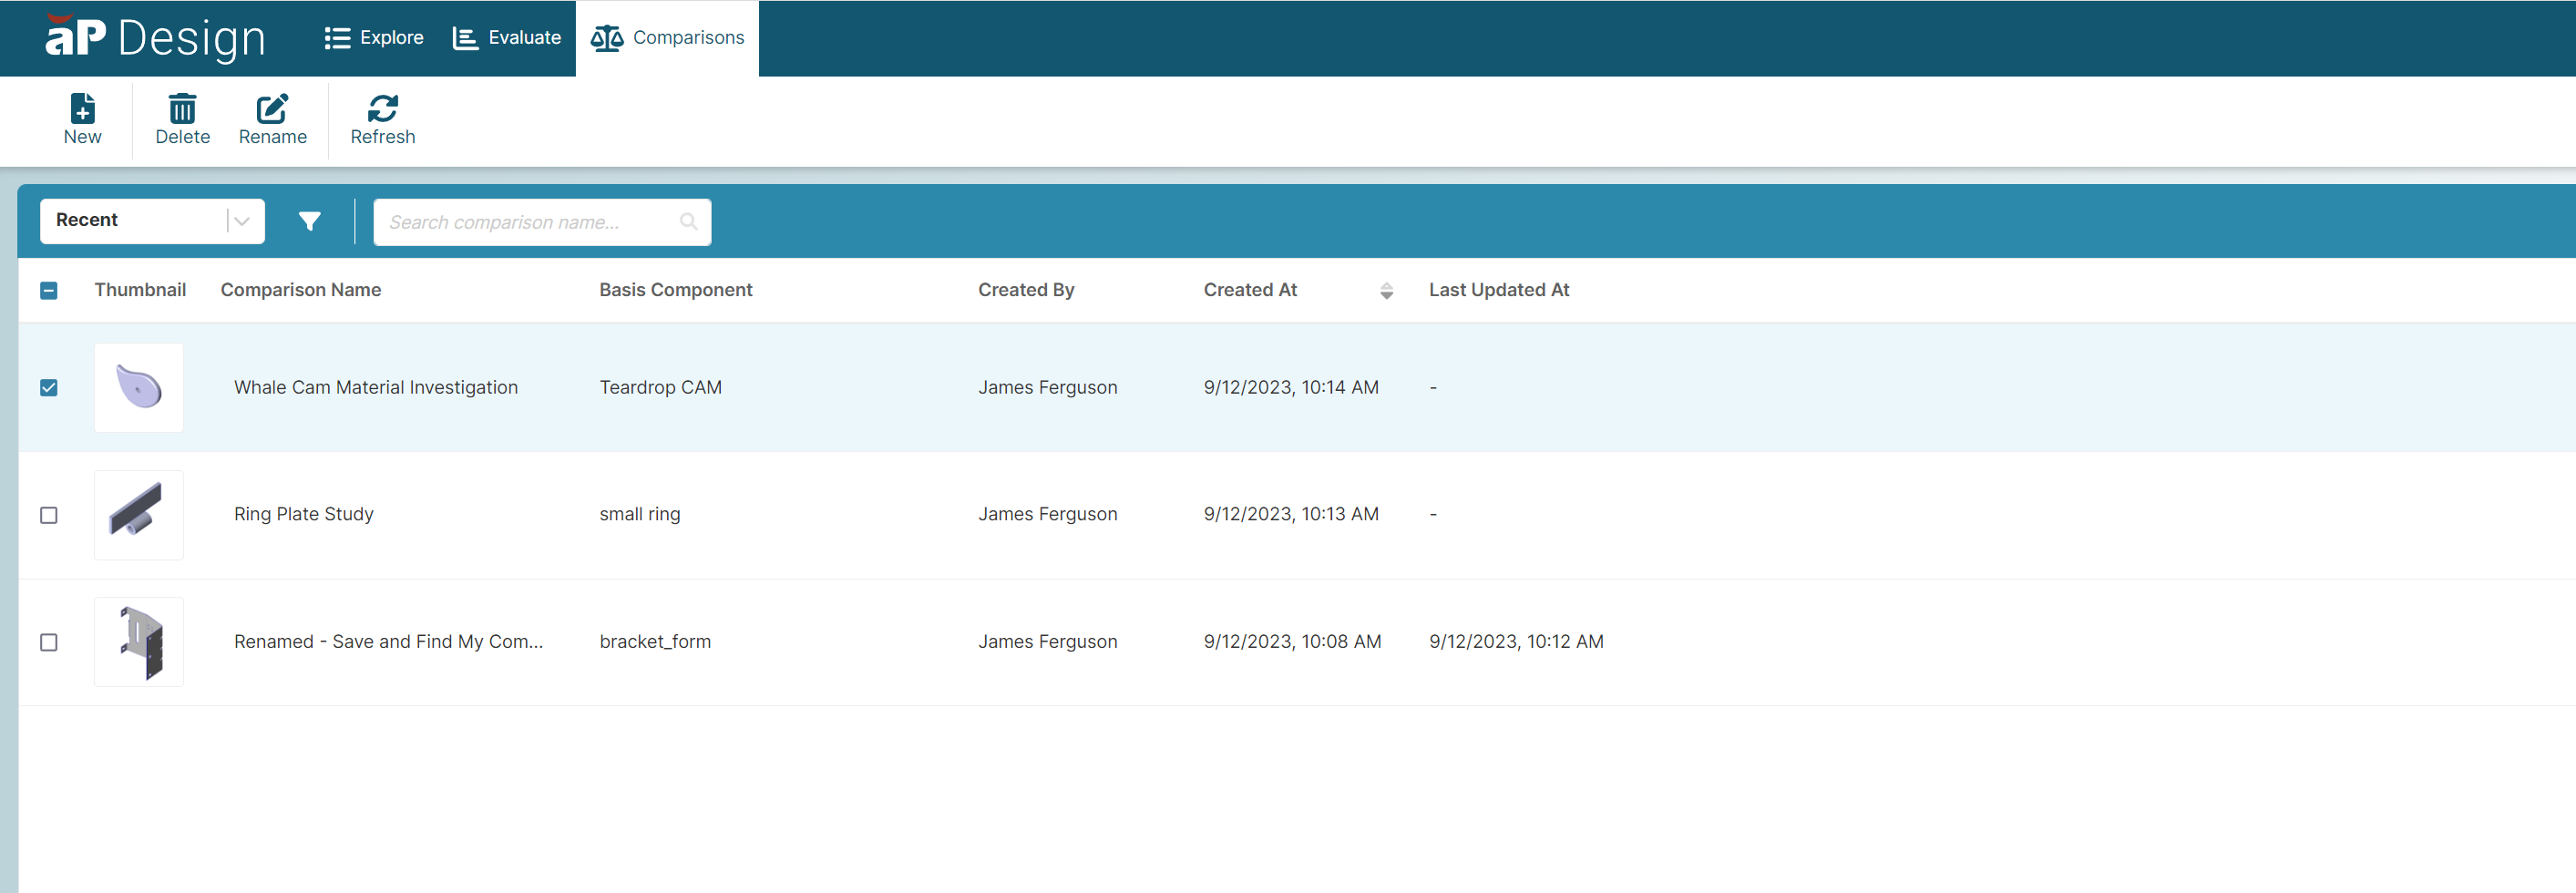
In aP Design 1.8.0 you can save, name, rename, modify, and delete comparisons created in aP Design. This allows you to create and store meaningful comparisons of designs or scenarios to assist with informed concept selection and refinement – both in the present and at a later date.
New Comparison Repository
In aP Design 1.8.0, when not displaying a specific comparison, the comparison tab also acts as a repository where, once created and saved, comparisons are stored and presented for future interrogation or reference. You can also rename or delete scenarios from within this view.
Improved Comparison Table
aP Design 1.8.0 includes additional fields in the comparison view that provide increased transparency and detail around the cost composition for a given scenario, including a more detailed investment and cost breakdown overview.
Limitations
Comparisons created in aP Design cannot be accessed from aP Pro. Likewise, comparisons created in aP Pro cannot be accessed from aP Design.
For more information on how to create and work with comparisons, see the aP Design User Guide.
Resolved Issues
The following issues are resolved in this release:
-
Digital Factories are not displayed in alphabetical order: In aP Design 1.8.0, Digital Factories in drop-down lists are presented in alphabetical order.
-
Intermittently, changing some PSO values does not enable a cost submission: In aP Design 1.8.0, you can cost or re-cost a part as normal after changing the values of PSOs.
-
Cost button disabled after clearing all PSO inputs: In aP Design 1.8.0, after changing PSO values and clicking the Clear All button to clear uncosted changes, you can use the Cost button as normal.
-
Cost button disabled after applying secondary processes when editing PSOs: In aP Design 1.8.0, after applying secondary processes when the PSO section is open, you can use the Cost button as normal.
Upgrading
As part of the fully managed aPriori Cloud Solution service, aPriori Customer Support manages cloud upgrades and provides upgrade schedules and testing windows to aPriori Cloud customers.
Minor updates, which do not typically require customer testing and validation, are automatic. For major updates and for minor updates that require upgrade testing and validation, aPriori provides customers with an Upgrade sandbox for a pre-defined time period. For more information about upgrade schedules and automated tooling that facilitates upgrades, please contact your account team.
aPriori Customer Support can help you to migrate scenario data, Digital Factories, and customized configurations for On-Premise deployments of the current or any prior aPriori release to a Cloud deployment of the current aPriori release. For more migration information, or to learn about production projects and use cases that are enabled by aPriori Cloud, please contact your aPriori account team lead, your aPriori Account Manager, or aPriori Customer Support.
 Jul 26, 2023
New Features
This release (Version 1.7.0) provides the following enhancements.
Updated Names and User Interfaces for aPriori Products
aPriori products were rebranded to reflect a broad focus that includes sustainability and manufacturability insights in addition to cost estimates.
This table includes the new and old names for the rebranded products, solutions, and modules. It also indicates the release in which the relevant user interface (UI) will be updated to reflect the name changes.
| Old Name | New Name |
UI Update Release |
|---|---|---|
|
Cost Insight Generate |
aP Generate |
2023 R1 Version 3.1.0 |
|
Cost Insight Connect |
aP Connect |
2023 R1 Version 3.1.0 |
|
Cost Insight Design |
aP Design |
1.7.0 |
|
Cost Insight Admin |
aP Admin |
2023 R1 SP2 |
|
Cost Insight Report |
aP Analytics |
2023 R1 SP2 |
|
aPriori Professional |
aP Pro |
2023 R1 SP2 |
Limitations
In some cases the UI may still use the old branding but will be updated shortly.
Upgrading
As part of the fully managed aPriori Cloud Solution service, aPriori Customer Support manages cloud upgrades and provides upgrade schedules and testing windows to aPriori Cloud customers.
Minor updates, which do not typically require customer testing and validation, are automatic. For major updates and for minor updates that require upgrade testing and validation, aPriori provides customers with an Upgrade sandbox for a pre-defined time period. For more information about upgrade schedules and automated tooling that facilitates upgrades, please contact your account team.
aPriori Customer Support can help you to migrate scenario data, Digital Factories, and customized configurations for On-Premise deployments of the current or any prior aPriori release to a Cloud deployment of the current aPriori release. For more migration information, or to learn about production projects and use cases that are enabled by aPriori Cloud, please contact your aPriori account team lead, your aPriori Account Manager, or aPriori Customer Support.
 Jun 28, 2023
New Features
This release (Version 1.6.0) provides the following enhancements.
Sustainability Insights
Cost Insight Design includes Sustainability Insights – a separately licensed module that calculates carbon emissions at the part manufacturing level. Cost Insight Report users can aggregate the data for part scenarios to determine the carbon emissions for assemblies.
If you are interested in adding the Sustainability Insights module to your deployment, please contact aPriori Support.
The Sustainability Insights module layers sustainability data on top of aPriori's cost models, allowing you to:
-
Create carbon baseline data
-
Identify carbon outliers
-
Perform material, process, and design trade-offs to assess their impact
-
Take actions to reduce parts or product carbon footprint
The sustainability data helps you determine the carbon footprint of your manufacturing processes by calculating how much carbon is emitted during the manufacture of products and during the production of the materials that go into those products.
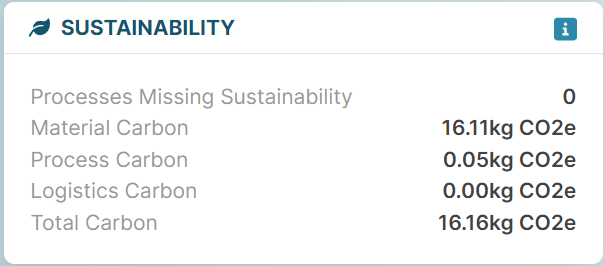
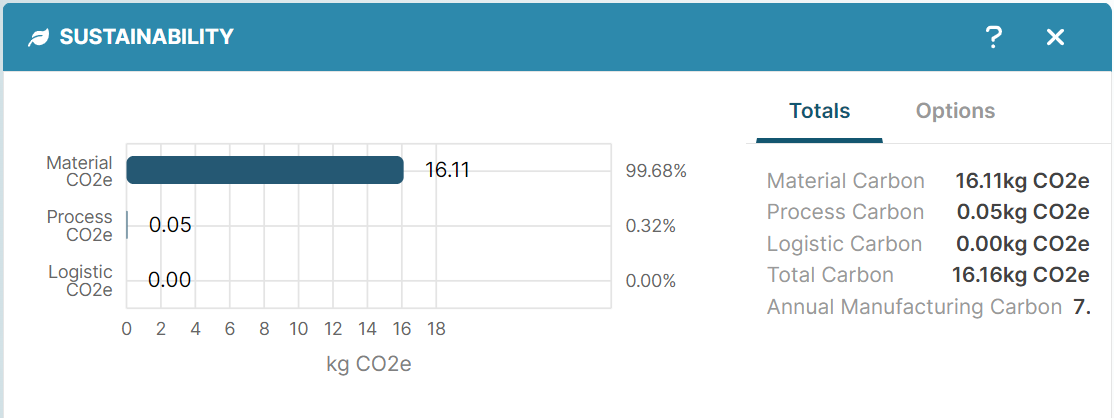
You can examine carbon data in the Sustainability tile and panel.
Processes supported in Sustainability
The processes that are supported by aPriori Sustainability Insights depend on your current version of aPriori Professional. For a full list of supported processes, refer to the 'Processes supported in Sustainability' section of the aPriori Professional User Guide.
Note: The Sustainability Insights module does not support custom processes at this time.
aPriori continues to add Sustainability calculations to more processes. Please contact your aPriori representative if there is a specific process that you want Sustainability support for.
Compatibility
aPriori Cloud products are compatible only with other aPriori Cloud products. You cannot, for example, use an aPriori Cloud installation of Cost Insight Admin to export data from an aPriori On-Premise installation of aPriori Professional and then use the exported data with aPriori Cloud version of Cost Insight Report. Likewise, aPriori On-Premise products are compatible only with other aPriori On-Premise products. For example, if you have an aPriori On-Premise installation of aPriori Professional, you cannot use it with aPriori Cloud versions of Cost Insight Admin or Cost Insight Report.
Within these environment constraints, the 1.6.0 release of Cost Insight Design is compatible only with the 2023 R1 SP1 release of other aPriori Cloud applications.
Upgrading
As part of the fully managed aPriori Cloud Solution service, aPriori Customer Support manages cloud upgrades and provides upgrade schedules and testing windows to aPriori Cloud customers. Minor updates, which do not typically require customer testing and validation, are automatic. For major updates and for minor updates that require upgrade testing and validation, aPriori provides customers with an Upgrade sandbox for a pre-defined time period. For more information about upgrade schedules and automated tooling that facilitates upgrades, please contact your account team.
aPriori Customer Support can help you to migrate scenario data, Digital Factories, and customized configurations for On-Premise deployments of the current or any prior aPriori release to a Cloud deployment of the current aPriori release. For more migration information, or to learn about production projects and use cases that are enabled by aPriori Cloud, please contact your aPriori account team lead, your aPriori Account Manager, or aPriori Customer Support.
 Jun 7, 2023
New Features
This release (Version 1.5.0) provides the following enhancements.
Toolbar Usability Improvements
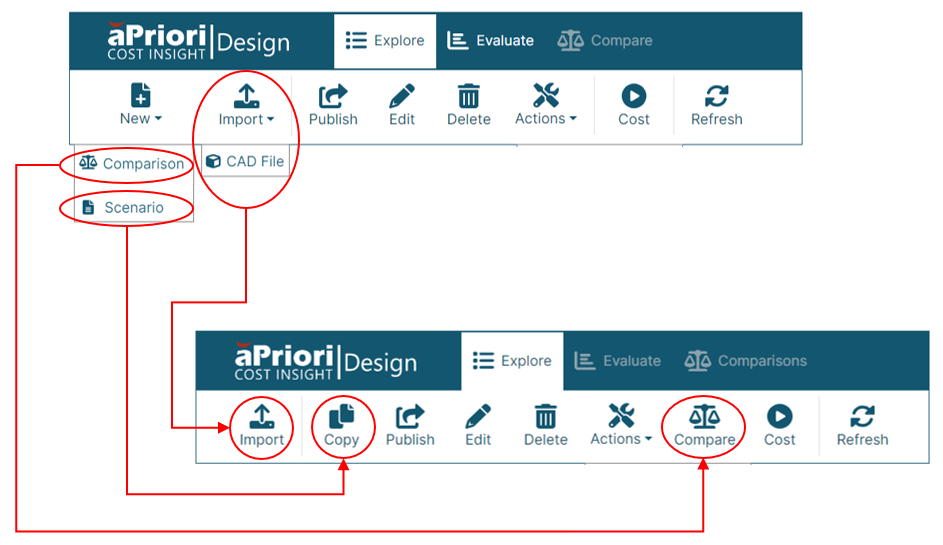
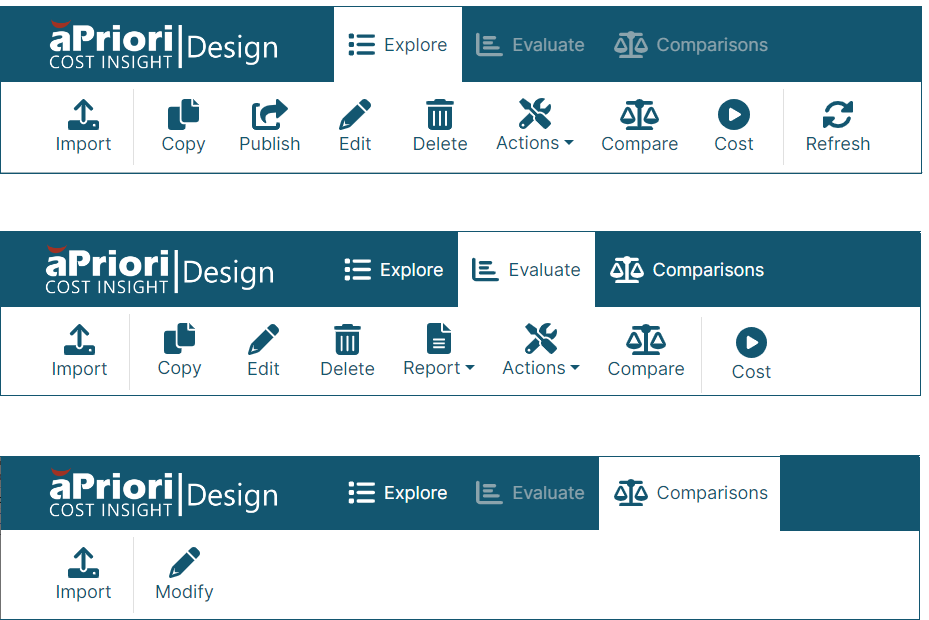
The primary toolbars on the Explore, Evaluate, and Comparison tabs have all been redesigned for usability. Several of the buttons on the toolbars have been simplified and reordered or replaced. For example this figure shows the previous (top) and new (bottom) versions of the Explore toolbar.
The Import button is now the first button and its dropdown menu has been eliminated. Therefore, you can now open the Import CAD File dialog with a single click.
The Copy button, which is the second button on the toolbar, is a new button that replaces the Scenario option on the dropdown menu of the New button. Previously, to open the New Scenario dialog, which allowed you to create an identical private copy of private scenario, you had to select the scenario, click the New button, and then select Scenario Now, after you select the private scenario that you want to copy, you can instead just click the Copy button to open the new Copy Scenario dialog. The enhancement provides more efficient and intuitively named elements for an essential workflow.
The new Compare button, which replaces the Comparison option on the dropdown menu of the New button, makes the workflow for comparing scenarios easier and more intuitive. Also, to disambiguate the Compare button and action from the Compare tab , the Compare tab has been replaced with the Comparisons tab .
As these figures show, all enhancements to the Explore toolbar (top) have been extended to the Evaluate toolbar (middle) and the streamlining of the Import button has been extended to the Comparisons toolbar (bottom).
Quick Scenario Comparisons
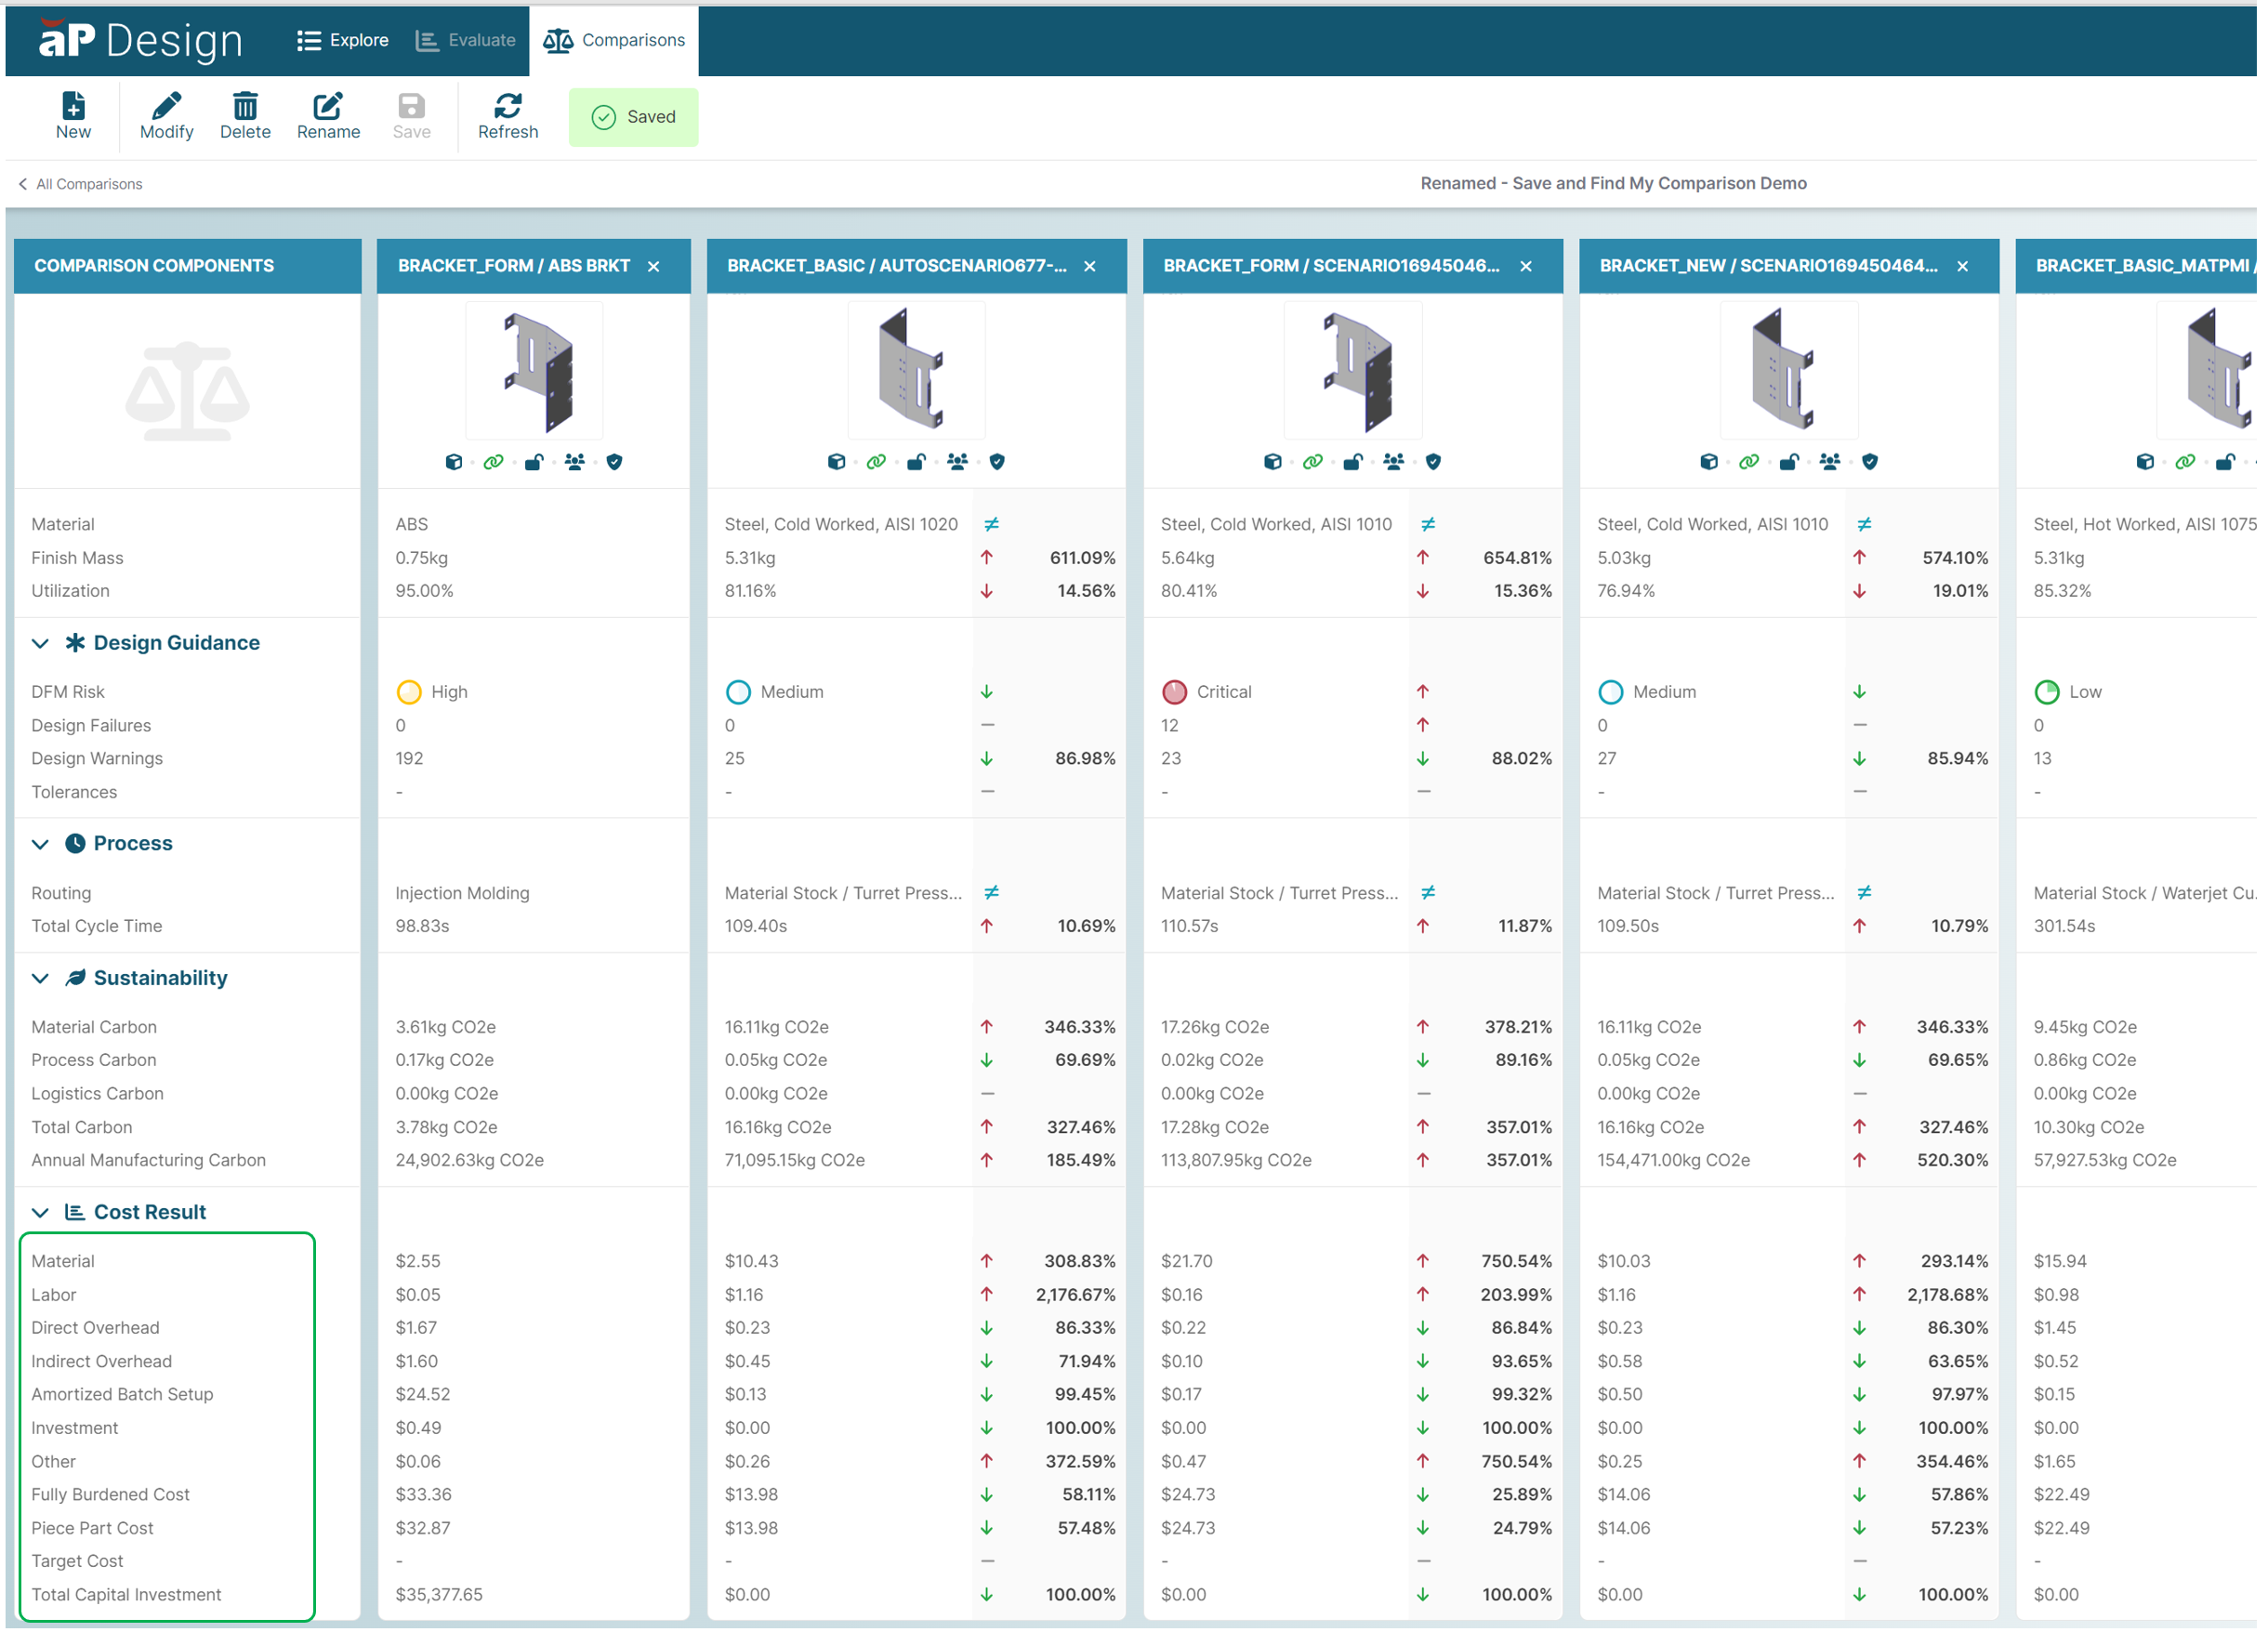
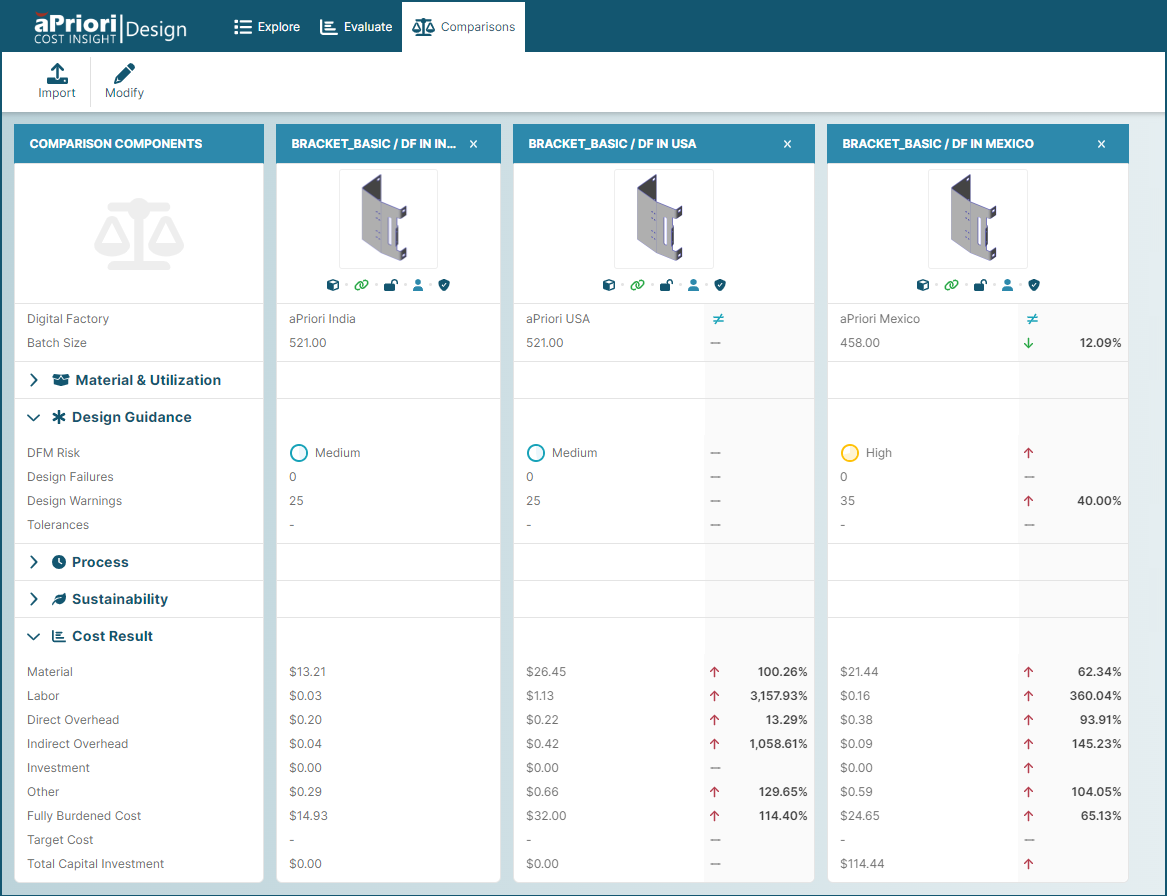
You can typically determine the optimal reviewing inputs and different in a side-by-side comparison For example, in this comparison of three different scenarios, each with a different input for the Digital Factory, you can quickly see that the basis (reference) scenario has the best combination of manufacturability and cost.
Until this release, Cost Insight Design provided only one type of comparison, which is now called a Manual Comparison because it includes only scenarios that you have manually identified by selecting them in the Explore tab. In other words, to create a Manual Comparison you must first manually identify all the scenarios that you want to include.
In this release, you can also create a Quick Comparison, which is a side-by-side comparison for which you need only identify the basis scenario. Once you do, Cost Insight Design identifies up to nine other scenarios for the comparison that meet both of these criteria:
-
They are all associated with the same component as the basis scenario.
-
They are the nine most recently updated scenarios for the component.
In other words, to create a Quick Comparison you must first identify only one scenario and then Cost Insight Design identifies up to nine other relevant scenarios and includes them in the comparison.
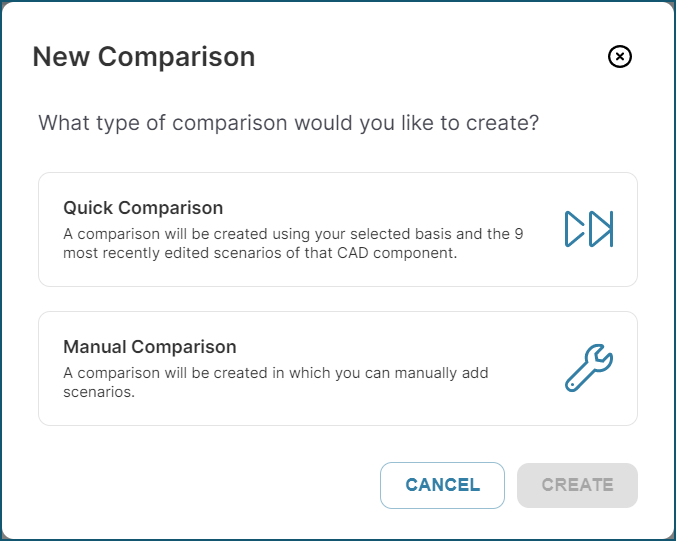
To create a Quick Comparison, from the Evaluate tab:
-
Click the Compare button.
The New Comparison dialog opens.
-
Select Quick Comparison and then click Create.
To create a Quick Comparison, from the Explore tab:
-
Select the basis scenario.
-
Click the Compare button.
-
Select Quick Comparison and then click Create.
 May 31, 2023
New Features
This release (Version 1.4.0) provides the following enhancements.
Manual Tolerancing
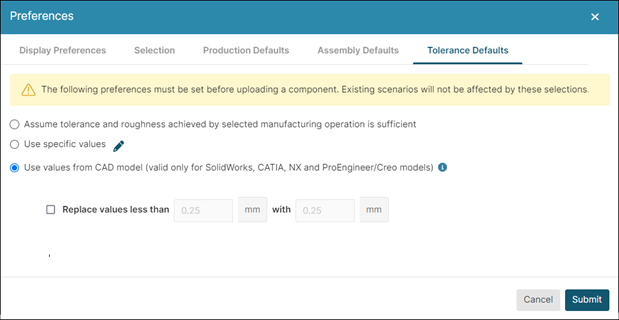
In previous releases, the application of tolerances was determined solely by tolerance policy that was selected in the Preferences > Default Tolerance settings.
The options for the tolerance policy (which is automatically applied to Geometric Cost Drivers (GCDs) during CAD file import and update processes) are:
-
Assume tolerance and roughness achieved by the selected manufacturing operation is sufficient — (Default option) Cost Insight Design assumes that selected processes have sufficient tolerance capabilities to manufacture each GCD in the part. That is, it does not determine whether a process or operation is infeasible or impractical with respect to any tolerance or roughness requirements. Furthermore, if this option is selected, Cost Insight Design does not include any tolerance or roughness PMI from uploaded models in the new component scenario.
-
Use specific default values — Cost Insight Design applies the fault tolerance and surface roughness values, which are also specified in the Tolerance Defaults settings, when a CAD file is imported or updated.
-
Use values from CAD model — Cost Insight Design uses semantic attributes for tolerance and roughness requirements that it extracts during the import or upload of the CAD model.
Once a CAD file had been imported or updated, you could not manually add or edit GCD tolerances. To add or edit tolerances, you had to update or re-import the CAD file after changing either the tolerances in the CAD model or your tolerance policy.
Now, in addition to providing automatically applied tolerance policies, Cost Insight Design allows you to add and edit tolerances manually after a CAD file has been imported or updated. In other words, you can now manually change GCD tolerances in an existing scenario.
There are two methods for manually changing tolerances. Both methods require that that scenario that you edit the tolerances for is private and has been successfully cost.
Method 1
The first method allows you to add or edit tolerances for any one GCD by using a dialog that provides information about any tolerances that already exist for that GCD.
-
Open a successfully cost private scenario to the Evaluate tab.
-
In the 3D viewer, on the component, select the feature that is associated with the GCD for which you want to add or edit a tolerance.
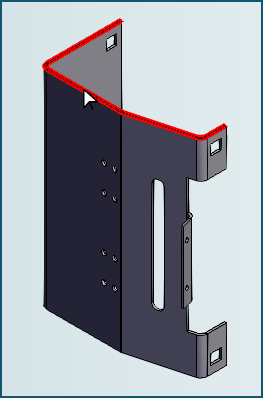
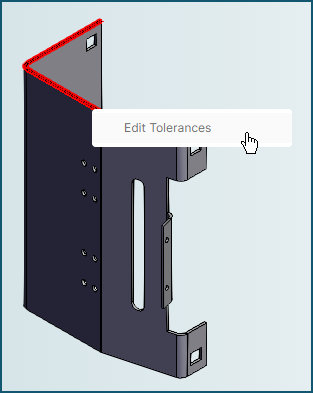
If the feature is associated with only one GCD, the feature becomes highlighted when selected. For example, because the edge of the bracket in this figure is associated with only one GCD, it becomes highlighted when selected.
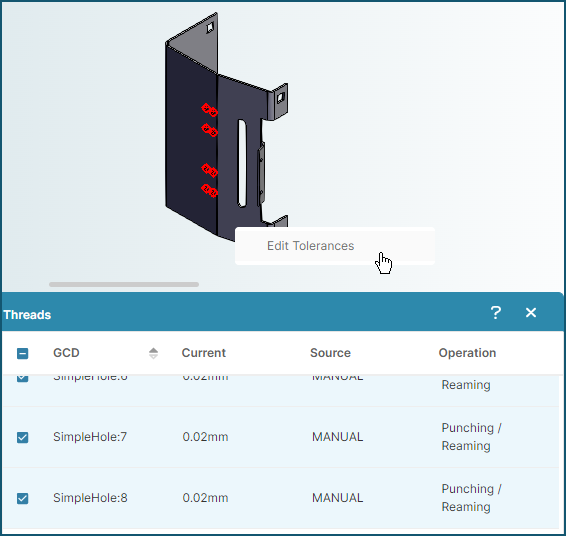
Once the feature is highlighted, right-click it and then, in the context menu that appears, select Edit Tolerances.
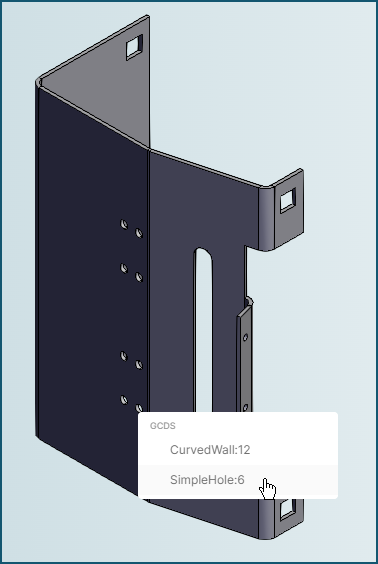
Alternatively, if the feature is associated with more than one GCD, a context menu that contains all the associated GCDs appears when you select the feature. For example, when a hole in the bracket is selected, a menu that contains two GCDs appears.
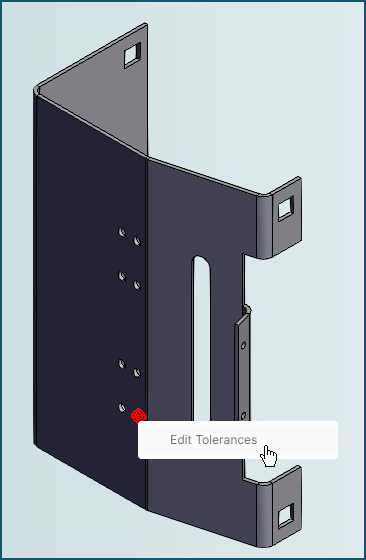
Once the menu appears, to close the menu and highlight the feature, select the relevant GCD. Then, right-click the highlighted feature and select Edit Tolerances.
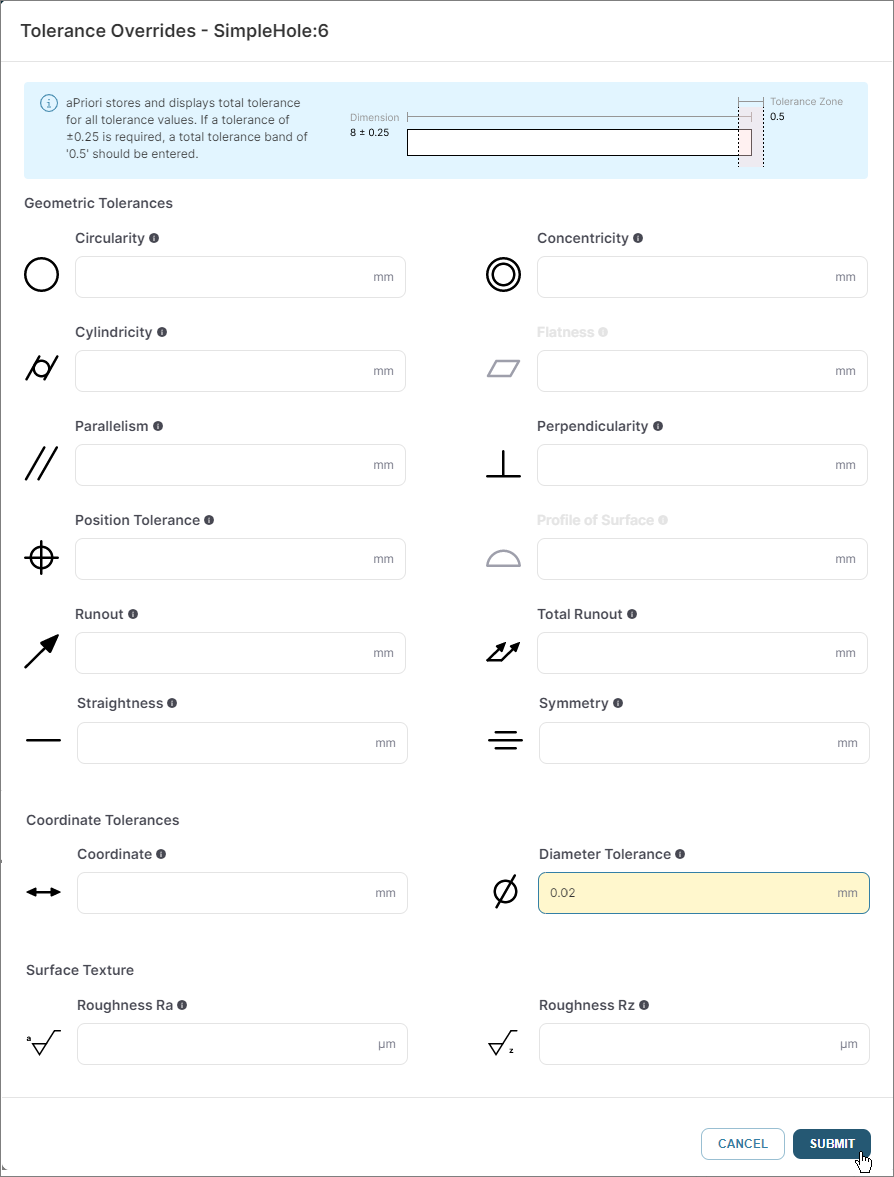
In either case, when you select Edit Tolerances, the Tolerance Overrides dialog for the selected GCD opens.
-
Add or edit one or more tolerances for the GCD and then click Submit.
You cannot specify 0 or a negative number for a tolerance.
To see the impact of the tolerance change, recost the scenario.
Method 2
The second method can be used only to add or edit tolerances for GCDs that already have at least one tolerance applied. In other words, you cannot use the second method to add tolerances to a totally untoleranced GCD, as you can by using the first method. The second method allows you to add or edit tolerances for multiple similar GCDs simultaneously and to select the GCDs by using the Tolerance tab on the Design Guidance explorer. However, when you use the second method to add or edit tolerances for multiple GCDs simultaneously, the dialog does not display the existing tolerance values as it does when you add or edit tolerances for only one GCD by using either the first or second method.
-
Open a successfully cost private scenario that contains at least one toleranced GCD to the Evaluate tab.
-
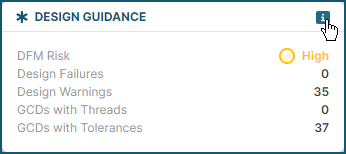
In the Design Guidance tile, click the Design Guidance explorer button, as shown in this figure.
Tip: In the Design Guidance tile, the GCDs with Tolerances value is the number of GCDs that already have at least one tolerance.
-
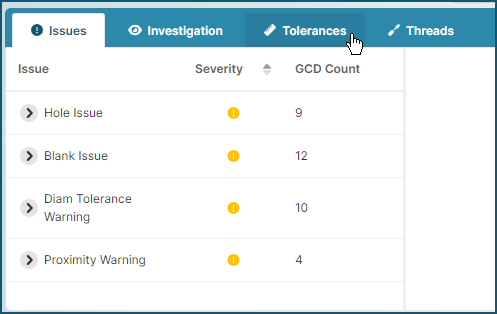
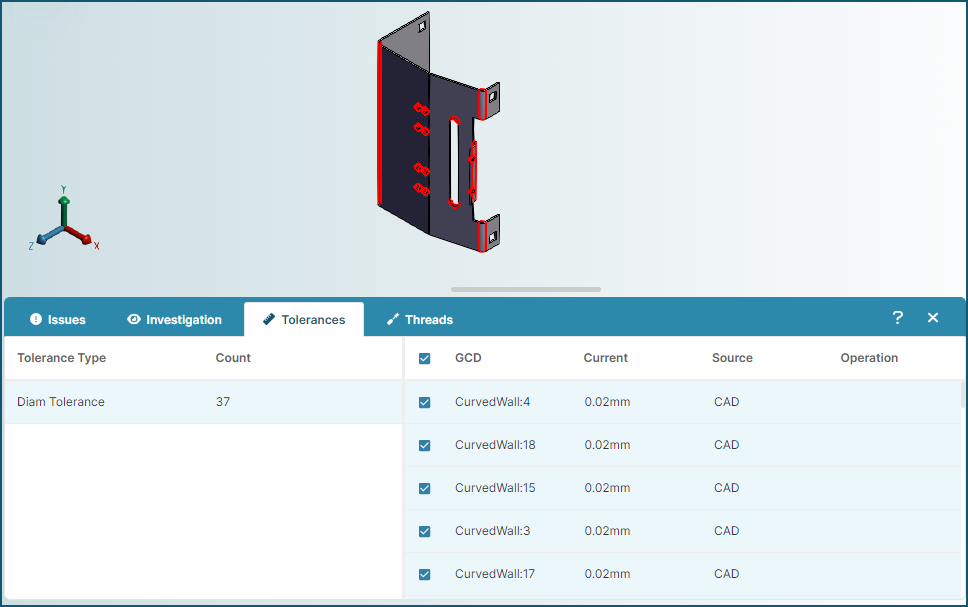
In the Design Guidance explorer, open the Tolerances tab.
-
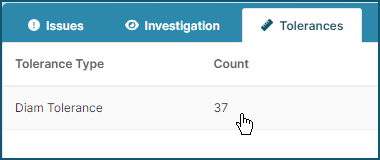
In the Tolerances tab, select a type of tolerance.
The toleranced GCDs are listed in the explorer and the associated features are highlighted in the 3D viewer.
In the explorer, select one or more similar GCDs, click on the model in the 3D viewer, and then click Edit Tolerances.
The Tolerance Overrides dialog for the selected GCDs opens.
-
Add or edit tolerances for the GCDs and then click Submit.
You cannot specify 0 or a negative number for a tolerance.
To see the impact of the tolerance change, recost the scenario.
By creating and comparing multiple scenarios for the same component, each with different tolerances, you can examine the impact of tolerances on cycle time, cost, manufacturability, and sustainability. For example, this scenario comparison shows the impact of applying half and double the initial tolerance values.
Limitations
-
You cannot manually delete a tolerance that was extracted from the Production and Manufacturing Information (PMI) in a CAD file. To nullify a tolerance that aPriori applied based on PMI, you can either:
-
Delete that PMI from the CAD model and then update the CAD file.
-
Relax the tolerance by manually replacing the existing value with a significantly larger or significantly smaller value, as applicable, that nullifies the effect of the tolerance.
-
-
If you manually specify a tolerance that is inappropriate (such as a runnout on a flat planar face) or that is permissible in Cost Insight Design but not in aPriori Professional, or vice versa, a conflict may occur during a regularly scheduled automatic synchronization between Cost Insight Design and aPriori Professional. If a conflict occurs, the scenario will become unstable and will fail to cost.
To avoid such a conflict, do not specify tolerances in Cost Insight Design that violate your organization's tolerances policies in aPriori Professional and vice versa.
To stabilize a scenario that is in an unstable state due to a tolerance issue, you can either:
-
Specify an appropriate value for the problematic tolerance within aPriori Professional or Cost Insight Design
-
Change your tolerance policy so that it does not apply the problematic tolerance and then update or re-import the CAD file
-
Change or delete the tolerance in the CAD Model and then update or re-import the CAD file
-
Group Set Capability for Tolerancing Similar GCDs
In this release, Cost Insight Design allows you to multi-select similar GCDs and then simultaneously add or edit the tolerances for them in the Tolerance Overrides dialog.
You can multi-select the similar GCDs in either the 3D viewer by using Shift+Click or in the Tolerances tab in Details Explorer by selecting multiple checkboxes. For more information how to manually add or edit tolerances, see Release Notes.
Tip: To arrange the GCDs in the explorer alphabetically, and therefore by type, click the sort by button in the GCD column header. 
If you select dissimilar GCDs, Cost Insight Design displays a message that indicates that you cannot add or edit tolerances for them.
Usability Improvements for the Tolerance Overrides Dialog
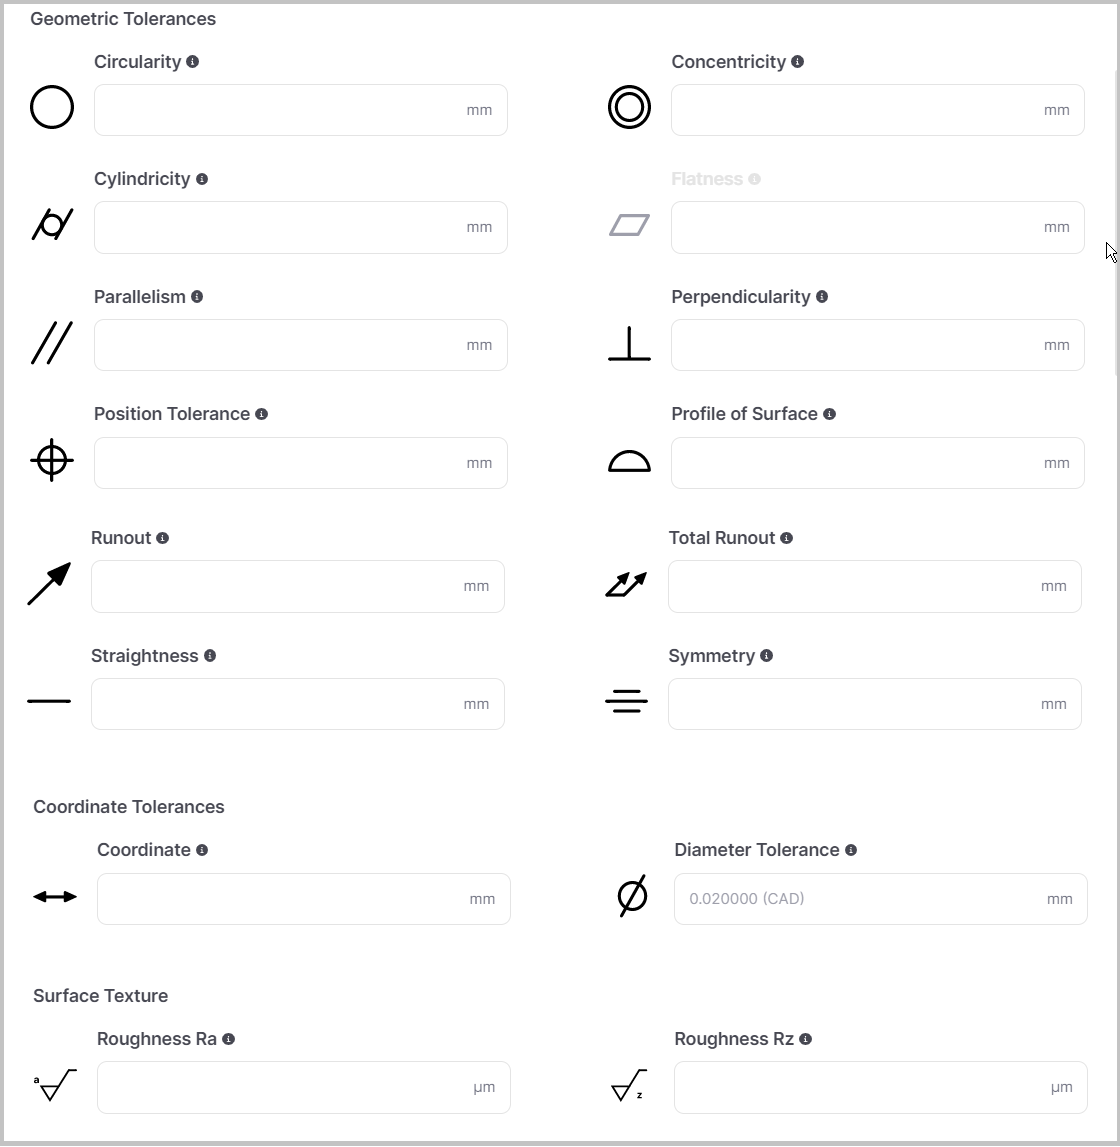
The Tolerance Overrides dialog, which you can use to specify values for a tolerance policy that can be applied to newly imported CAD models and to specify tolerance values for selected GCDs now contains a graphic and a description that explain how the aPriori manages and applies tolerances.
Each tolerance field in the dialog includes a standard engineering symbol and a tool tip that appears when you hoover over the information icon next to the tolerance name.
If a tolerance is not applicable to the selected GCDs, it is disabled to prevent you from applying a tolerance that is impossible to achieve.
If all the tolerances in a tolerance category are inapplicable, the entire category is disabled.
Known Issues and Workarounds
This release contains unresolved issues from prior versions of Cost Insight Design (as described in the release notes for the version in which they were identified) and this newly identified issue:
-
3D viewer measurement tool unit system disagreement issue – When you measure from point-to-point by using the measurement tool in the 3D viewer on the Explore tab, the displayed numerical value is equal to the numerical value that would display for the same point-to-point distance in the CAD model. The displayed unit in the measurement is determined by the specified default length unit in Cost Insight Design, even if it does not match the specified default unit for the CAD model. Therefore, if the length unit that was specified for the CAD file matches the default length unit that is specified in Cost Insight Design, both the displayed value and the displayed unit in point-to-point measurement a are correct. However, if the specified default length unit for the CAD file does not match the default length unit for Cost Insight Design, only the displayed value is correct in point-to-point measurements. The displayed unit is incorrect.
For example, if the CAD file was authored in Inches but Cost Insight Design is configured to display distance in mm, a 20 inch point-to-point distance will display as 20 mm.
To avoid this issue, configure the default units and unit systems in your CAD models to match the specified default units and unit systems in Cost Insight Design.
