Create or Identify Folders and Directories for a File System Integration
This example shows how to create the folders and identify the directories that are required for a File System integration.
Prerequisites
Before proceeding, complete these prerequisites:
-
Determine which physical configuration scenario you want to use. For more information, see PLM Integration Physical Configuration Options and System Access Requirements.
-
Obtain a ZIP file that contains the installer and other files that are required for the installation of an aP Connect Agent from aPriori Customer Support. For more information, see Agent Installer Files.
Create or Identify Folders and Directories for a File System Integration
Create the aP Connect Root Folder
The aP Connect Root folder stores the inputs, including CAD models, and outputs for an aP Connect Workflow.
Note:
The aP Connect Root Folder must reside on either the machine that you plan to install the Agent to or a network share or drive share that you can read to, write from, and control from the machine or server that you are going to install the Agent to.
-
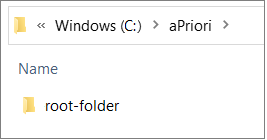
On the machine or server that you want to store Workflow inputs and outputs, navigate to, or create an aPriori Folder. Then, within the aPriori folder, create an aP Connect Root Folder.
For example, on the C: drive of your machine or server, in a new or pre-existing aPriori folder, create a new folder named root-folder.
-
Note the directory for, that is, the full path to, the aP Connect Root Folder.
For this example, the aPriori folder is on the C: drive of the machine that the aP Connect Root Folder is going to be stored on and is named aPriori. The aP Connect Root Folder is named root-folder.
Therefore, the directory for the aP Connect Root Folder in this example is
C:\aPriori\root-folder
Create or Identify the Directory for the aPriori Program Files
Caution:
You can install an Agent by using either an Install Wizard or a Command prompt. If you plan to install the Agent by using a Command prompt, for this release, there must not be any spaces in path to the Agent installation folder.
- On the machine or server that you want to install your Agent to, navigate to or create an aPriori folder.
-
Note the directory for the aPriori folder.
For this example, the Agent is going to be installed to a shared K: drive. The aPriori folder that is on the K: drive is named aPriori.
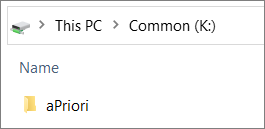
Therefore, in this example, the directory for the aPriori folder is
Note:
Do not create a folder for the installation files in the aPriori folder. The Agent installer creates an installation folder based on the directory that you specify in the options.ini property file.
Create the Agent Installer Folder
The Agent installer folder will contain the files that you extract from the aP Connect Agent installer ZIP file that you obtain from aPriori, including the installer executable, the option.ini properties file, and any other files that are provided in the ZIP file.
- Navigate to the folder that contains the zipped installation files that you obtained from aPriori.
- Extract the zipped folder to the aPriori folder on the machine that you are going to install the Agent to. The extracted folder is the installer folder.