View All Connectors
You can view a list of all existing Workflows on the Connectors page. To open the Connectors page, in the aP Connect header bar, click Connectors.
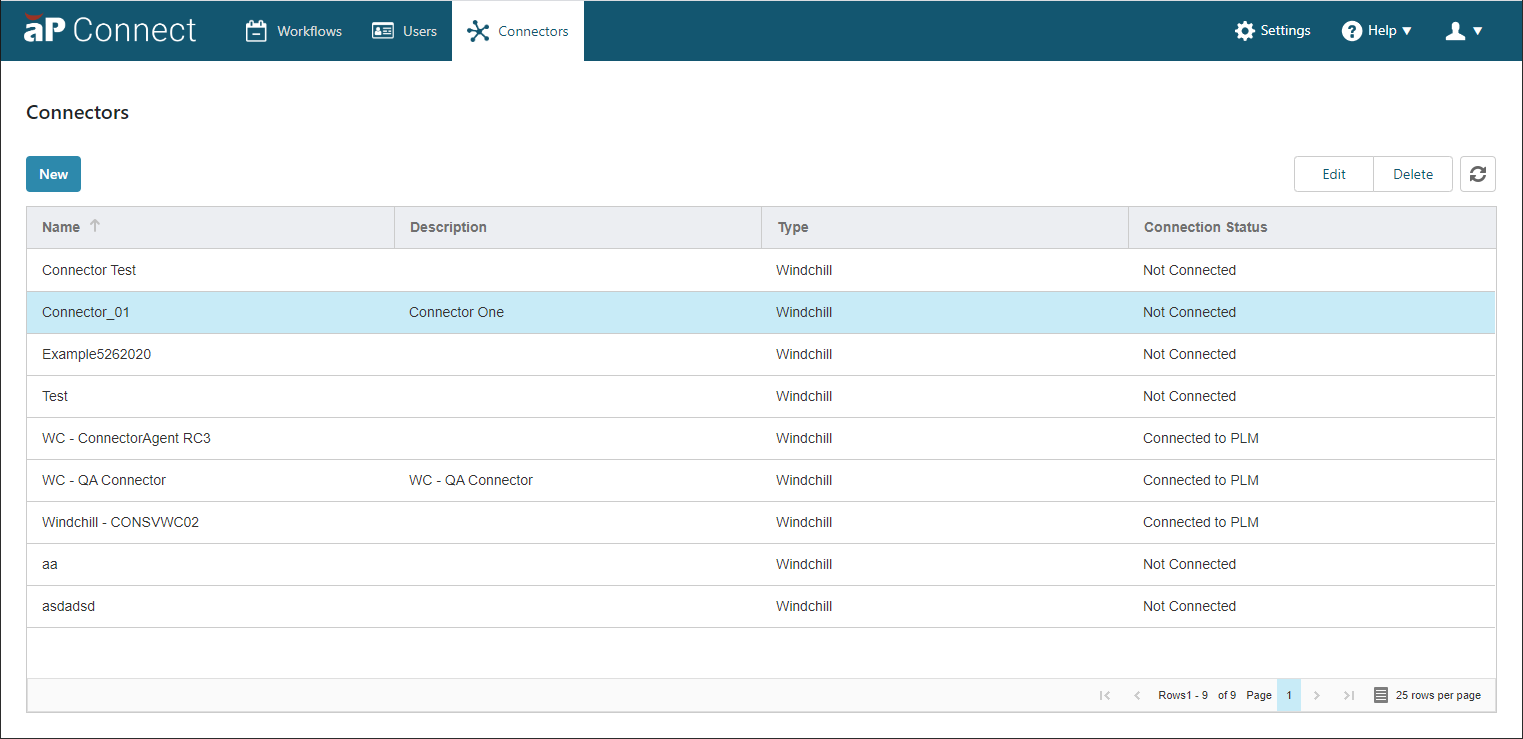
The table on the Connectors page includes these column headings
- Name – Name of the Connector as specified in the Connector details settings
- Description – Description of the Connector if specified in the Connector details settings
- Type – Type of PLM system that the Connector communicates with.
- Connection Status – State of the connections between the aP Connect, the Agent, and the PLM system. The options are:
- Connected to PLM – aP Connect is able to communicate with the Agent and the Agent is able to communicate with the PLM system.
- Connected to Agent – aP Connect is able to communicate with the Agent, but the Agent is not able to communicate with the PLM system.
- Not Connected – aP Connect is not able to communicate with the Agent.
You can:
- Refresh the Connector table. To refresh the table, click ,
-
Sort the rows in the table. To sort the rows, click the right side of any of the column headings.
Note:
When you sort the rows, the sorting is not strictly alphanumeric. The case of the characters in each field affect the sorting order. All rows that contain strings that start with an uppercase character are grouped together, as are all rows that contain strings that start with a lowercase character.
-
Change the order of the column headings by dragging and dropping a column heading.
- Change the width of a column by pulling the edges of the column heading.
- Using the page menu in the lower right corner of the table to navigate to another page or to adjust the table to include 5, 10, 25, 50, or 100 rows per page.
- Using a Workflow Schedule that is Based on Minutes
- There is one option for a schedule frequency based on Minutes.
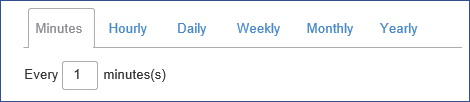
- The start time is constant at 00:00:00.
-
In variable terms, the Workflow is scheduled to run every x minutes, where x is a positive integer and the default value for x is 1.

-
Therefore, by default, the Workflow starts the first run at 00:00:00 the morning after it is enabled. The second run starts at 00:01:00 (12:01 am) and a new run starts at one-minute intervals thereafter.
- To change the schedule, enter a different number in the dialog box. For example, to schedule a Workflow run to start every twenty minutes, enter
20in the dialog box. Per the new value, the Workflow starts the first run at 00:00:00 the morning after it is enabled. The second run starts at 00:20:00 (12:20 am) and a new run starts at twenty-minute intervals thereafter.