Create a Workflow
To create a Workflow, you name the Workflow, select a Connector, define a query, and configure actions. You can also enter a Workflow description, enable or disable the Workflow, configure a schedule, and specify mapping rules and default for certain costing inputs.
Prerequisites for Creating an aP Connect Workflow
Before you can create a Workflow, you must create an aP Connect Connector that maps your PLM attribute fields to aP Connect fields.
Step 1. Configure the Workflow Details Settings
The Details settings include the name description (optional), Connector, state, and schedule for the Workflow.
-
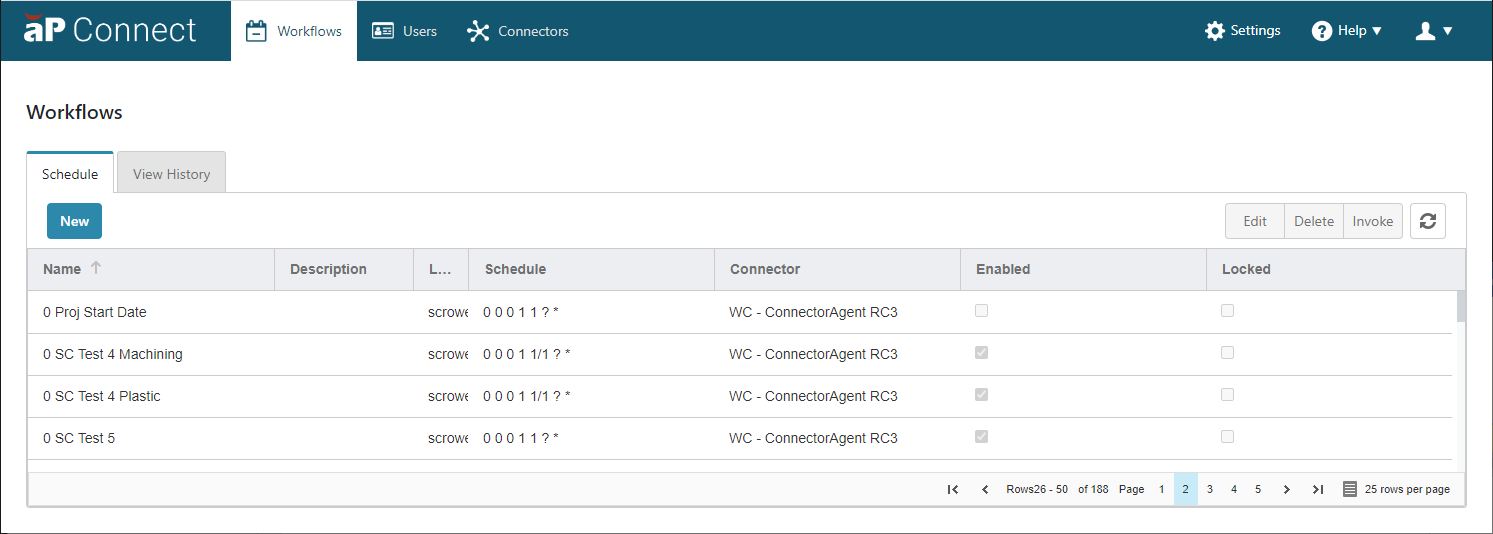
In the aP Connect header bar, click Workflows.
The Workflows page opens.
-
In the Schedules tab, click New.
The Create a New Workflow window opens to the Details settings:

The Next button is enabled only if you enter a valid, unique Name and select a Connector.
-
Enter a valid, unique Name for the Workflow.
Note:
The minimum character length for a Workflow name is one. The maximum character length for a Workflow name is 64. Only alphanumeric characters, underscores, hyphens, and spaces are valid Workflow name characters.
-
Optionally, enter a Description for the Workflow.
-
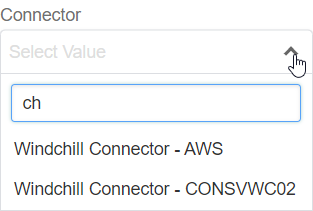
From the Connector dropdown menu, select the Connector for aP Connect to use to connect to the PLM or File System Agent.
As required, use the Search box to filter the list of available Connectors. To filter the list, start entering the name, or any part of the name of the Connector that you are searching for. Search terms are not case sensitive.
For example, as the figures show, entering "ch" in the Search box filters the list of Connectors to those that contain the term "ch"
-
As required, select a method by which the WorkFlow selects components. The options that are available depend on the type of Connector that selected. If the Connector is a:
- PLM System Connector – The Workflow can select components by using either a Query Definition or a REST API Request.
- File System Connector the Workflow selects components from an Input Spreadsheet.
-
Select an automation state for the Workflow by selecting or clearing the Enabled option. If the Enabled option is:
- Selected – The Workflow is enabled to run automatically. aP Connect runs the Workflow in accordance with the designated schedule.
-
Cleared – The Workflow is not enabled to run automatically. aP Connect does not run the Workflow in accordance with the designated schedule.
The default value is selected.
Note:
You can invoke, that is manually run, a Workflow regardless of whether the Enabled option is selected or cleared.
-
Configure a schedule for the Workflow. aP Connect provides seven different frequencies for configuring Workflow schedules: Minutes, Hourly, Daily, Weekly, Monthly, and Yearly. You can configure more than one schedule frequencies for a Workflow, but only the schedule frequency on the tab that is selected in the Details settings is operational.
The default schedule frequency is Daily.
NOTES
-
If you invoke a Workflow, the Workflow runs immediately, regardless of:
-
The schedule designated by the active schedule frequency tab
- Whether the Workflow schedule is enabled
- aP Connect runs the Workflow automatically only if the Workflow is enabled.
- More than one run of a Workflow can occur at any given time. For example, if a Workflow is scheduled to run at the start of every hour, but it takes 1.5 hours to complete a run, a second run will start while a first run is 30 minutes from completion.
-
-
Set the desired, configured schedule to active by selecting the tab that displays that schedule. Then, click Next. The Query Definitions settings open.
Note:
If a required field in the Details settings is incomplete, the Next buttons is disabled.
Step 2. Define a Workflow Query
For a PLM integration, you must define a Workflow query. For a File System integration, you need not and cannot define a Workflow query; skip this step.
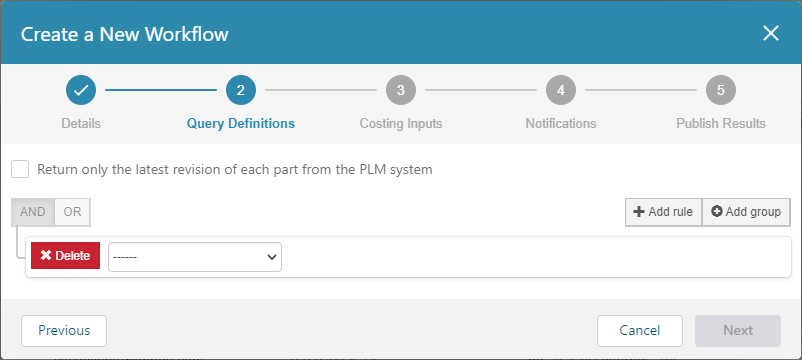
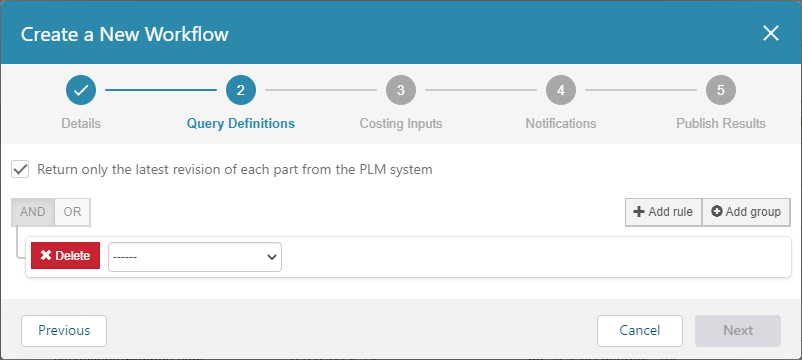
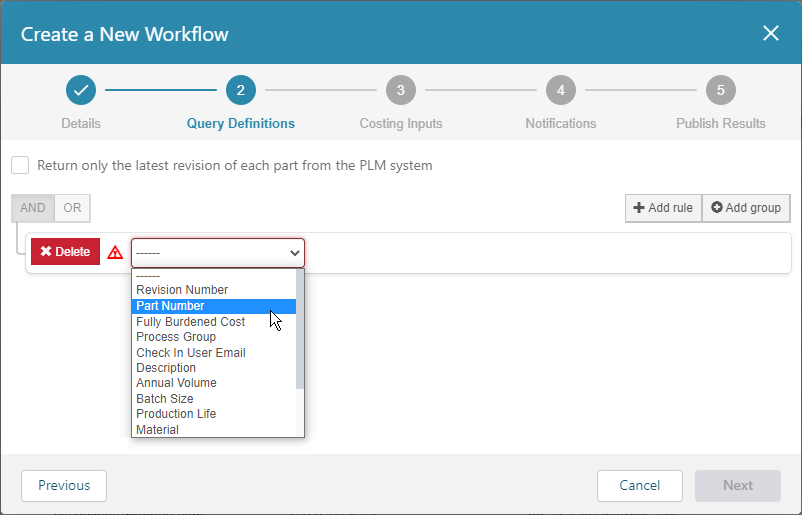
The figure shows the Query Definitions settings.
NOTES
- You can open the Query Definitions settings only if a name is specified and a Connector is selected in the Details settings for the Workflow.
- The AND operator is the default operator.
- Joins are disabled until more than one query statement is added.
- The Next button is enabled only if at least one query statement is created.
- To delete a statement, click the X Delete button that appears to the left of the statement.
- aP Connect supports Workflow queries that are defined using attributes of these data types only: Int, Real, Reference, String, and Date & Time. aP Connect does not yet support queries that are defined using attributes of these data types: Time, Boolean, Real with Units, or URL. If a query statement includes an attribute of an unsupported data type, the query, and thus the associated job, fail.
-
Optionally, select the check box to return on the latest revision of each part from the PLM system.
-
From the attribute dropdown menu, select the name of the aP Connect Field that you want to query. The dropdown menu contains all of the fields that are mapped in the Connector that is associated with the Workflow.
For each mapped field of data type Date Time, there is an additional operator. For more information, see Using the Date Time Data Type and the Days Elapsed Since <DateTime Field>Attribute.
-
From the operator dropdown menu, select an operator.
The operators that are available depend on the Data Type of the attribute.
-
The criteria value also depends on the Data Type of the attribute. For string, real, integer, and email data types, enter a value. For a Date Time data type click within the dialog box (or dialog boxes, for the between and not between operators) and then use the calendar and clock that appear to select the date and time.

-
As applicable, click AND, OR, + Add Rule, and + Add group to define a query that returns all the components that you want the Workflow to cost.
-
Click Next. The Costing Inputs settings open.
Note:
If a required field in the Query Definitions settings is incomplete, the Previous and Next buttons are disabled.
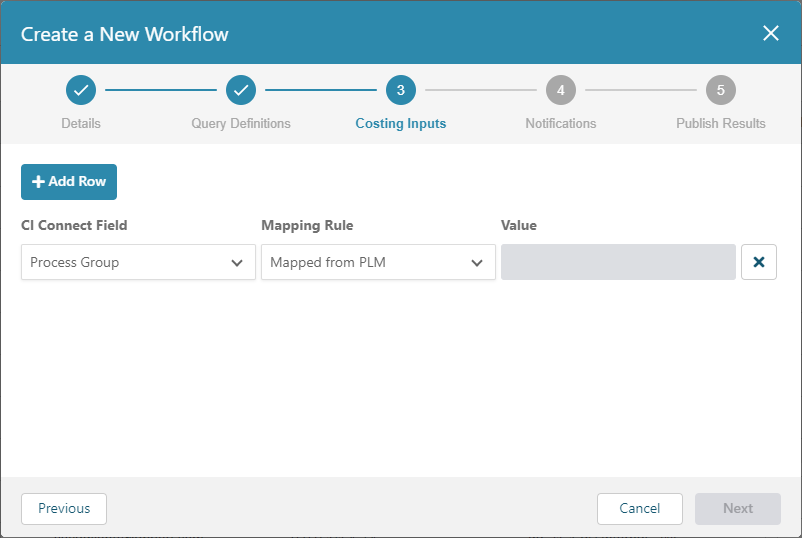
Step 3. Configure the Costing Inputs Mapping Rules (Optional)
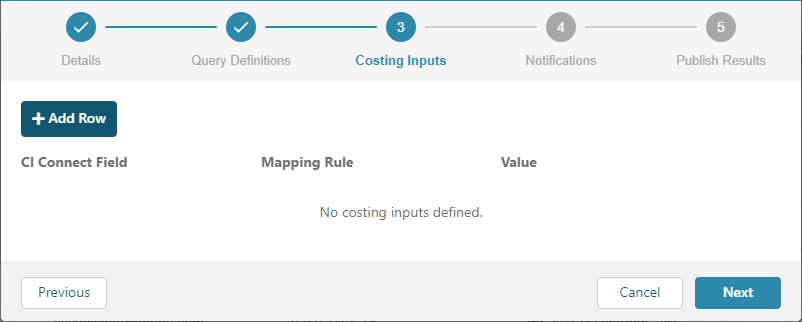
The figure shows Costing Inputs settings.
Notes
- For a PLM integration, you can open the Costing Inputs settings only after you write at least one query statement for the Workflow.
- For a File System integration, you can open the Costing Inputs settings only if a name is specified and a Connector is selected in the Details settings for the Workflow.
- The Next button is enabled even if you do not configure any mapping rules for the costing inputs because doing so is optional. However, if you start to add a mapping rule, the Next button is disabled until you either complete or delete the rule.
- To delete a rule, click the X button that appears to the right of the rule.
-
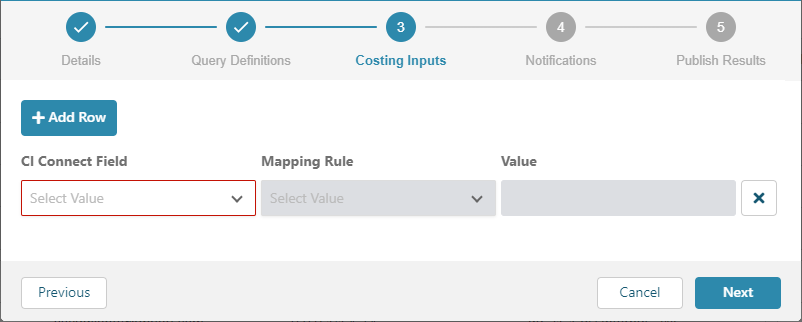
Click +Add Row.
A row of input boxes appears.
-
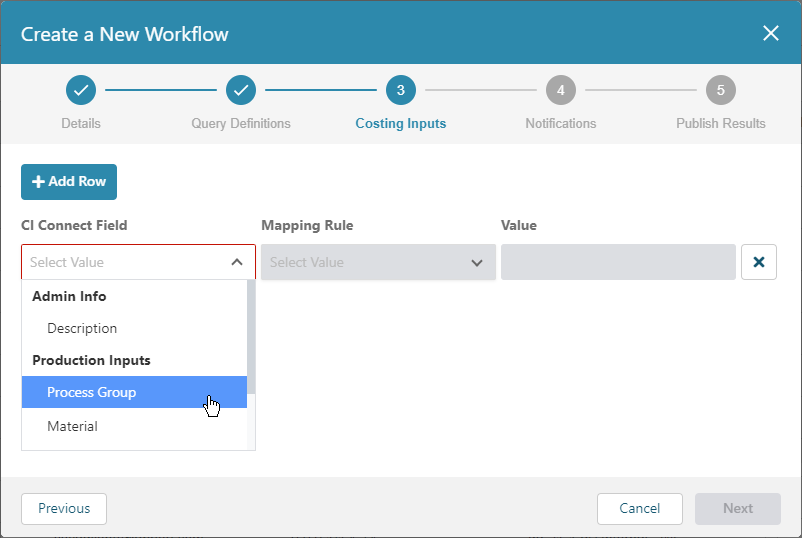
Select a aP Connect Field from the dropdown menu of the first input box.
-
Select a Mapping Rule from the dropdown menu of the second input box.
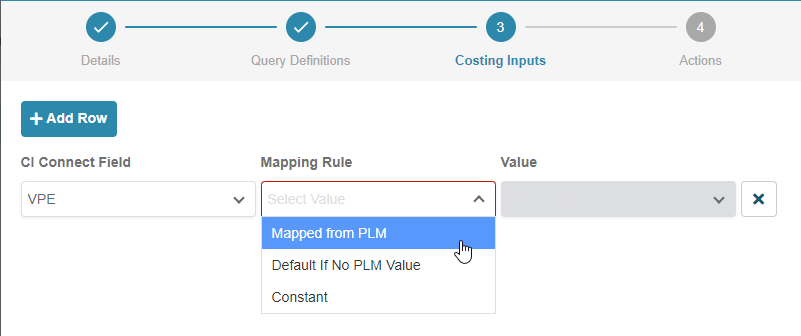
The options that appear in the dropdown menu depend on whether the aP Connect Field is mapped in the Connector that is associated with the Workflow. The potential options are:
- Mapped from PLM – Always use the value from the mapped PLM field. This option is available only if the aP Connect Field is mapped in the associated Connector.
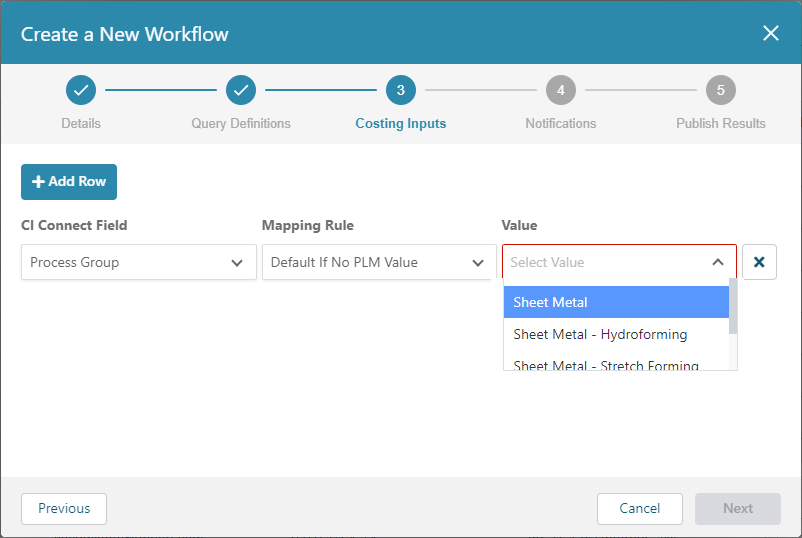
- Default if No PLM Value:
- If there is no value in the mapped PLM field, use the value that is specified in the Costing Input settings of the Workflow.
- If there is a value in the mapped PLM field, use that value.
-
This option is available only if the aP Connect Field is mapped in the associated Connector.
Constant – Always use the value specified in the Costing Inputs settings of the Workflow. This option is available even if the aP Connect Field is not mapped in the associated Connector.
-
As required, select or enter a Value to apply to the mapping rule. For standard attributes with predefined values, you can select the value from a dropdown menu. For all other fields, you enter a value.
-
As desired, configure mapping rules for additional Costing Inputs.
-
Click Next.
Note:
If a required field in the Costing Inputs settings is incomplete, the Previous and Next buttons are disabled.
Step 4. Configure the Workflow Notifications Settings
Notifications are optional but extremely useful for communicating information and issues about Workflow jobs and outputs to members of your team, key stakeholders, and System Administrators.
There are the following types of notification:
- DFM Part Summary notifications
- Configurable Summary
- Job monitoring notifications The notifications are sent via email to the recipients that are specified in the Notifications settings.
If you configure a Workflow to send a DFM Part Summary notification email, you can also configure the Workflow to generate and attach a report to the email.
You can also build a filter that determines which components are included in the DFM Part Summary notification email or the attached report.
The Configurable Summary template allows you to select the fields you want to view in the notification.
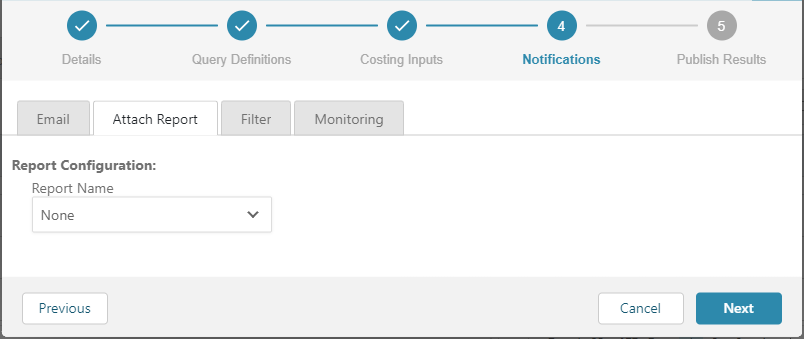
The figure shows the default states of the Email, Attach Report, Filter, and Monitoring tabs in the Notifications settings.
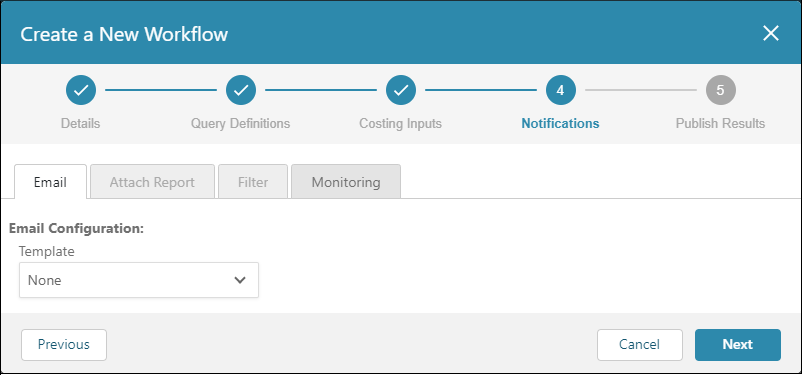
The Notifications settings includes these tabs:
- Email – Specify the template, recipients, and cost settings for an email that contains a DFM Part Summary. If you are attaching a report to the email, specify the email recipients and configure how the cost is displayed in the report. For a Configurable Summary email, specify the recipients, the scenario, and up to five configurable fields.
- Attach Report – Optionally, configure and attach either a single or multiple part report to the notification email.
- Filter – Optionally, create a filter that determines which components are included in the DFM Part Summary or in an optionally attached multiple part report.
-
Monitoring – Configure a Workflow to send a job monitoring notification email
Note:
If a required field on any tab in the Notifications settings is incomplete, the Previous and Next buttons are disabled.
Configure the Settings on the Email Tab
The settings on the Email tab allow you to configure the Workflow to generate and send a DFM Part Summary or Configurable Summary notification email to your team members or other stakeholders. For more information about the DFM Part Summary report, see Workflow Generated Reports.
- Open the Email tab.
-
Expand the Template dropdown menu and select one of the following:
DFM Part Summary
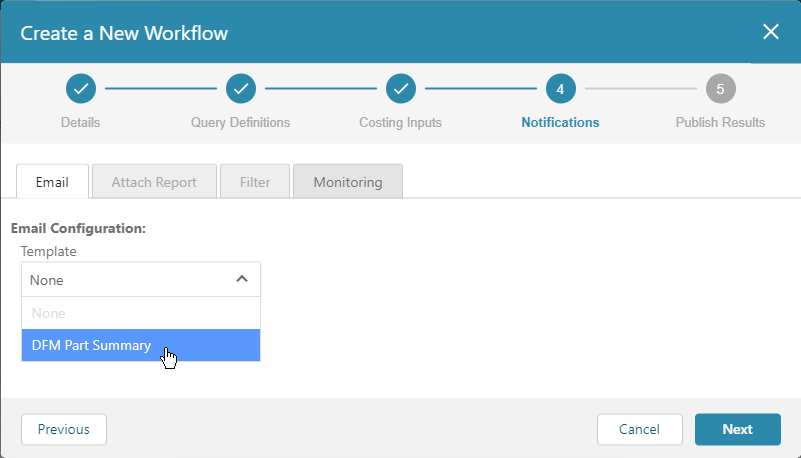
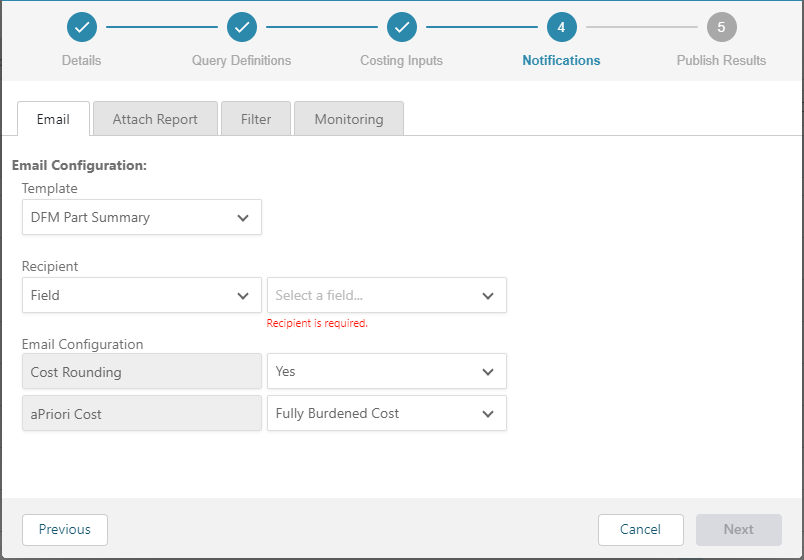
The settings that appear when you select DFM Part Summary for the email Template allow you to:
- Specify a Recipient for the email.
- Select whether to round the cost that displays in the DFM Part Summary that appears in the email to the nearest integer or to the second decimal place.
- Select between displaying the Fully Burdened Cost, Piece Part Cost, or Material Cost in the DFM Part Summary.
-
Configure the Workflow to generate and attach a report to the email.
Configurable Summary
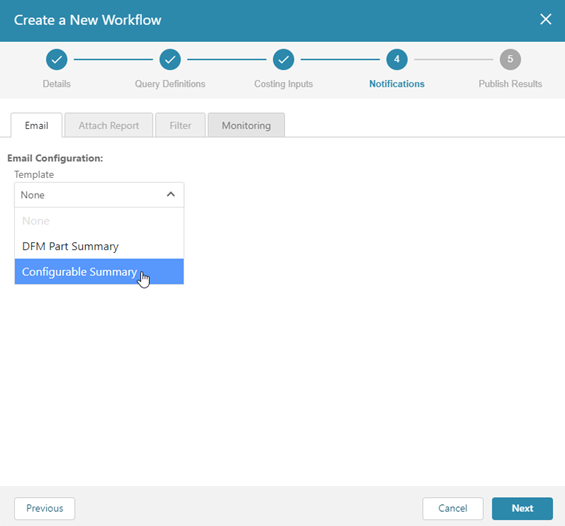
The settings that appear when you select Configurable Summary for the email Template allow you to:
- Specify a Recipient for the email.
- Select whether to round the cost that displays in the Configurable Summary that appears in the email to the nearest integer or to the second decimal place.
- Select a scenario.
-
Select up to five configurable Fields. For each Field you use a drop-down list to select the input and output options under the following categories: PLM System, Admin Info, Production Inputs, Costing Outputs, and Additional Info (and User Defined Attributes, depending on the UDAs defined in your system).
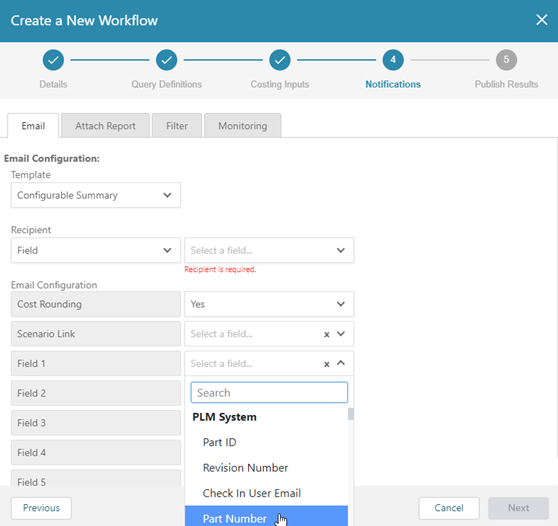 The input and output options become the table column headings in the notification email. The options that are available for selection in each category are as follows:
PLM System fields
- Part ID
- Revision Number
- Check in User Email
- Part Number
- CAD File Name
- Sequence Id
- Part Name
Admin Info fields
- Description
Production Inputs fields
- Process Group
- Material
- Annual Volume
- Batch Size
- Production Life
- Digital Factory
- Target Cost
- Target Mass
- Machining Mode
Costing Outputs fields
- Capital Investment
- Fully Burdened Cost
- Material Cost
- Labor Time
- Finish Mass
- Rough Mass
- Utilization
- DFM Risk Rating
- Currency Code
- Costing Result
- Cycle Time
- DFM Risk Score
- Piece Part Cost
- Material Carbon
- Process Carbon
- Logistics Carbon
- Total Carbon
- Annual Manufacturing Carbon
Additional Info fields
- Status Details
- Component Type
- Process Routing
User Defined Attributes (UDA) fields
- These depend on the user defined attributes that are defined in your environment.
-
Specify a Recipient for the email. The setting on the left specifies the source of the Recipient value while the setting on the right specifies the Recipient value.
The dropdown list in the Recipient value source setting contains two options: Field and Constant.
Select Field if you want to specify the recipient by selecting a aP Connect Field that is mapped, in the associated Connector, to a PLM Field with the Email data type attribute.
For example, the figures show the Standard Fields and Additional Fields tabs in the Mappings settings for a Connector.
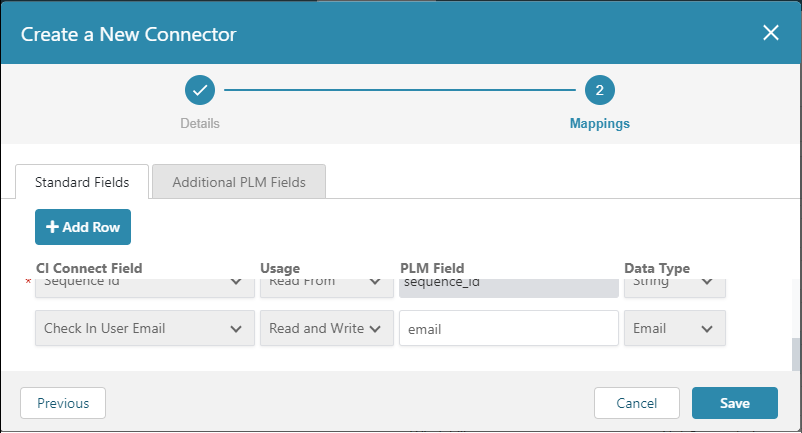
On the Standard Fields tab, the Check In User Email field in aP Connect maps to email field in the PLM system and has the Data Type for the mapping set to Email.
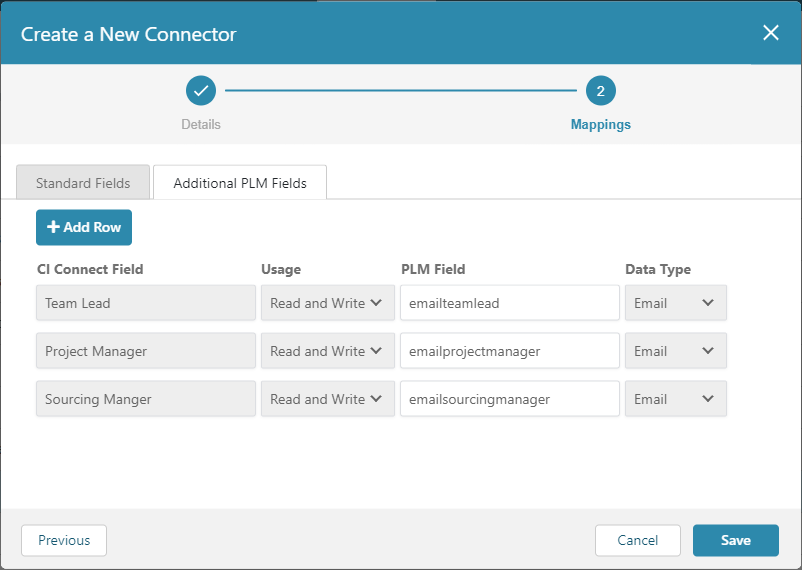
On the Additional PLM Fields tab, the Team Lead, Project Manager, and Sourcing Manager fields in aP Connect each map to an email field in the PLM system and have the Data Type for the mappings set to Email.
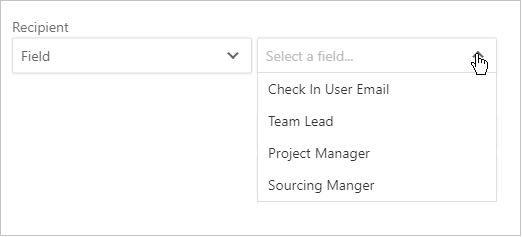
As this figure shows, for a Workflow that uses this Connector, if the Recipient source setting is set to Field, then the dropdown menu for the Recipients value setting contains the mapped aP Connect fields, Check In User Email, Team Lead, Project Manager, and Sourcing Manager.
Select Constant for the Recipient source setting if you want to enter a Recipient value manually. For example, this figure shows a manually entered email address.

To configure the workflow to send the email to more than one address, enter a series of comma-separated email addresses.
-
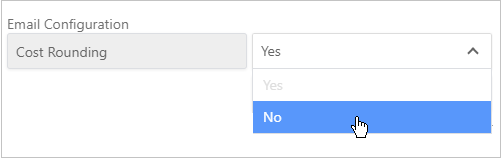
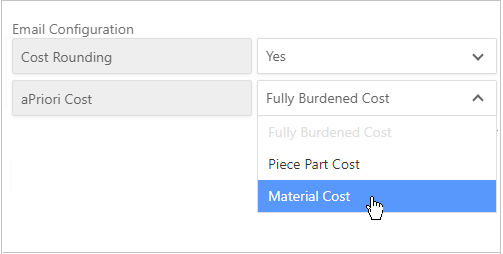
The Cost Rounding setting determines whether the cost that is displayed in the report that appears in the generated email is rounded to the nearest integer. For the default setting, Yes. the displayed cost is rounded to the nearest integer.
To not round the displayed cost to the nearest integer, change the Cost Rounding setting from Yes to No.
-
For the DFM Part Summary report, the aPriori Cost setting determines which cost is displayed in the DFM Part Summary report that appears in the generated email. The options are:
- Fully Burdened Cost
- Piece Part Cost
- Material Cost
To change from the default option, Fully Burdened Cost, select a different option from the drop down menu.
After you configure the settings on the Email tab, to:
- Configure the Workflow to attach a report to the email, open the Attach Report tab.
- Create a Filter for the notification or an attached report, open the Filter tab.
- Create a Job Monitoring notification email, open the Monitoring tab.
- Configure the Workflow to write data or attach a report to your PLM or File System, click Next.
-
Return to Costing Inputs settings, click Previous.
Note:
If a required field on any tab in the Notifications settings is incomplete, the Previous and Next buttons are disabled.
Configure the Settings on the Attach Report Tab
If you configure a workflow to send a DFM Part Summary notification email, you can attach a report to the email. For more information about the reports, see Workflow Generated Reports.
Note:
If you do not configure a workflow to send a DFM Part Summary notification email, the Attach Report tab is disabled.
Generate and attach a report to the email
-
Open the Attach Report tab.
-
Expand the Report Name dropdown menu, select the type of report that you want the Workflow to generate and attach to the email, and then, as required, configure the report using the Report Configuration settings.
If you select:
- Part Cost [SSR] or Part Carbon [SSR], there are no Report Configuration settings.
-
DTC Part Summary [CIR], the Report Configuration settings are:
- Currency Code – Three-letter code that determines the currency that the cost in the report is displayed in. Select a from the options that are available in the dropdown menu.
- Cost Rounding – Option to round the cost that displays in the report to the nearest integer. To round the displayed cost to the nearest integer, select Yes. Otherwise, select No.
-
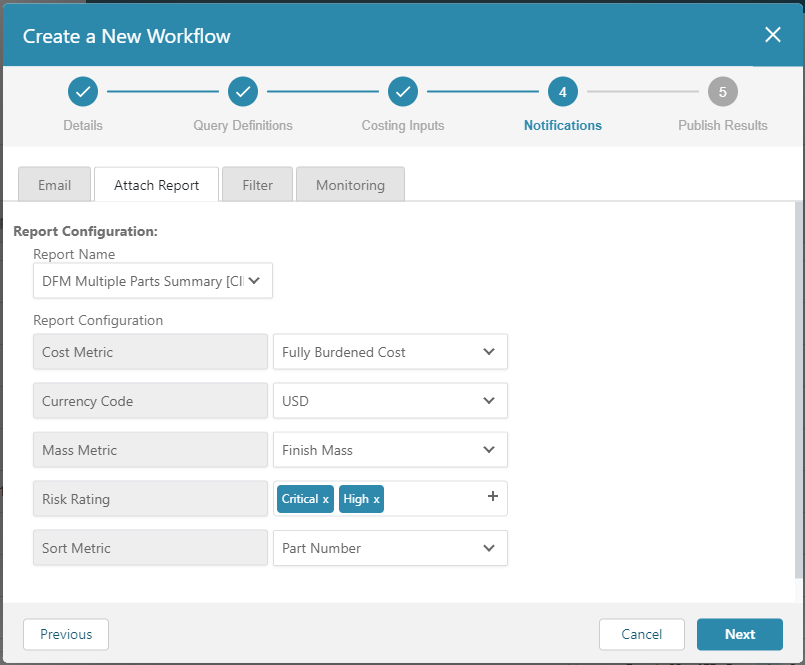
DFM Multiple Parts Summary [CIR], the Report Configuration settings are:
- Cost Metric – Option to display the cost in the report as either the Fully Burdened Cost or the Piece Part Cost.
- Currency Code – Three-letter code that determines the currency that the cost in the report is displayed in. Select a from the options that are available in the dropdown menu.
- Mass Metric – Option to display the mass in the report as either the Rough Mass or the Finish Mass.
-
Risk Rating – Option to filter the components in the report to those with Critical, High, Medium, or Low DFM Risk Ratings. To filter the components in the report, select one, two, three, or four ratings. To include all components, regardless of DFM Risk Rating, in the report, select All.
Note:
DFM Risk Ratings are calculated only for components with DTC-supported processes groups.
-
Sort Metric – Option to sort the components in the report by Part Number, Process Group, or Risk Rating.
Note:
DFM Risk Ratings are calculated only for components with DTC-supported processes groups.
This figure shows the Attach Report settings for a Workflow that attaches a DFM Multiple Parts Summary report for components that meet the query definition criteria of the Workflow, use a process group that is supported for Design to Cost (DTC) analysis and have a Critical or High Design for Manufacture (DFM) risk.
After you configure the settings on the Attach Report tab, to:
- Reconfigure the settings for the DFM Part Summary notification email, open the Email tab.
- Create a Filter for the notification or an attached report, open the Filter tab.
- Create a Job Monitoring notification email, open the Monitoring tab.
- Configure the Workflow to write data or attach a report to your PLM or File System, click Next.
- Return to Costing Inputs settings, click Previous.
Note:
If a required field on any tab in the Notifications settings is incomplete, the Previous and Next buttons are disabled.
Configure the Settings on the Filter Tab
You can build a filter that determines which of the components that are process by the Workflow are included in the summary. If you also configure the workflow to attach a report to the email, you can apply the filter to the report as well. You also have the option of applying the filter to just the notification email or just the attached report.
Note:
If you do not configure a workflow to send a DFM Part Summary notification email, the Attach Report tab is disabled.
Build and apply a filter to the notification email or attached report
-
Open the Filter tab.

-
To apply the filter, select the Email check box. To apply the filter to the attached report, select the Attach Report check box. To apply the filter to both the Summary and the attached report, select both checkboxes.
- Build the first query statement by using the AND operators. For the first two fields in the statement, select a property and an operator from the dropdown menus. For the third field in the statement, specify a value. To add additional statements and to nest statements or groups of statements, use the AND, OR, Add rule, and Add groups buttons, and nesting.
After you configure the settings on the Attach Report tab, to:
- Reconfigure the settings for the notification email, open the Email tab.
- Configure the settings for an attached report, open the Attach Report tab.
- Create the settings for a Job Monitoring notification email, open the Monitoring tab.
- Configure the Workflow to write data or attach a report to your PLM or File System, click Next.
- Return to Costing Inputs settings, click Previous.
Configure the Settings on the Monitoring Tab
-
Open the Monitoring tab.
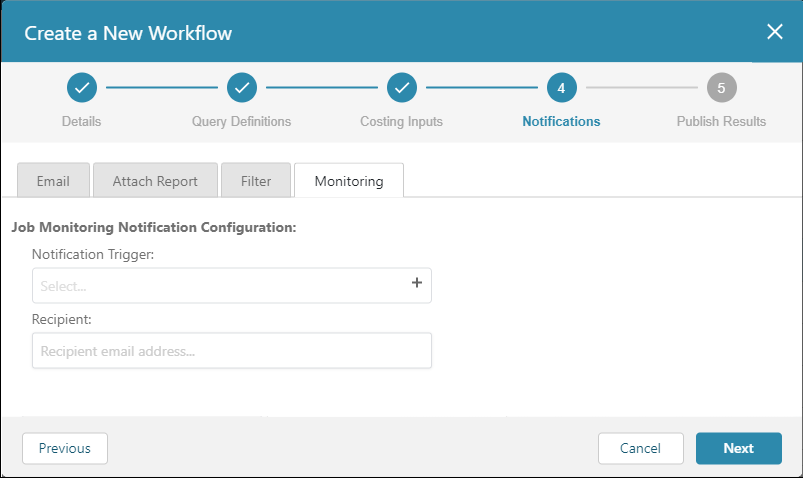
-
From the Notification Trigger dropdown menu, select one or more of these options as triggers for the job monitoring notification process:
- Failed Job – Job that ends in an errored state
- Errored Components – Job that ended in a non-errored state with one or more components that failed
- No Errored Components – Job that ended in a non-errored state with zero components that failed
-
For Recipient, enter a single email address or, for multiple recipients, a comma separated list of email addresses.
After you configure the settings on the Monitoring tab, to:
- Configure the settings for the DFM Part Summary notification email, open the Email tab.
- Configure the settings for an attached report, open the Attach Report tab.
- Create a Filter for the DFM Summary Report notification or an attached report, open the Filter tab.
- Configure the Workflow to write data or attach a report to your PLM or File System, click Next.
-
Return to Costing Inputs settings, click Previous.
Note:
If a required field on any tab in the Notifications settings is incomplete, the Previous and Next buttons are disabled.
Step 5. Configure the Workflow Publish Results Settings
The Publish Results settings enable you to configure the Workflow to write data or generate and attach reports to your PLM or File System.
You can write data or attach reports only to fields that are mapped, with Usage set to Write To or Read and Write, from your PLM or File System to an aP Connect Field in the Mappings settings of the connector that is associated with the Workflow. For more information, see Connector Mappings.
You can attach a report to your PLM or File System even if you choose not to write data to it. You can also filter the components that you write data or generate and attach reports to.
Note:
On each tab, the Save button is enabled by default. If you start to configure the settings on a tab, the Save button is disabled until you either complete or revert the configuration.
You can also create a filter that determines which of the Workflow processed components in your PLM or Files System have data written to them or a report attached to them. You can apply the filter to the writing of fields or the attaching of reports.
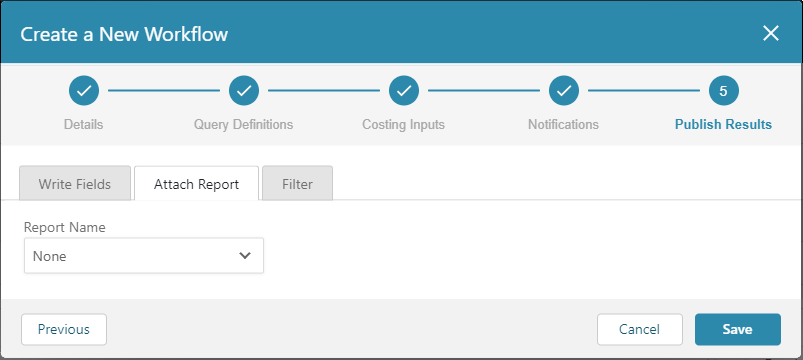
The figure shows the default states of the Write Fields, Attach Report, and Filter tabs in the Publish Results settings.
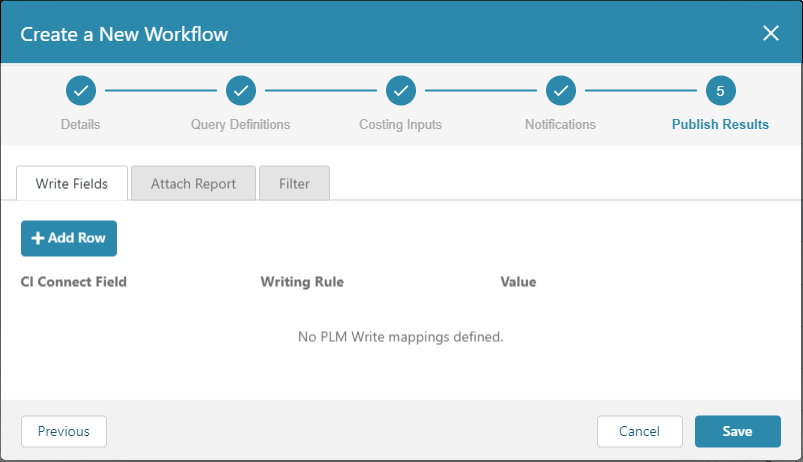
The Publish Results settings includes these tabs:
- Write Fields – Specify the fields that you want to write data to and choose between writing the Workflow generated value or a specified constant value.
- Attach Report – Optionally, configure and attach a single part report to your PLM or File System.
- Filter – Optionally, create a filter that determines which components have data written to them and reports generated about them.
Configure the Settings on the Write Fields Tab
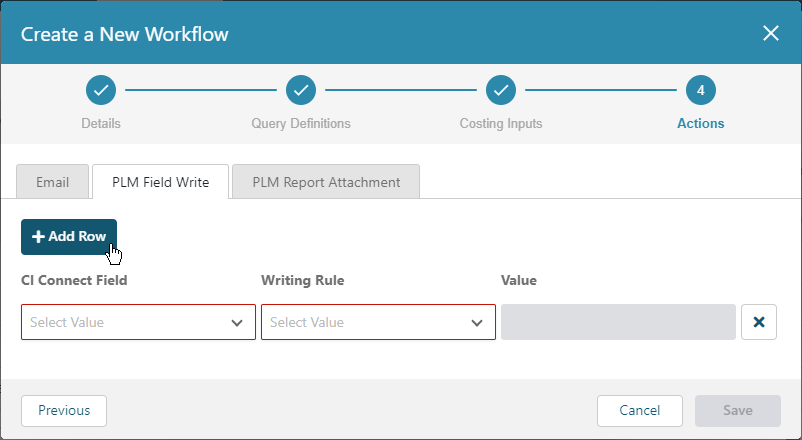
The settings on the PLM Field Write tab allow you to configure the Workflow to write data to mapped fields in your PLM system.
Note:
You can write data to a PLM field only if it is mapped to an aP Connect field and has the Usage set to Write to or Read and Write in the Mappings settings of the Connector that is associated with the Workflow. For more information, see Connector Mappings.
-
Open the PLM Field Write tab.
-
Click +Add Row
-
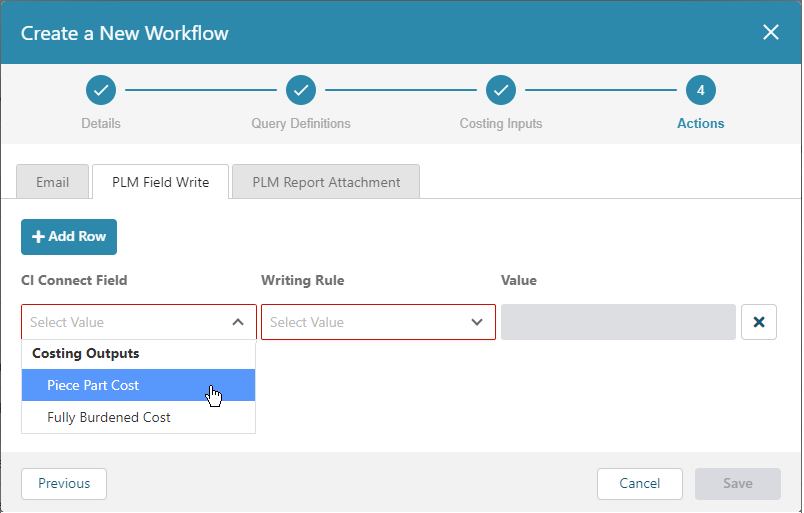
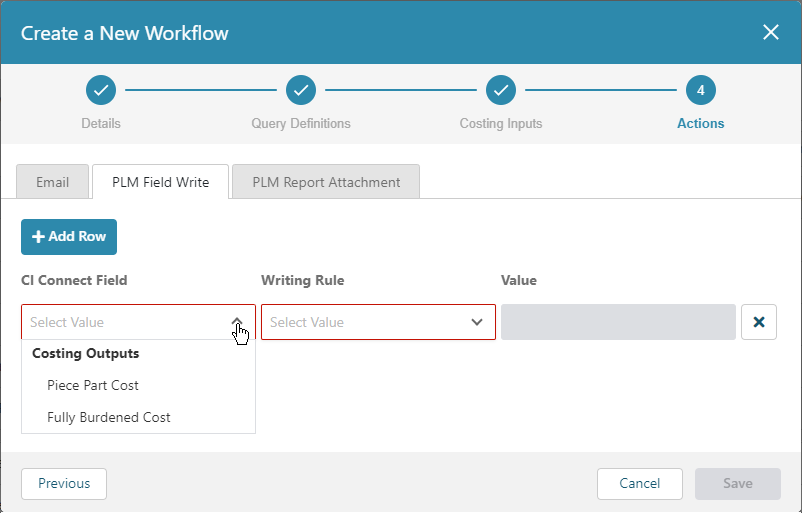
From the aP Connect Field dropdown menu, select a costing output attribute that you want to write to the PLM system.
Note:
Only fields that are mapped in the Connector that is associated with the Workflow and have Usage set to Write to or the Read and Write appear in the aP Connect Field dropdown menu.
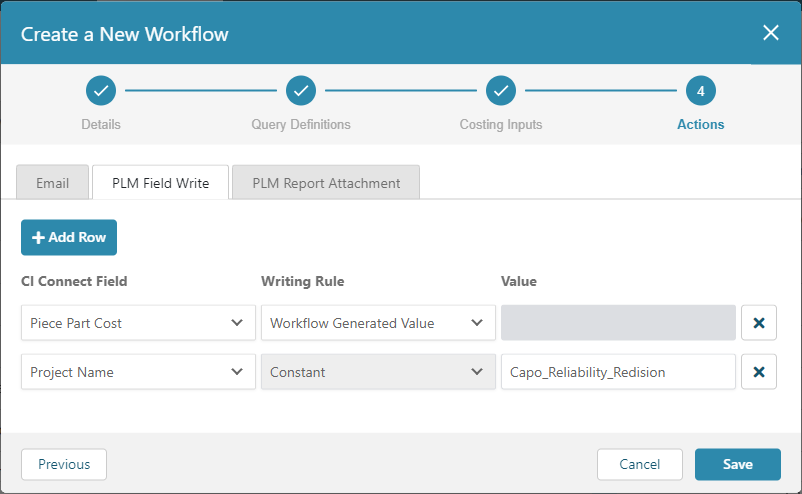
For example, the connector in the figure maps three aP Connect Fields, Piece Part Cost, Fully Burdened Cost, and Utilization, to PLM Fields. Only the Piece Part Cost and Fully Burdened Cost fields have Usage set to Write to or the Read and Write.
 Therefore, for any Workflow that uses the connector, in the Publish Results settings, on the PLM Field Write tab, the dropdown menu for the aP Connect Field contains only the Piece Part Cost and Fully Burdened Cost fields.
-
Select a Writing Rule.

There are two options for each aP Connect Field that you add:
- Constant – aP Connect writes back the value that you enter. If you select this option, you must also enter a value.
- Workflow Generated Value – aP Connect writes back the value that is determined by the costing analysis.
For example, for the Workflow in this figure no Value is specified for the Piece Part Cost field because the Writing rule for the field is set to Workflow Generated Value. On the other hand, a Value is specified for the Project Name field because the Writing rule for the field is set to Constant.
-
To configure the Workflow to write data to more fields in your PLM system, click +Add Row, select a aP Connect Field, a Writing Rule, and as applicable, specify a Value.
-
To delete a row, click the X button that appears at the end of the row.
After you configure the settings on the Write Fields tab, to:
- Configure the settings for attached reports, open the Attach Report tab.
- Create a filter that determines which of the Workflow processed components in your PLM or Files System have data written to them or a report attached to them, open the Filter tab.
- Return to Notifications settings, click Previous.
-
Save the Workflow and close the window, click Save.
Note:
If a required field on any tab in the Publish Reports settings is incomplete, the Previous and Save buttons are disabled.
Configure the Settings on the Attach Report Tab
The settings on the Attach Report tab allow you to configure the Workflow to attach a report to your PLM or File system on a part-by-part basis.
-
Open the Attach Report tab.
-
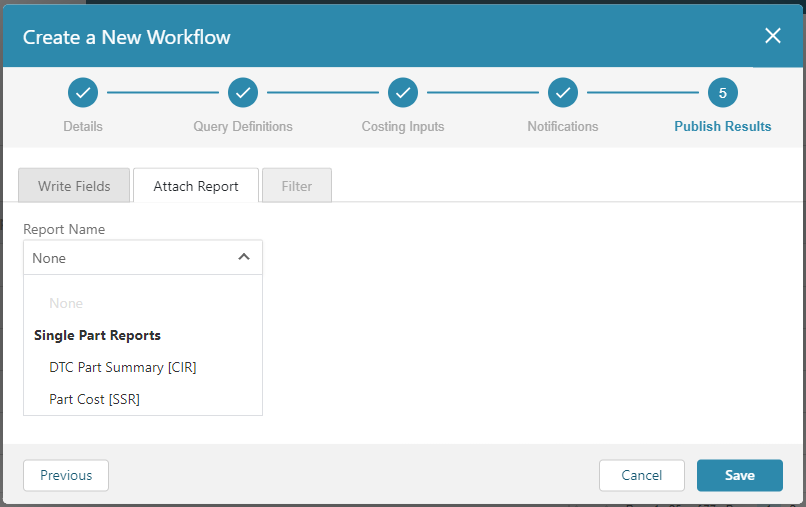
To generate and attach a report to components in your PLM or File System, expand the Report Name dropdown menu and select the type of report that you want the Workflow to generate and attach to the email. For more information about the report options, see Workflow Generated Reports.
Note:
The DFM Multiple Parts Summary [CIR] is not an option for PLM report attachments because it contains data for multiple parts.
If you select:
- Part Cost [SSR] or Part Carbon [SSR], no further configuration is required for the PLM Report Attachment tab.
-
DTC Part Summary [CIR], configure these Report Configuration settings:
-
Currency Code – Three-letter code that determines the currency that the cost in the report is displayed in. Select a from the options that are available in the dropdown menu.
- Cost Rounding – Option to round the cost that displays in the report to the nearest integer. To round the displayed cost to the nearest integer, select Yes. Otherwise, select No.
After you configure the settings on the Attach Report tab, to:
- Configure the settings for writing fields to your PLM or File System, open the Write Fields tab.
- Create a filter that determines which of the Workflow processed components in your PLM or Files System have data written to them or a report attached to them, open the Filter tab.
- Return to Notifications settings, click Previous.
- Save the Workflow and close the window, click Save.
Note:
If a required field on any tab in the Publish Reports settings is incomplete, the Previous and Save buttons are disabled.
Configure the Settings on the Filter Tab
If you configure a workflow to write fields or attach a report to your PLM or File System, you can build a filter that determines which of the components that are processed by the Workflow have fields written or reports attached to them.
Note:
If you do not configure a workflow to write fields or attach reports to your PLM or File System, the Filter tab is disabled.
Build and apply a filter to the notification email or attached report:
-
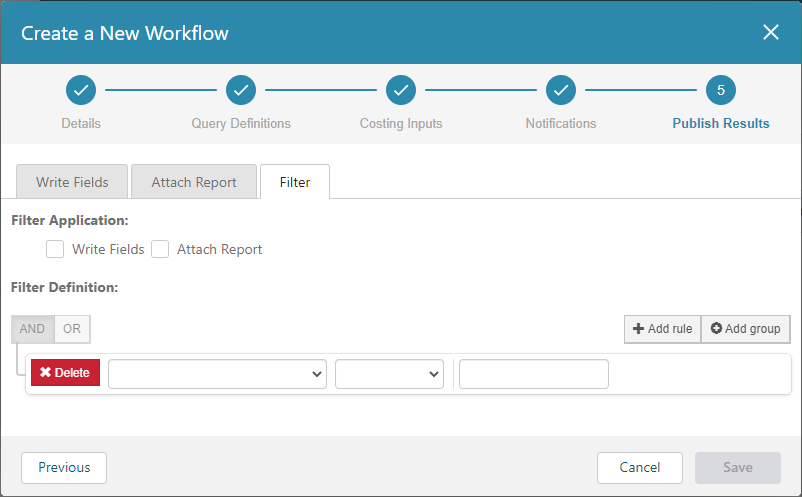
Open the Filter tab.
Note:
If you do not configure a workflow to write fields to your PLM or File System, the Write Fields checkbox is disabled. If you do not configure a workflow to attach a report to your PLM or File System, the Attach Report checkbox is disabled.
-
To apply the filter to field writing, select the Write Fields check box. To apply the filter to the attached reports, select the Attach Report check box. To apply the filter to both the field writing and the attached reports, select both checkboxes.
- Build the first query statement by using the AND operators. For the first two fields in the statement, select a property and an operator from the dropdown menus. For the third field in the statement, specify a value. To add additional statements and to nest statements or groups of statements, use the AND, OR, + Add rule, and + Add groups buttons, and nesting.
After you configure the settings on the Filter tab, to:
- Configure the settings for writing fields to your PLM or File System, open the Write Fields tab.
- Configure the settings for attached reports, open the Attach Report tab.
- Return to Notifications settings, click Previous.
- Save the Workflow and close the window, click Save.
Note:
If a required field on any tab in the Publish Reports settings is incomplete, the Previous and Save buttons are disabled.