Advanced Support for Assemblies
Support for Native CAD Assembly Files
Create, update, edit, cost, and publish assembly scenario.
In Cost Insight Design 2021 R1 SP1, if an assembly had been imported in a previous release or was synchronized from aPriori Professional you could view it, but could not import, edit (create an editable clone of), set inputs for, cost, publish, or otherwise work with assemblies. Now, you can import a supported native CAD assembly file to Cost Insight Design (directly or via a Cost in aPriori Plug-in) and you can edit an assembly that was imported as a native CAD file to aPriori Professional, to a previous release of Cost Insight Design, or to Cost Insight Design 2022 R1 by Cost Insight Generate. Once you have imported or edited an assembly, you can further work with the assembly. For example, you can set its inputs, cost it, and publish it.
For more information about:
- Importing, editing, and otherwise working with assemblies, see the Cost Insight Design User Guide.
- Supported native CAD files and CAD platforms that are supported for a Cost in aPriori plug-in, see the aPriori Cloud System Requirements Guide.
Limitations
- STEP and JT assembly files are not supported for assemblies in Cost Insight Design 2022 R1.
- The actions that you can perform in Cost Insight Design depend on your access control permissions.
Support for Assemblies Created by Cost Insight Generate
Work with assemblies and components of assemblies that have been created by a Cost Insight Connect Workflow
Cost Insight Generate is an aPriori Cloud solution that automates the creation, input specification, costing, and publication of scenario in Cost Insight Design. Prior to this release, Cost Insight Generate could automate costing for CAD part files, but not for CAD assembly files.
Now, Cost Insight Generate can automatically import native CAD assembly files to Cost Insight Design. Therefore, with the required access control permissions, you can access and edit assembly scenario that have been created, cost, and published by Cost Insight Generate. Once you edit an assembly scenario, you can specify its inputs, update its CAD file, and cost or publish it.
Furthermore, because Cost Insight Generate can now group publish the current scenarios for the components (parts and subassemblies) in an assembly, if you have the required access control permissions, you can edit a published scenario and then specify its inputs, cost, and re-publish it. You can also update the CAD file for the associated component while the scenario is private.
Synchronization of Published Assemblies to aPriori Professional
Published scenarios for assemblies and assembly components are available aPriori Professional
In the aPriori Cloud 2021 R1 SP1, part and assembly components synchronized automatically from aPriori Professional to Cost Insight Design but only part components published in Cost Insight Design synchronized automatically to aPriori Professional. For this release, once a scenario for an assembly component is published in Cost Insight Design, the assembly scenario and the scenarios for all the components in the assembly are automatically synchronized to aPriori Professional.
Support for Creo® Assembly Welds
Cost assembly-level welding in Creo® models.
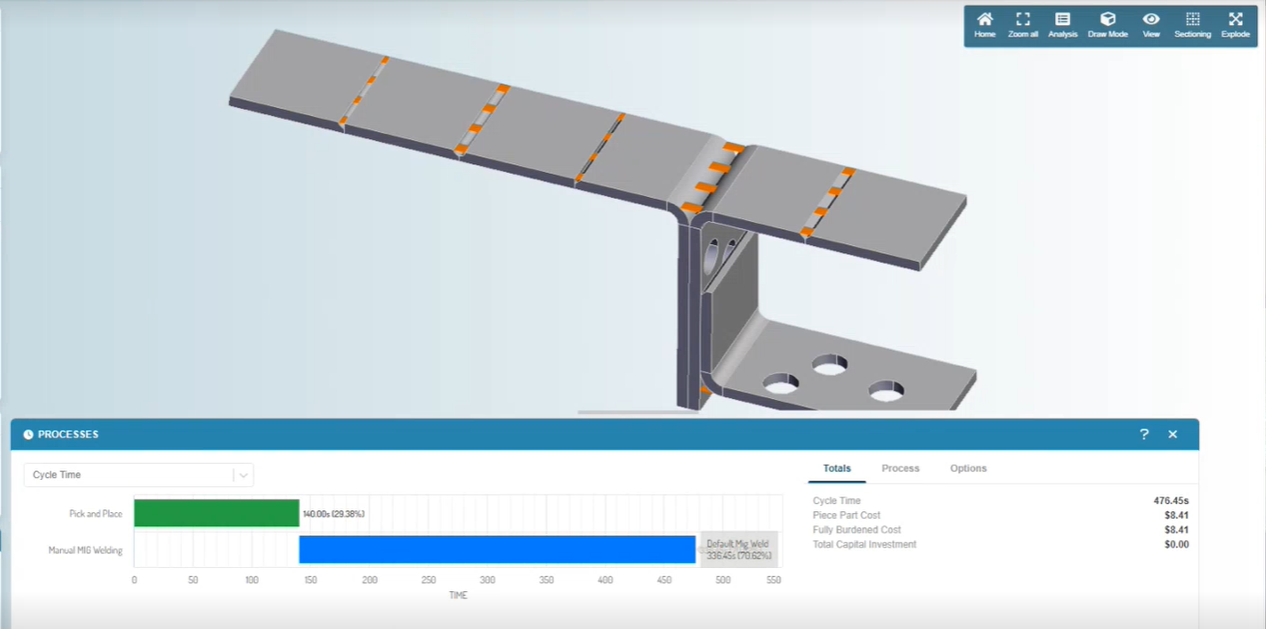
An optional module for Creo® allows you to apply welding to assembly joints. aPriori now offers an optional module for Cost Insight Design that allows you to cost welds that have been applied to Creo® assembly models.
For example, this figure shows the cycle time for manual welds in an assembly that was created in Creo® and cost in Cost Insight Design.
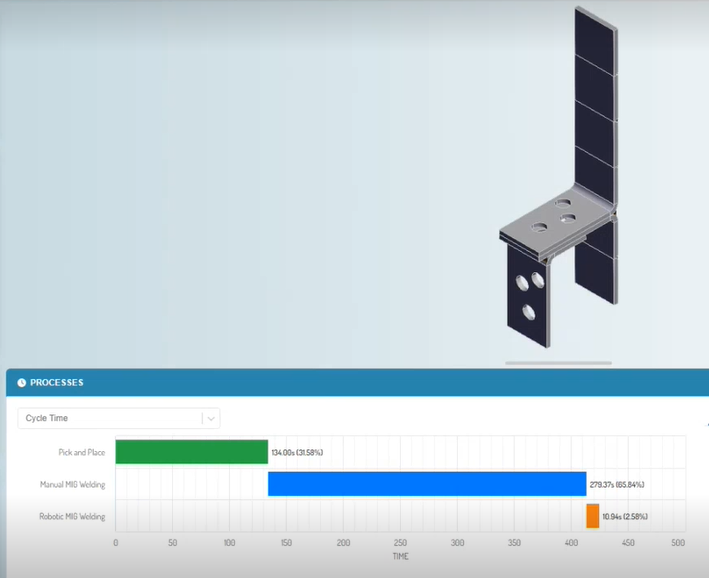
If you publish an assembly that contains assembly level-welds, the assembly is synchronized to aPriori Professional. In aPriori Professional, you (or a member of your team) can open the assembly and update the welding configuration. For example, you can change the Production Mechanism setting from Manual to Robotic
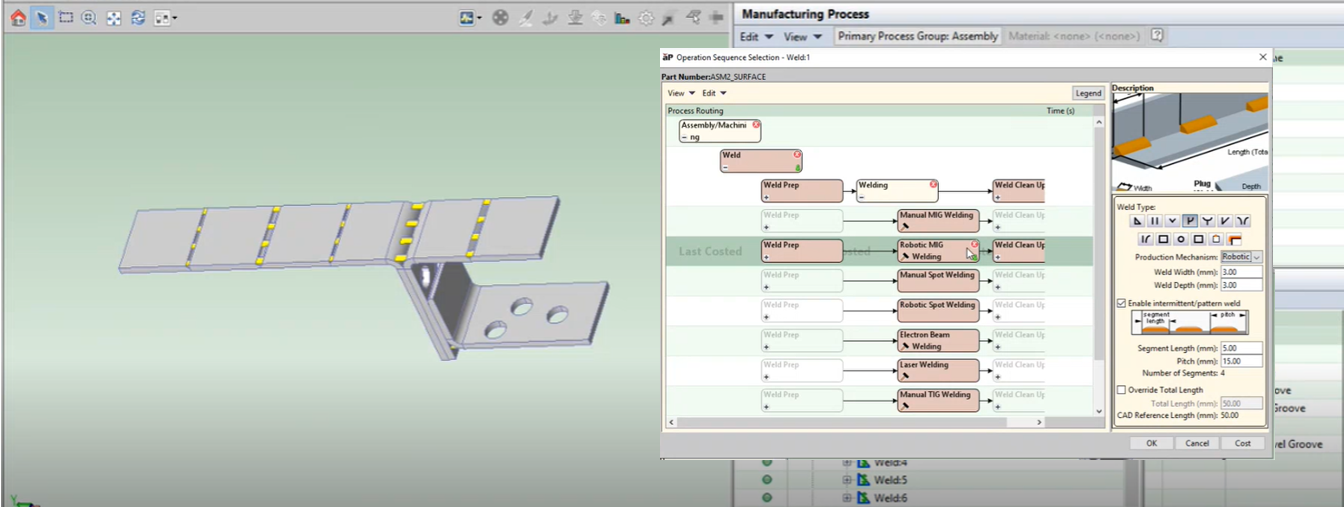
If you then recost the assembly in Cost Insight Design, The cycle time (and costing) results update.
For more information about the optional module for Creo® assembly welds, contact aPriori Customer Support.
Usability Improvements and New Actions for the Assembly Explorer
Easily find, explore, and work with the components of an assembly and their associated scenarios in the Assembly Explorer.
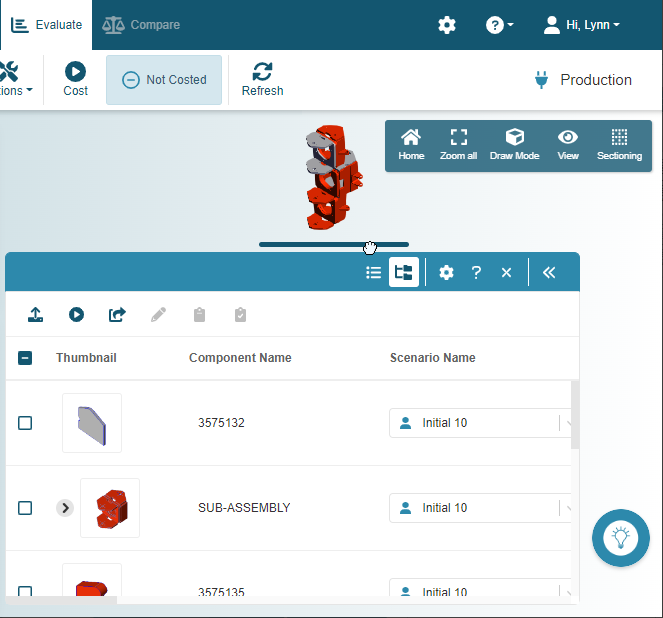
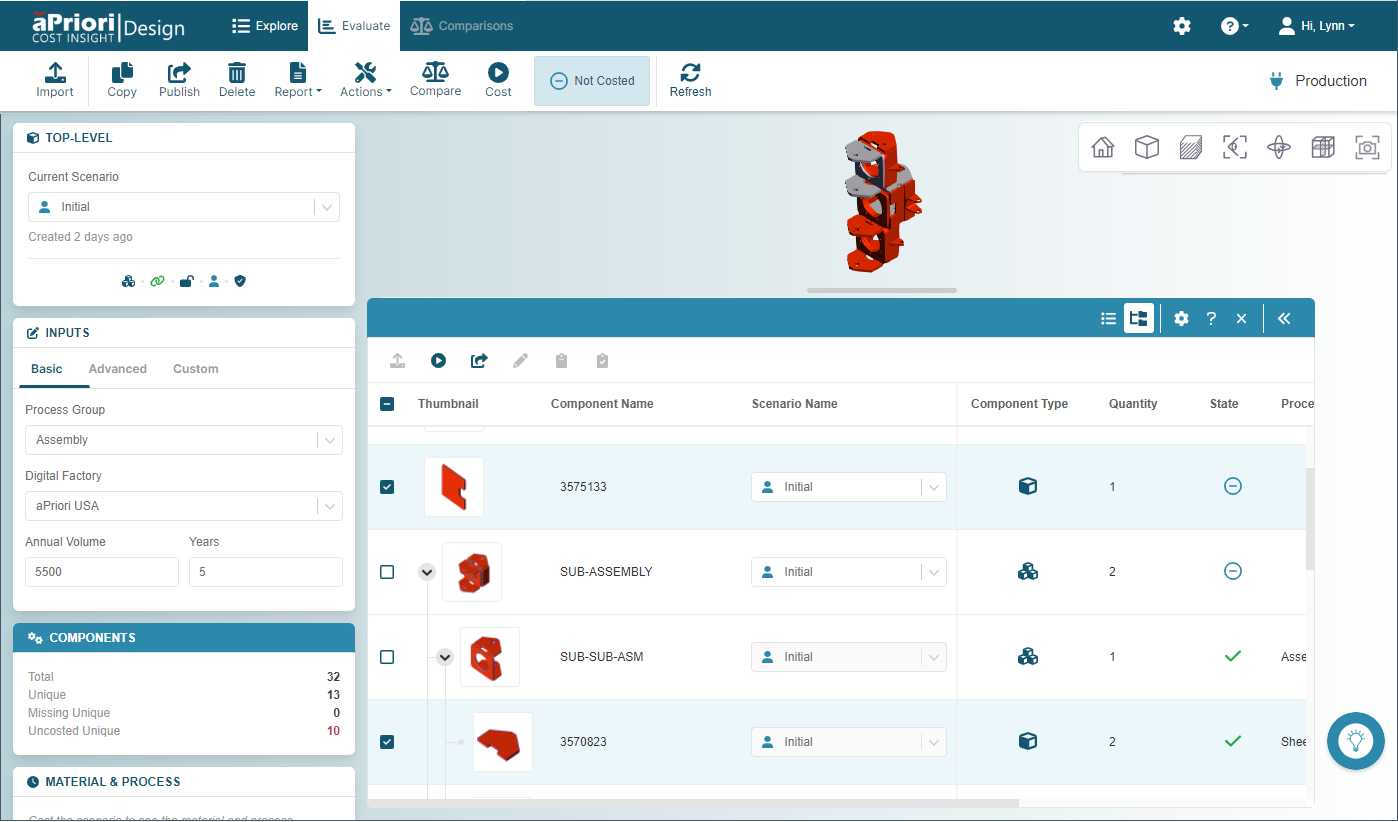
The Assembly Explorer, which is available when an assembly is open on the Evaluate tab, allows you to explore and work with the for the components (the parts and subassemblies) that make up an assembly and all the scenarios with which they are associated. For this release, the Assembly Explorer is easier to work with and provides new capabilities.
As this figure shows, the Assembly Explorer includes a region that displays the components , a grab bar, a header bar, a toolbar, and a Preview.
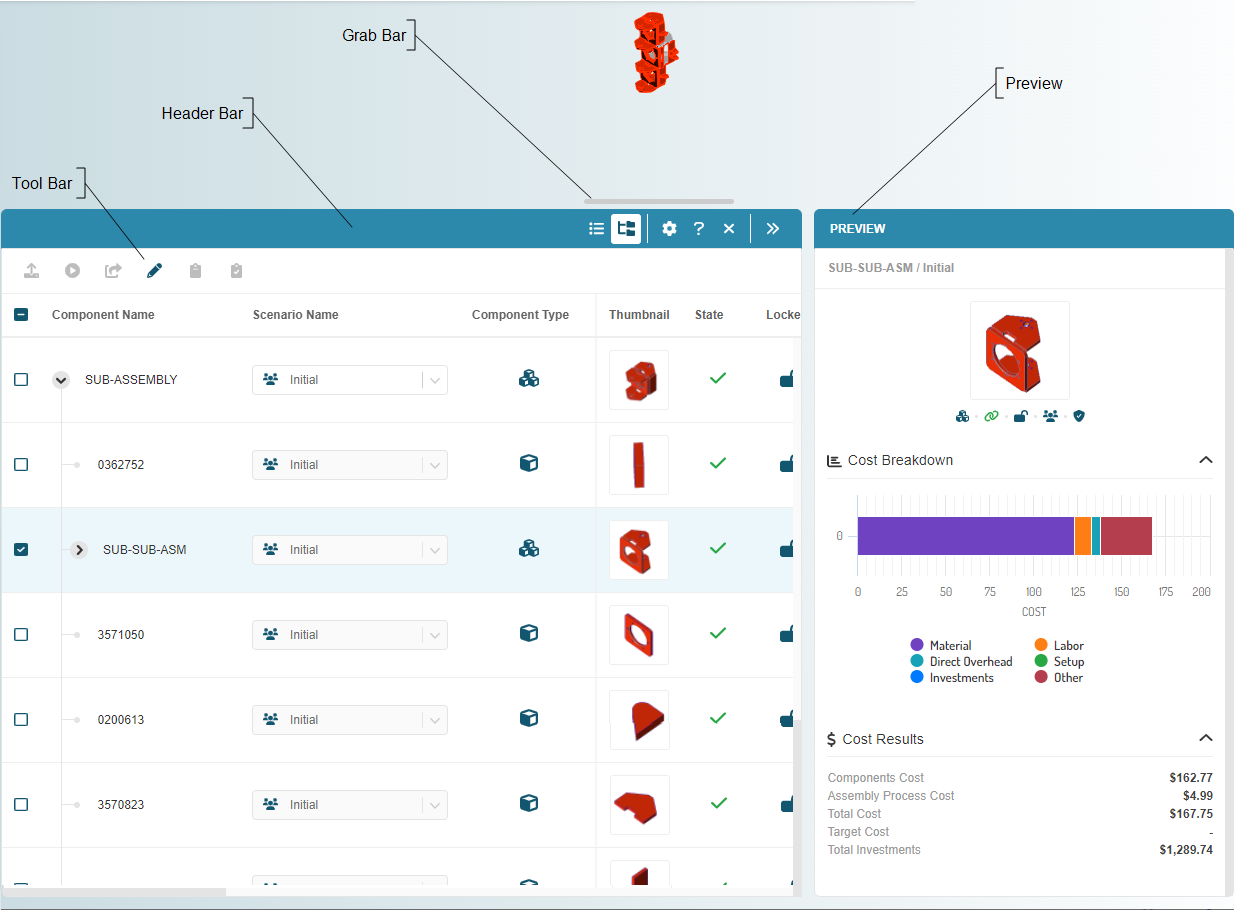
Tree View
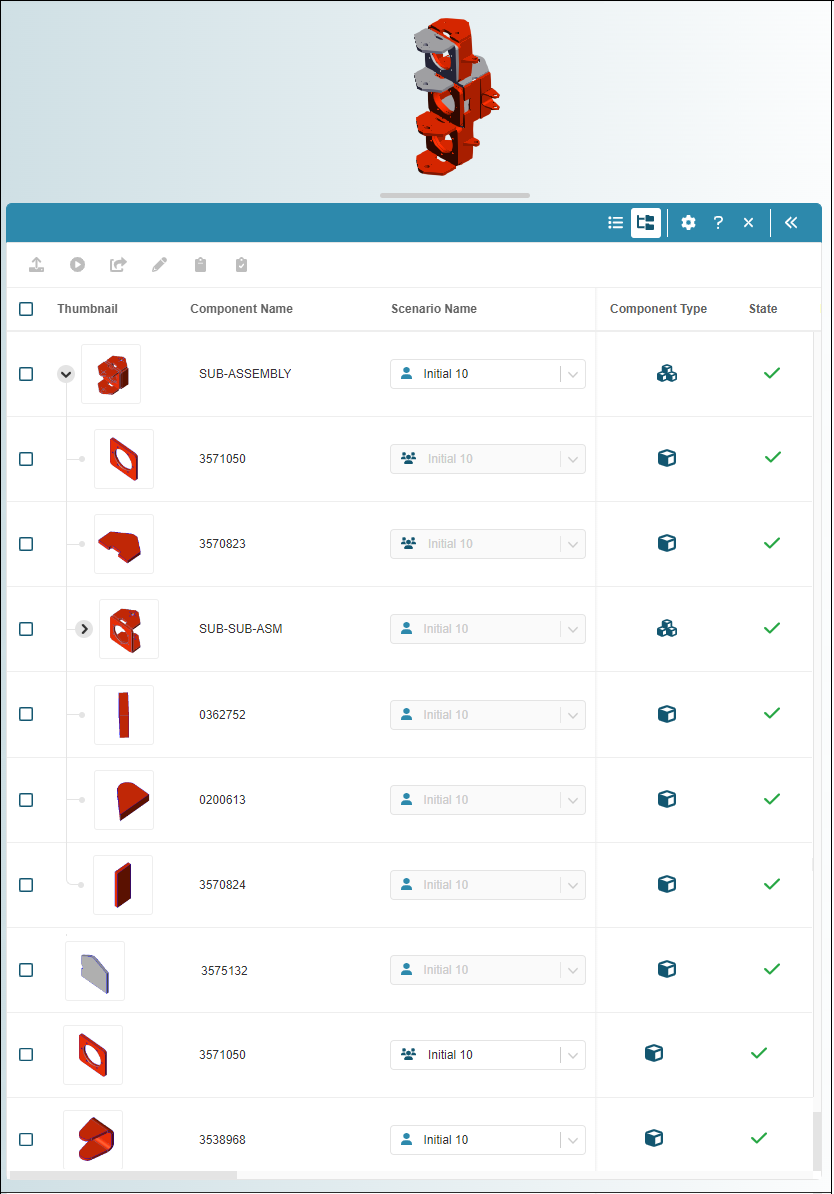
The Assembly Explorer can display components in either a Tree View and a List View. For 2022 R1, based on user feedback and usability studies, both views have been updated for usability.
By default, the components are displayed in the Tree View, , which, as shown in the figure, is similar to CAD applications in that it displays the components in the assembly in a node-based expandable, collapsible hierarchical tree that conveys the parent-child relationships of the components in the assembly.
Limitations
The Tree View, , does not provide filter or search capabilities because the implementation of the returned components would disrupt the hierarchical nature of the view. Likewise you cannot sort the columns in the Tree View. You must use the List View to search for a component by name, filter for a scenario, or sort a column.
List View
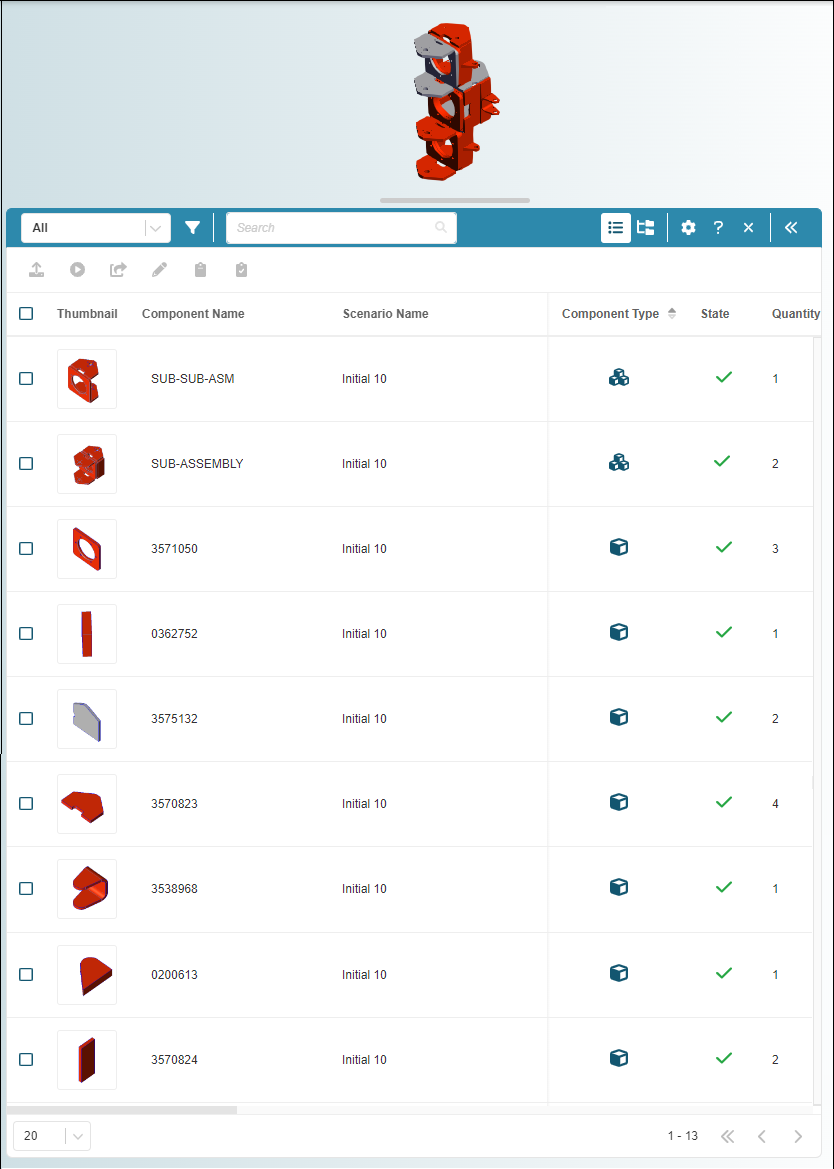
The List View, , contains a flattened (non-hierarchical) list of the components. Like a bill of materials (BOM) the List View includes only one row for each unique component and each row contains the total quantity for the component across all levels of the assembly.
When the List View is selected, you can sort the columns by the alpha-numeric order and the header bar of the Assembly Explorer includes a:
- Filter field that allows you to apply a preset or custom scenario filter
- Filter button that opens a dialog in which you can build custom scenario filters
- Search field that allows you to search for components by name
Limitations
You cannot Exclude or Include components while the List View is selected because excluding one instance of a component would exclude each instance of the component across every level of the assembly. You must use the Tree View to Exclude or Include components.
Configuring Views
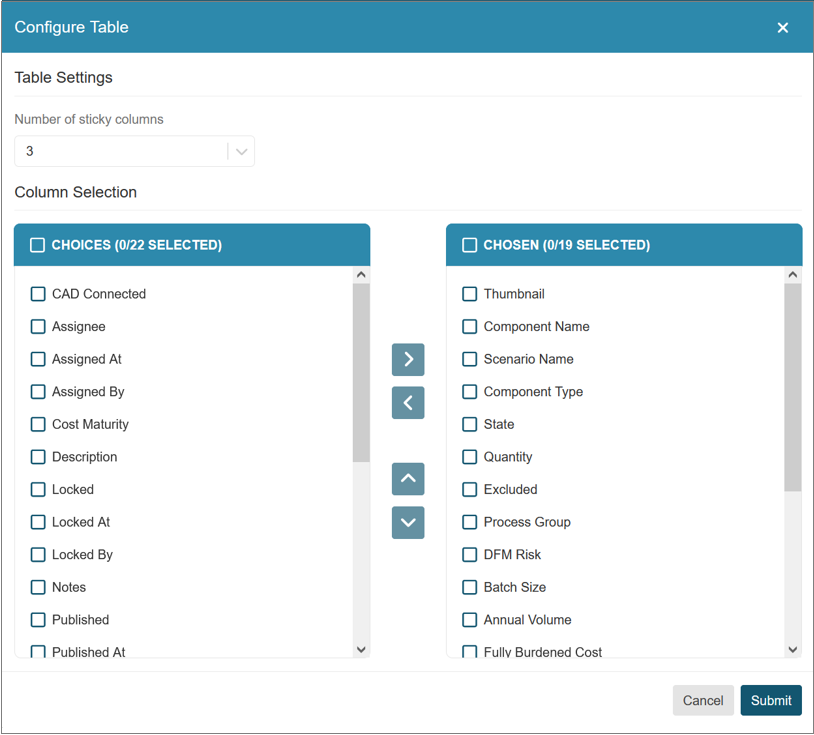
For the out-of-the box configuration of both views, the columns are ordered to support the workflows that are likely to be performed while the view is selected. Even so, you can add, delete, or reorder the columns because both views are configurable.
To configure the current view, in the header bar of the Assembly Explorer, first click the configure button, . Then in the Configure Table dialog, as desired, add, delete, reorder, or change the number of fixed columns.
Adjusting the Assembly Explorer Height by Using the Grab Bar
The grab bar allows you to increase the height of the panel by using the drag and drop process.
Note
If the grab bar “sticks” to your pointer while you are trying to adjust the height of the Assembly Explorer, move the pointer up or down as needed to obtain the desired height and then, click the grab bar to release it.
Header Bar
The Assembly Explorer header bar contains the menus, fields, and buttons in this table. Some tools are available or enabled only under certain circumstances as described in the Notes column.
| Name | Category | Icon | Description | Notes |
|---|---|---|---|---|
| Filter | Menu | NA | Select a preset or custom filter. | Available only whenList Viewis selected and set to All by default. |
| Filter | Button | Create a custom filter. | Enabled only whenList Viewis selected. | |
| Search | Field | NA | Search by Component Name. | Enabled only whenList Viewis selected. |
| List View | Button | Set the Assembly Explorer toList View. | Enabled only whenTree Viewis selected. | |
| Tree View | Button | Set the Assembly Explorer toTree View. | Enabled only whenList Viewis selected. | |
| Configure | Button | Configure the Assembly Explorer columns. | – | |
| Help | Button | Open the online help page for the Assembly Explorer. | – | |
| Close | Button | Close the Assembly Explorer. | – | |
| Open Preview | Button | Open thePreview. | Available only when a single component is selected and thePreviewis closed. | |
| Close Preview | Button | Close thePreview. | Available only when thePreviewis open. |
Toolbar
The Assembly Explorer toolbar contains the buttons in this table. Some items are available and enabled only under certain circumstances as described in the Notes column.
| Name | Icon | Description | Notes |
|---|---|---|---|
| Update CAD File | Update the CAD file for the selected component. | The Update CAD File in the Assembly Explorer applies only to the components in the assembly. To update the CAD file for the assembly, use the Update button in the Evaluate tab toolbar. | |
| Set Inputs | Configure and cost the scenarios for up to ten selected part components or up to ten selected assembly components. | Enabled only for private scenarios. | |
| Publish | Publish the scenarios for up to 10 selected components. | Enabled only for private scenarios. | |
| Edit | Edit the scenarios for up to 10 selected components. | Enabled only for public scenarios. | |
| Exclude | Exclude the selected components. | Enabled only for included components whenTree Viewis selected. | |
| Include | Include the selected components. | Enabled only for excluded components whenTree Viewis selected. |
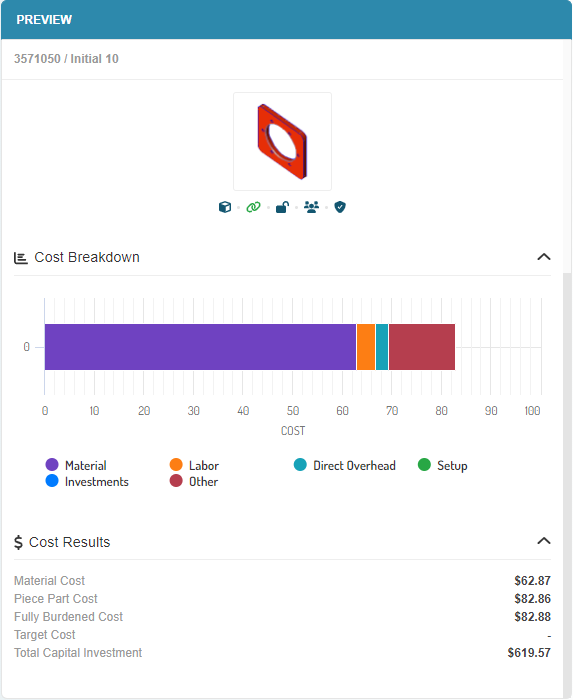
Preview
The Assembly Explorer Preview provides an interactive cost breakdown chart and summary of the cost results for a successfully cost, selected scenario. To provide maximum space for the information in the Tree View or the List View, the Preview is closed by default.
To:
-
Open the Preview, select a component and then click the Open Preview button, .
-
View the Cost Breakdown chart or Cost Results, summary expand the respective node.
- Exclude or include a cost category from the Cost Breakdown chart, select or deselect the name of the category. To display the numerical data for a cost category, hover over the category in the chart.
- Open the component to the Evaluate tab, hover over the image of the component, and then, click the button that appears.
- Close the Preview, click the Close Preview button, .
Standard and Custom Filters for Assembly Components
Use preset and custom filters to find assembly components in the Assembly Explorer
When you open an assembly to the Explore tab, the components, which opens by default, displays all the components (parts and subassemblies) in the assembly. You can quickly find specific components by using preset filters that are available in the Assembly Explorer toolbar.
You can also build, use, and save multiple custom filters. For each custom filter, you can include multiple property-based criteria. Each criterion allows you to choose from a variety of relevant operators and many allow you to select multiple values. You can even use a predefined custom filter as the basis for a new custom filter.
To search for a component of an assembly by using a preset filter in the Assembly Explorer:
- Open an assembly to the Evaluate tab.
-
In the Assembly Explorer toolbar, click the Table View button, .
-
Also in the Assembly Explorer toolbar, expand the filter dropdown menu and select an out-of-the-box filter.
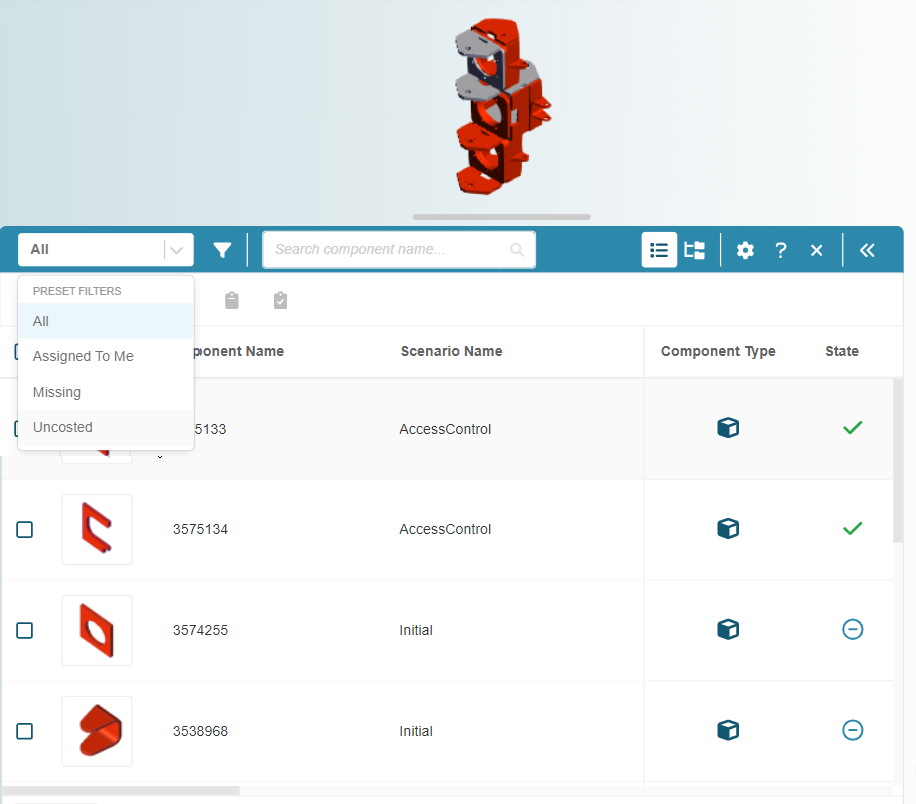
The options are:
-
All – Display all components.
-
Assigned to me – Display only the components that are assigned to you.
-
Missing – Display only the components for which the associated scenario is missing.
-
Uncosted – Display only the components that have not been initialized, that is, that have never been costed.
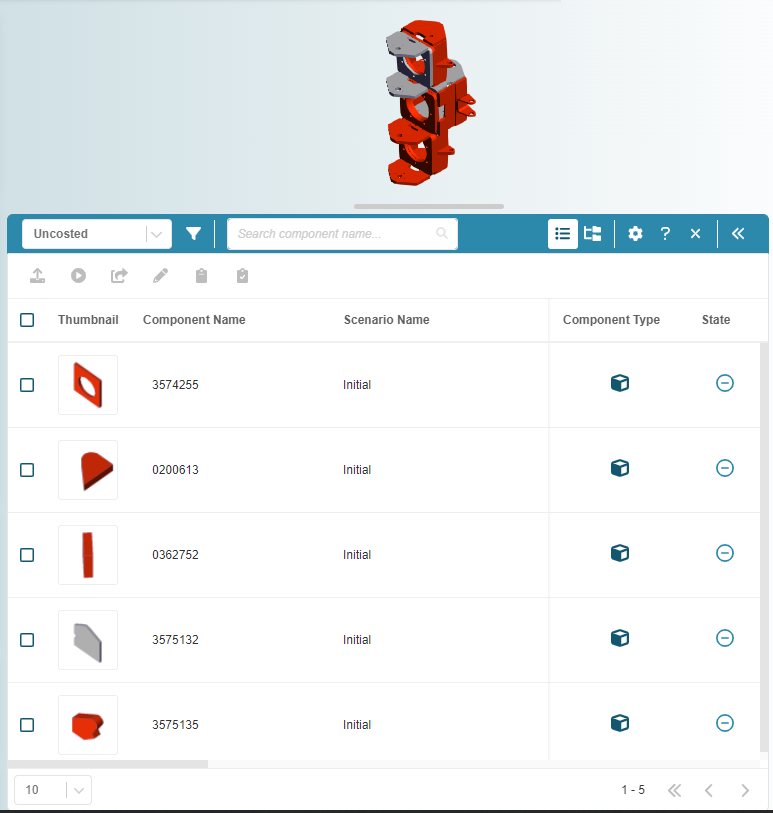
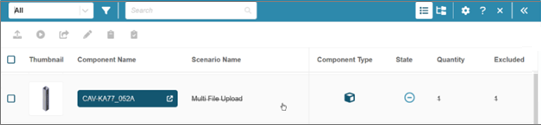
For example, this figure shows that when the filter is set to Uncosted, all the components that are displayed have the uncosted icon, , in the State column.
-
To search for a component of an assembly by using a custom filter in the Assembly Explorer:
- Open an assembly to the Evaluate tab.
-
In the Assembly Explorer toolbar, click the Table View button, .
-
Also in the Assembly Explorer toolbar, click the filter button, .
-
In the Scenario Filter dialog, supply a name and configure the filter criteria. For example, this figure of the Scenario Filter dialog shows how you could use the preset Assigned to me filter to create a filter to return all scenario that have a critical or high (Design for Manufacturability (DFM)risk that have been assigned to you.
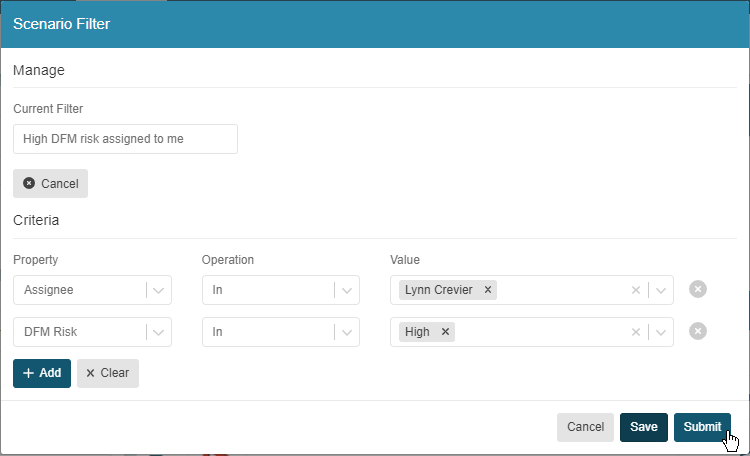
-
To save and apply the filter, click Submit.
The Scenario Filter dialog closes, the filter is applied, and the custom filter becomes an option in the filter dropdown menu.

For more information about custom filters, including the properties and operators that you can use to define the criteria for custom filters, see the Cost Insight Design User Guide.
Component Name Based Search for Assembly Components
Search for a scenario by Component Name in the Assembly Explorer.
When you open an assembly to the Explore tab, the components, which opens by default, displays all the components (parts and subassemblies) in the assembly. You can quickly find specific components by using the Search component name search field in the Assembly Explorer toolbar.
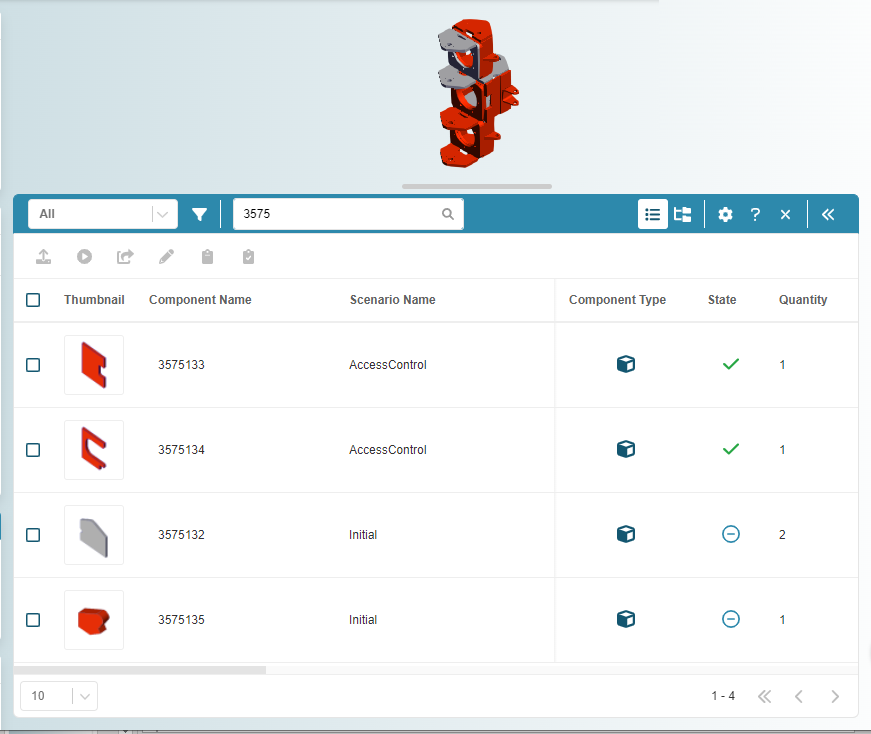
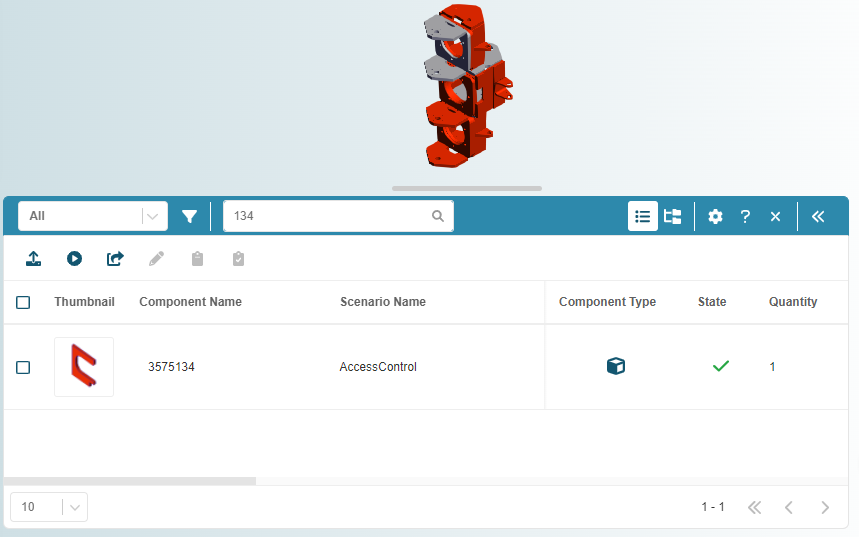
To search for a component of an assembly by name in the Assembly Explorer:
- Open an assembly to the Evaluate tab.
- In the Assembly Explorer toolbar, set the filter to All.
- In the search field, enter a string that includes part or all the name of the component of interest.
-
Click the search button, .
All components that match the search criteria appear in the Assembly Explorer. If an excessive number of components that are not of interest are returned, refine the search string. For example, these figures show that entering "3575" in the search field returns several scenarios, each of which has a component name that include "3575". When the entire component name is entered in the search field, only one scenario is returned.
Scenario Switching for Assembly Components
Easily see how the manufacturability and cost of an assembly is affected by the manufacturability and cost of its subcomponents by iteratively rebuilding and recosting the assembly using a different combination of scenario for its subcomponents.
If a component (part or subassembly) in an assembly scenario has more than one scenario, you can replace the current scenario with an alternative scenario for the same component. If, at any time you want to revert to the original configuration, simply switch back to the original scenario.
By switching the scenario for one or more components in an assembly, and then re-costing the assembly, you can see how using alternative production and manufacturing inputs for those components affects the cost and manufacturability of the assembly. Alternatively, you could create and cost a new assembly scenario that includes different scenarios for the same components, but switching component scenarios is a quicker, easily reversible process.
To switch the scenario for one or more components in an assembly:
- Open an assembly to the Evaluate tab.
-
In the Assembly Explorer, expand the Scenario Name dropdown menu and select an alternative public or private scenario for each component of interest.
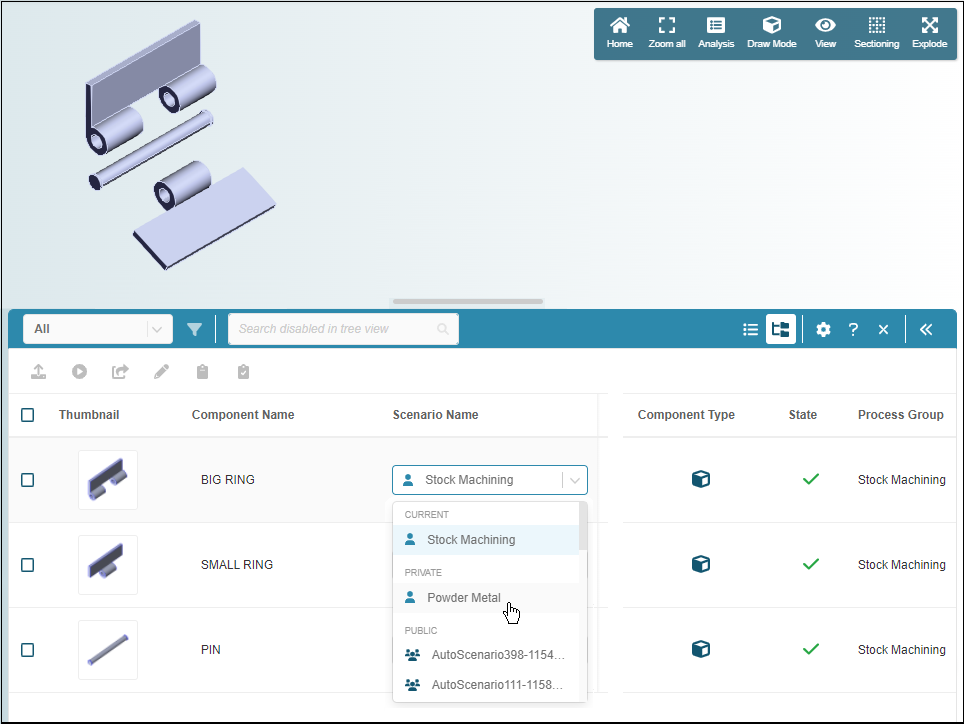
To see the results for the assembly with the switched component scenario, once the selected scenario for each component in the scenario has been successfully cost, cost the assembly.
Limitations
-
The assembly scenario must be private (as designated by the private icon, ). For information about public and private scenarios and workspaces, see the Cost Insight Design User Guide.
-
You cannot switch to a public scenario for which you have a private instance.
- The Assembly Explorer must be set to Tree View.

3D Viewer Tools for Assembly Components
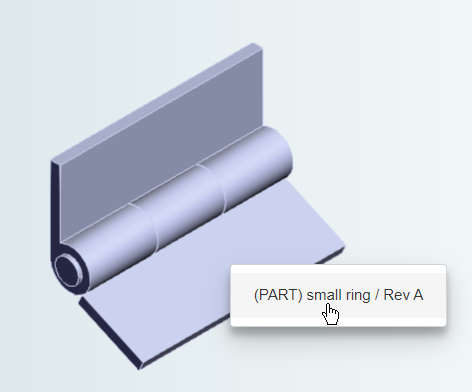
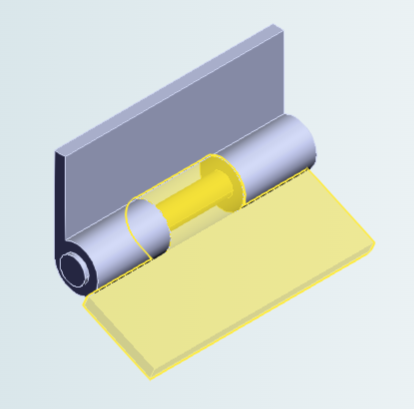
Open, isolate, zoom, hide, or make a component of an assembly transparent by using a context menu in the 3D viewer.
For assemblies, the 3D viewer on the Explore tab now includes a context menu that allows you to perform one of these actions on a selected component (part or subassembly) in the assembly:
- Open – Open the selected component to the Explore tab.
- Isolate – Hide all components in the 3D viewer except the selected component.
- Hide – Hide the selected component in the 3D viewer.
- Transparent – Make the selected component transparent in the 3D viewer.
- Zoom – Zoom to the selected component in the 3D viewer.
To apply one of the actions to a component in an assembly scenario that is open in the Explore tab:
- In the 3D viewer, click the component that you want to apply the action to. If your mouse is
-
In the menu that opens, again, select the component that you want to apply the action to.
The selected component becomes highlighted in the default Selection color, as specified in the Cost Insight Design Preferences.
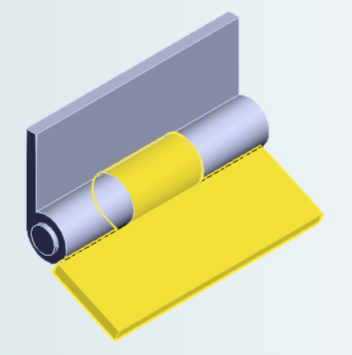
In the context menu that appears, right-click the action that you want to apply.
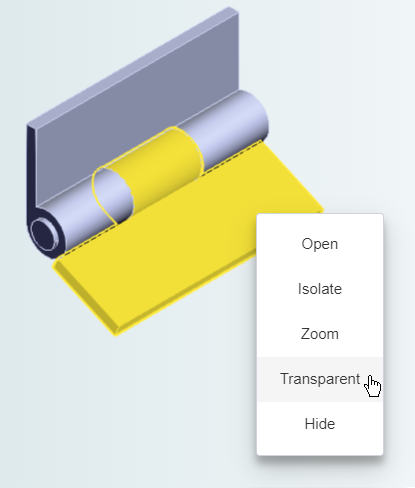
For example, if you click Transparent, the selected component becomes transparent.
To deselect a selected component, click it.
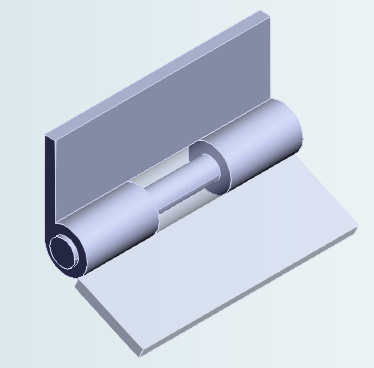
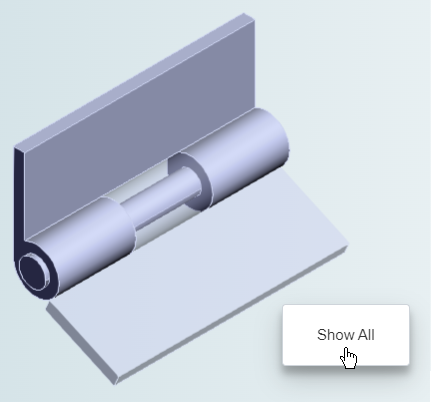
To revoke a Hide, Transparent, or Isolate action, either:
- In the Explore tab toolbar, click the Refresh button.
- In the 3D viewer, right-click an area that contains no components, and then in the menu that appears, click Show All.
Group Actions for Assembly Components
Simultaneously edit, cost, and publish multiple parts or subassemblies in an assembly.
Cost Insight Design allows you to simultaneously edit, cost, or publish the selected scenario for up to ten components in an assembly by using the Assembly Explorer. To prevent the initiation of a group action when the action is not applicable for the current scenario in one or more of the components that are selected, Cost Insight Design disables the button for the action in the toolbar of the Assembly Explorer.
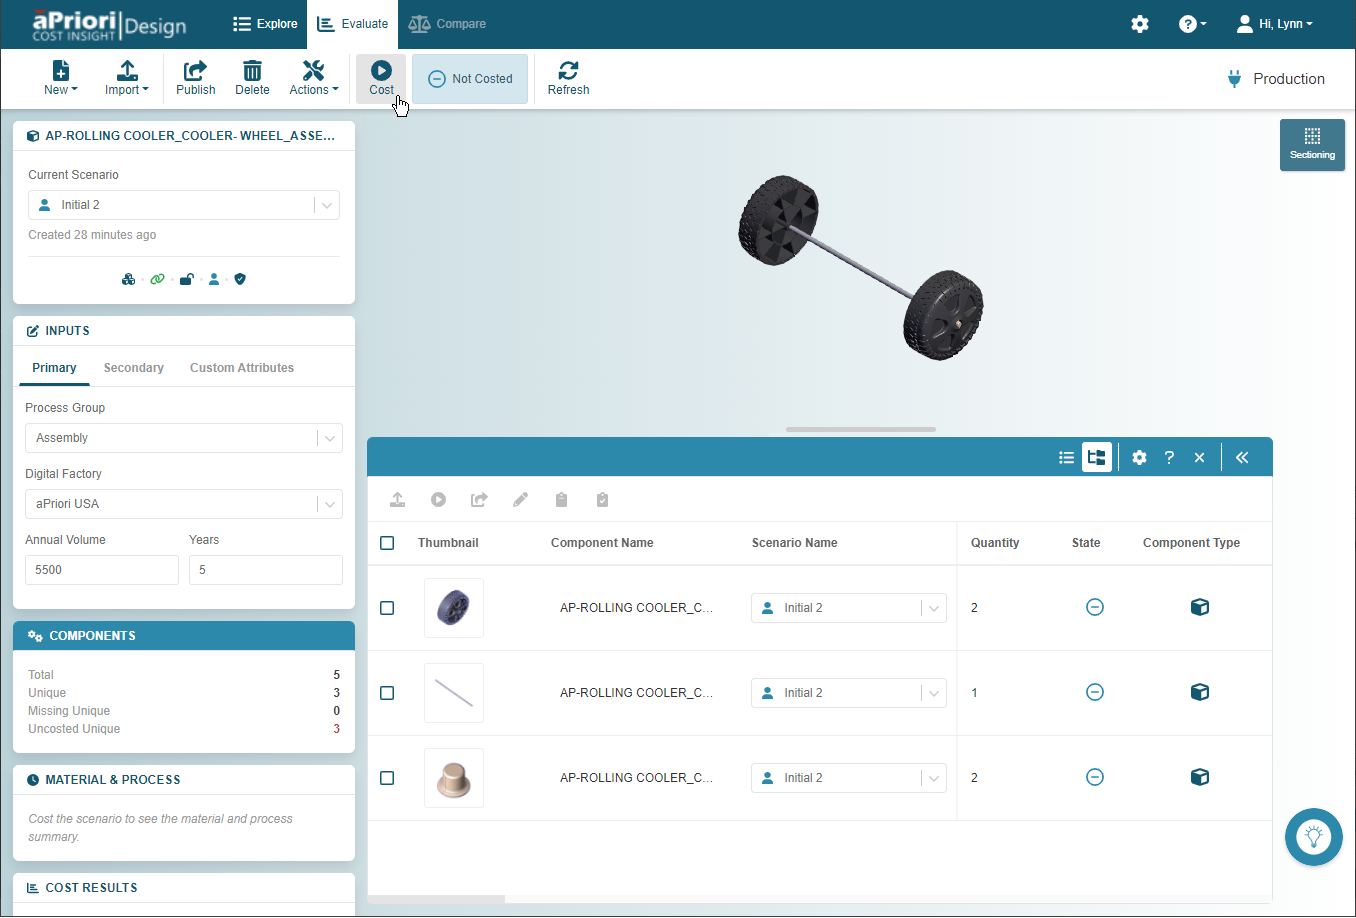
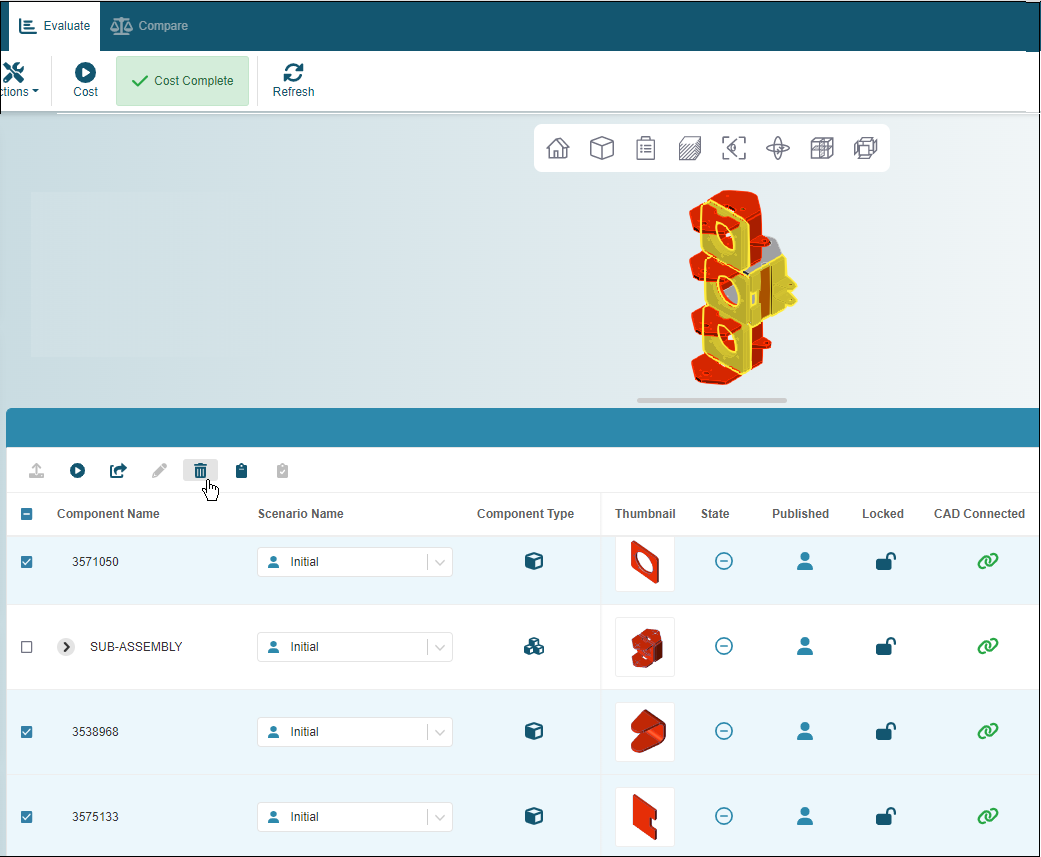
For example, this figure of a wheel assembly shows that in the Assembly Explorer, when only the WHEEL is selected, these buttons are applicable and enabled:
-
– Update CAD button
-
– Set inputs and cost
-
– Publish
-
– Exclude
However, if END_CAP, a component in the assembly for which the CAD file is Not Connected, , is also selected:
- The Update CAD button is disabled because it is not a group action.
- Set inputs is enabled because the END_CAP component will be excluded from costing. Therefore, it does not matter that you cannot set inputs for or cost a scenario if it the associated CAD file is Not Connected.
- Publish is enabled because it is a group action that is applicable for both the selected components.
-
Exclude is disabled because if the CAD file for a component is Not Connected, the component is already excluded.
Tip
To indicate that the END_CAP component is excluded from the assembly, the Component Name is displayed in strike through text.
Group Editing
Simultaneously create an editable copy of the selected scenarios for up to 10 of the components in an assembly.
You can now simultaneously edit (create and editable copy of) the selected scenario for up to 10 components (parts and subassemblies) in an assembly. To group edit scenarios:
- Open an assembly to the Evaluate tab.
- In the Assembly Explorer, select each row that contains a scenario that you want to edit
-
In the Assembly Explorer toolbar, click the edit button.
-
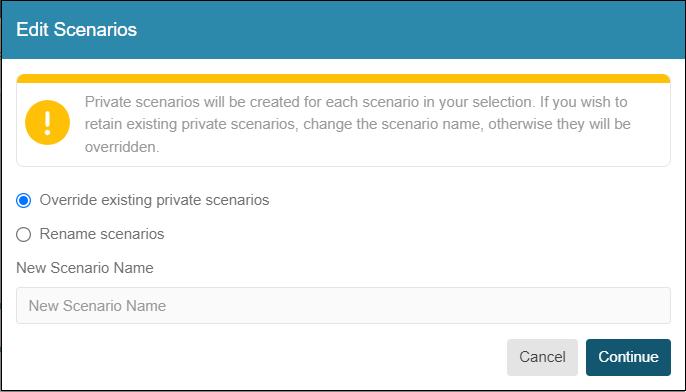
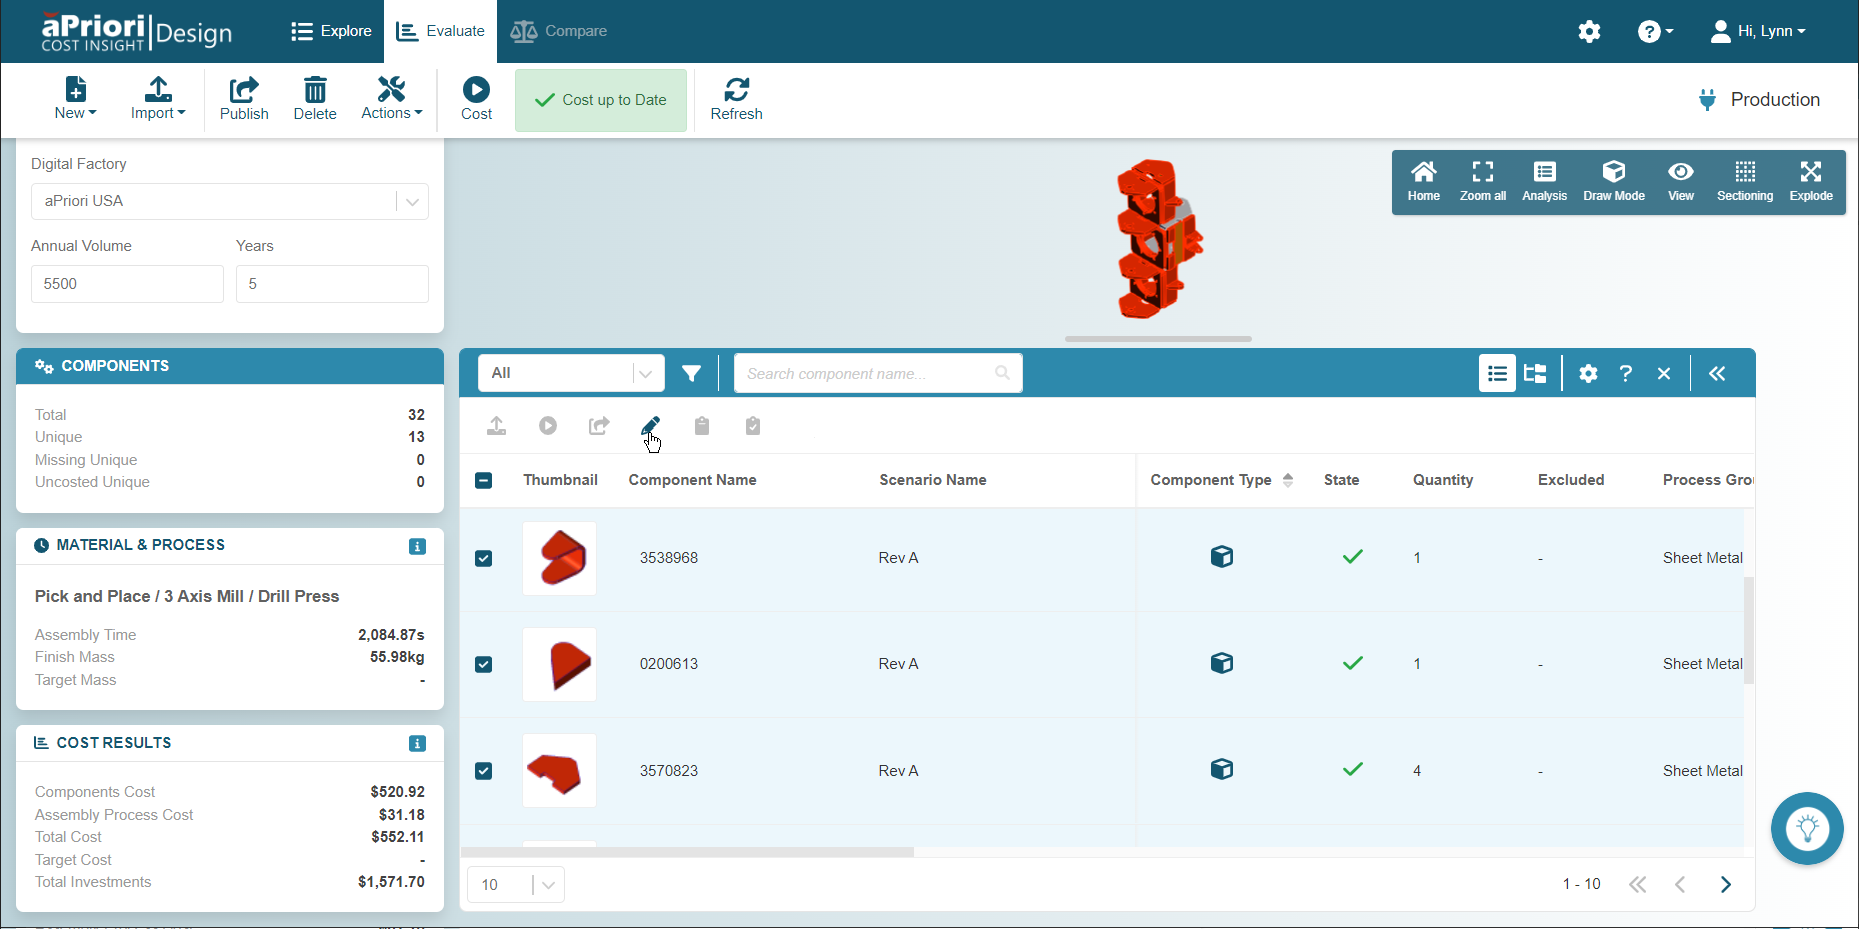
In the Publish Scenarios dialog, select one of these options:
-
Override existing private scenario - Any private scenario that have the same Component Name and Scenario Name as a scenario that you are editing will be overwritten by the scenario that you are editing.
-
Rename scenario - A new public scenario will be created for each scenario that you are editing. For this option, you must provide a unique scenario name. The name will be applied to all the scenario that you are editing.
-
-
Click Continue.
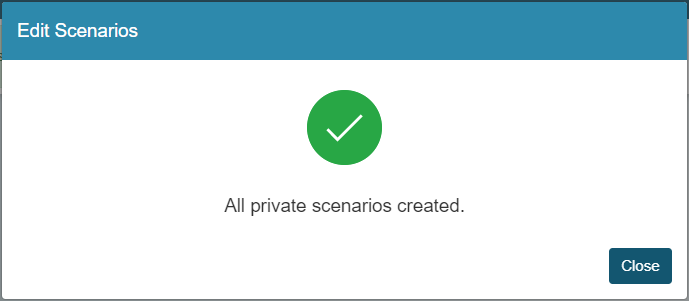
-
Once the dialog indicates that the new scenarios are created, click Close.
Group Costing
Simultaneously cost multiple parts or subassemblies in an assembly.
You can now group cost, that is, simultaneously set inputs for and then cost, up to 10 parts or up to 10 subassemblies in an assembly, regardless of the level of the parts or subassemblies. To group cost parts or subassemblies:
- Open an assembly to the Evaluate tab.
-
In the Assembly Explorer, select the rows for up to 10 parts or up to 10 assemblies that you want to cost.
-
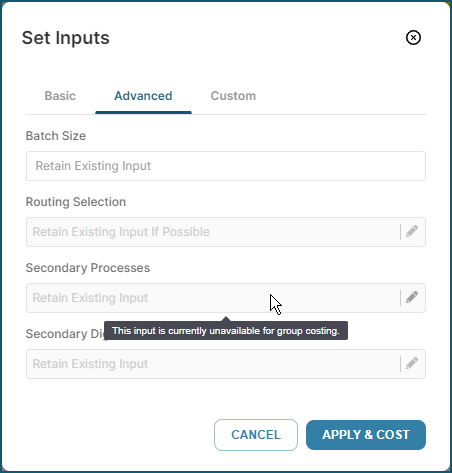
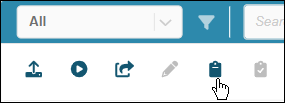
In the Assembly Explorer toolbar, click the set inputs button, .
-
In the Set Inputs dialog, you can change the production and manufacturing inputs for the components. However, any changes you make are applied to the current scenarios for all the components that are selected for costing because for each input you can either:
-
Retain Existing Input - Use the previously specified input for each component.
-
Update the input - The inputs for all scenarios are updated to the same newly specified values.

-
-
Click Apply & Cost.
Cost Insight Design costs all selected components.
Limitations
-
To cost a component of an assembly in the Assembly Explorer, both the current scenario for the assembly and the current scenario for the component must be private (in your private workspace, as designated by the private icon, ). For information about public and private scenarios and workspaces, see the Cost Insight Design User Guide.
-
You cannot initiate a costing while the State for one or more components is Costing in Progress.
- You cannot group cost a combination part components (parts) and assembly components (subassemblies). You can group cost either part components (parts) or assembly components (subassemblies).
- An assembly scenario, including an assembly scenario that is a subassembly of another assembly scenario, will not cost successfully if it contains any components that have not costed successfully.
- A group can consist only of all part components or all assembly components. You can not include both parts and assemblies in the same group.
- Any changes that you make to the inputs are applied to every scenario in the group. For example, if for Process Group, you select Sheet Metal, the Process Group for the selected scenario for every component in the group is set to Sheet Metal.
-
Any Secondary Inputs that have already been specified for the scenarios in the group are honored, but Batch Size and Volume are the only Secondary Inputs that you can set in the Set Inputs dialog for a group costing.
 Workaround
If you want to apply Secondary Inputs (other than Batch Size or Volume) or if you want to update any other inputs for one or more scenarios that you want to group cost, set those inputs individually. Then, in the Set Inputs dialog for a group costing, use the default value, Retain Existing Input, as applicable.
Group Publishing
Simultaneously publish the scenarios for multiple parts and subassemblies in an assembly.
You can now simultaneously publish the current scenario for up to 10 components (parts and subassemblies) in an assembly, regardless of the level of the components. To group publish scenarios:
- Open an assembly to the Evaluate tab.
-
In the Assembly Explorer, select up to 10 rows that contain components that you want to publish.
-
In the Assembly Explorer toolbar, click the publish button, .
-
In the Publish Scenarios dialog, select one of these options:
-
Override existing public scenarios - The existing public scenarios will be overwritten by the scenario that you are publishing.
-
Rename scenarios - A new public scenario will be created for each scenario that you are publishing. For this option, you must provide a unique scenario name. The name will be applied to all the scenarios that you are publishing.
-
-
Click Continue.
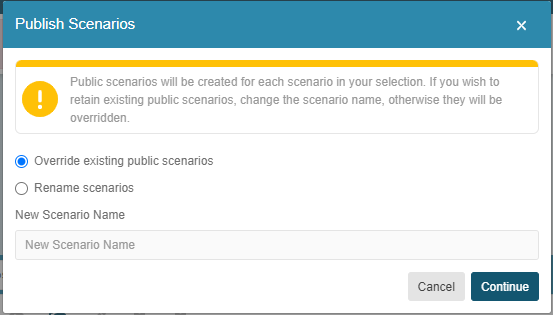
-
Optionally, lock or select a Status, a Cost Maturity, or an Assignee for the scenarios.
-
Click Publish.
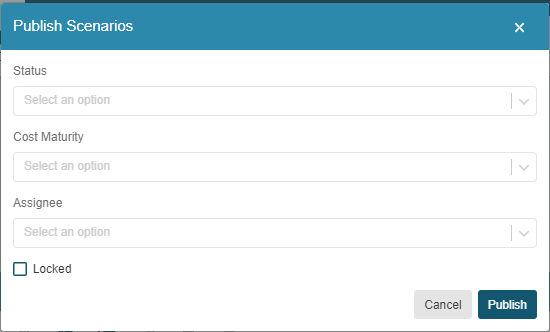
-
Once Cost Insight Design indicates that all scenarios are publishing, click Close.
Cost Insight Design publishes the selected scenarios to the public workspace. Anyone on your aPriori collaboration team that has the required access control permissions can see or edit the published scenarios in either Cost Insight Design or aPriori Professional.
Limitations
You cannot perform group publish if any of these conditions is true:
-
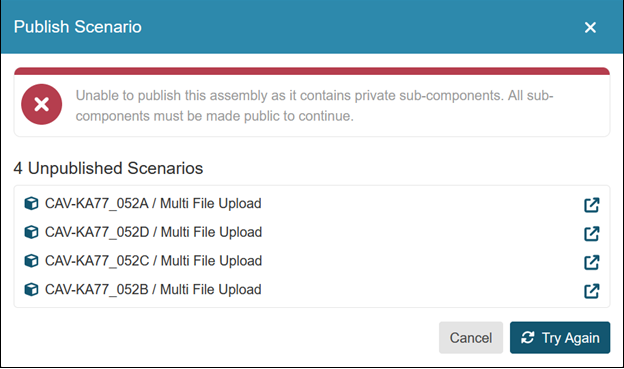
A selected component is an assembly that contains a component for which the current scenario is private but is not also selected for publication.
If you attempt to publish an assembly that contains one or more components for which the current scenario is private, the Publish Scenario dialog displays an error message that provides both the names of the components for which the current scenario is private and buttons that you can use to open and publish each of the private scenarios.
-
The current scenario for a selected component is public.
Exclude or Include Assembly Components
Easily see how the cost and manufacturability of the assembly is affected by the inclusion or exclusion of one or more of its components.
You can now exclude one or more components (parts or subassemblies) from an assembly in Cost Insight Design. You can also include one or more components that has been excluded by you or a member of your team.
By excluding one or more components from an assembly, and then re-costing the assembly, you can see how eliminating those components affects the cost of the assembly. Alternatively, you could eliminate the component from the CAD model of the assembly, and then update the CAD file in Cost Insight Design, but excluding components is a quicker, reversible process.
To exclude one or more components from an assembly:
- Open an assembly to the Evaluate tab.
-
Select each row that contains a component that you want to exclude. If a component is in more than one level of the assembly, to:
-
Exclude any and all instances of the component, in each level that contains the component, select the row that contains the component.
-
Exclude only the component from one or more specific levels of the assembly, select the row that contains the component only in the levels that you want to exclude it.
-
-
In the Assembly Explorer toolbar, click the Exclude button, .
-
To save the exclusions and see how excluding the components affects the results, cost the assembly.
Once the assembly is successfully cost, the selected components are excluded from the cost results. All instance of the selected components are also removed from the 3D representation of the assembly in the viewer.
Note
Regardless of the number of instances of a component that you select for exclusion:
- All instances of the component are excluded from the 3D viewer.
- Only the instances that are selected are excluded from the costing.
In the Tree View, if a component is excluded its name is displayed in strike through text and there is a check mark in the Excluded column.

In the List View, if a component is excluded its name is displayed in strike through text and the number of excluded instances is displayed in the Excluded column. As Quantity indicates the total number of instances that there are of the component in the assembly, this view also allows you to determine if any instances of the component will be included in the costing.
To include one or more excluded components, in Assembly Explorer, with the Tree View selected :
-
Select each row that contains an excluded component that you want to include, and then click the include button, .
-
To save the inclusions and see how including the components affects the results, cost the assembly.
Once the assembly is successfully cost, the selected components are included from the cost results. They are also added to the 3D representation of the assembly in the viewer.
Limitations
To exclude or include a component in an assembly scenario:
-
The assembly scenario must be private (in your private workspace, as designated by the private icon, ). For information about public and private scenarios and workspaces, see the Cost Insight Design User Guide.
-
The Assembly Explorer must be set to Tree View.
-
If an assembly contains the same component in different assembly levels, you can exclude the component from one or more levels but include it in other levels. Although the included instances of the component will be included in the costing results, they are excluded from the representation of the assembly that is displayed in the 3D viewer on the Evaluate tab.
Scenario Switching for Assembly Components
Easily see how the manufacturability and cost of an assembly is affected by the manufacturability and cost of its subcomponents by iteratively rebuilding and recosting the assembly using a different combination of scenario for its subcomponents.
If a component (part or subassembly) in an assembly scenario has more than one scenario, you can replace the current scenario with an alternative scenario for the same component. If, at any time you want to revert to the original configuration, simply switch back to the original scenario.
By switching the scenario for one or more components in an assembly, and then re-costing the assembly, you can see how using alternative production and manufacturing inputs for those components affects the cost and manufacturability of the assembly. Alternatively, you could create and cost a new assembly scenario that includes different scenarios for the same components, but switching componentscenarios is a quicker, easily reversible process.
To switch the scenario for one or more components in an assembly:
- Open an assembly to the Evaluate tab.
-
In the Assembly Explorer, expand the Scenario Name dropdown menu and select an alternative public or private scenario for each component of interest.
To see the results for the assembly with the switched componentscenario, once the selected scenario for each component in the scenario has been successfully cost, cost the assembly.
Limitations
-
The assembly scenario must be private (as designated by the private icon, ). For information about public and private scenarios and workspaces, see the Cost Insight DesignUser Guide.
-
You cannot switch to a public scenario for which you have a private instance.
- The Assembly Explorer must be set to Tree View.
Automatic Scenario Switching for Assembly Components
Cost Insight Design automatically switches scenarios when the selected scenario for a component in an assembly is edited, published, or deleted.
In Cost Insight Design2022 R1, you can switch between different scenarios, as available, for the components in an assembly by using the Assembly Explorer. You can switch to a private scenario or to a public scenario for which you do not have a private copy.
If the current scenario for a component in an assembly is a public scenario for which you do not have a private copy, and you then create a private copy of the public scenario (via an Edit action), the current scenario for all instances of the component in the assembly automatically switch to the newly created private scenario. You can not switch back to the public scenario unless you publish or delete your private copy.
If a private scenario is selected for a component in an assembly and you publish the private scenario, the scenario automatically switches to the public instance of the published private scenario
If a private scenario is selected for a component in an assembly and you delete the private scenario, if there is a public instance of the deleted private scenario, the scenario automatically switches to the public instance. If there is not a public instance of the deleted private scenario, but there is a different private scenario, the scenario automatically switches to the different private scenario. If there is not a different private scenario, but there is a different public scenario, the scenario automatically switches to the different public scenario. If there are not other private or public scenarios for the component, the scenario is designated as missing. To resolve the missing scenario, re-import the CAD model.
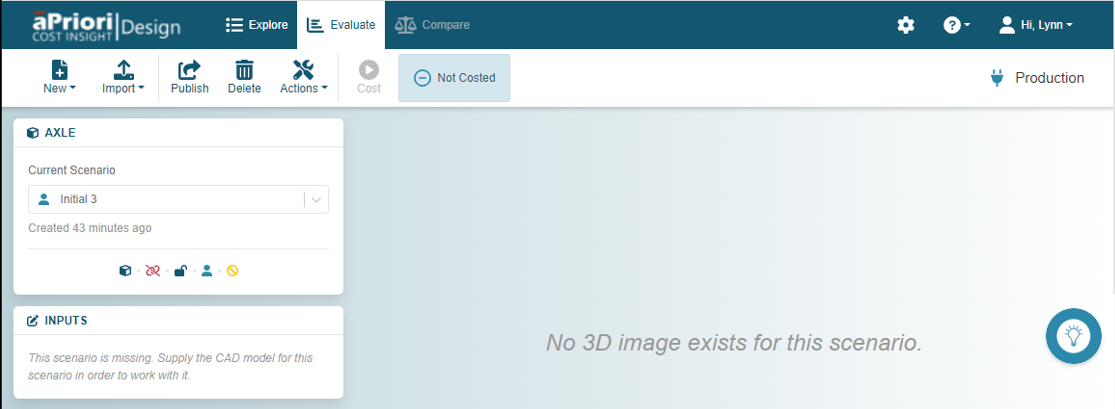
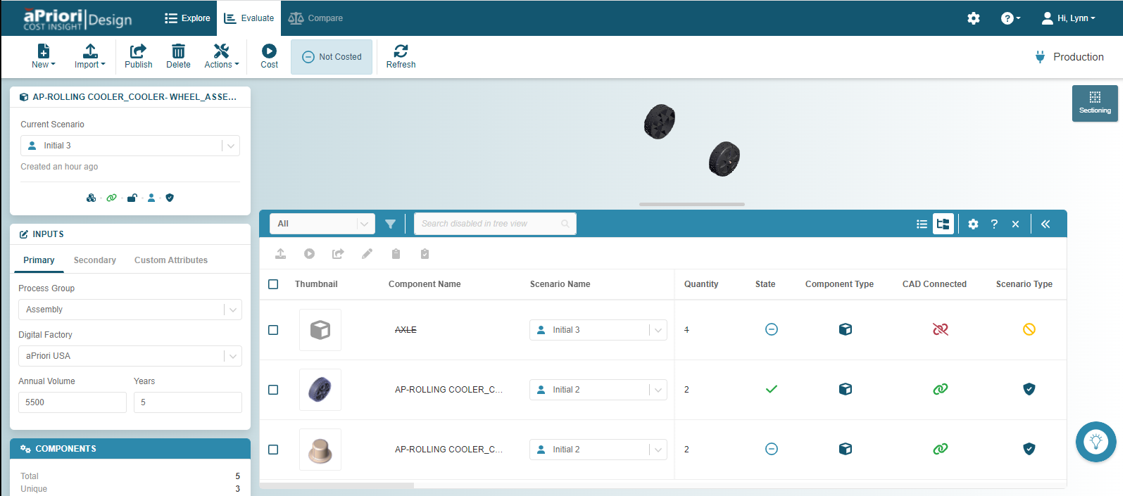
Placeholder and Automatic Exclusion for Missing Assembly Components
Cost Insight Design creates an excluded placeholder component when you import, update, or copy of an assembly that has a missing component.
In Cost Insight Design, a part or assembly is considered missing if it has not been successfully synchronized, imported, or associated with a scenario. If, when you import, update, create a scenario from, or edit (create an editable clone from) an assembly that has a missing component (part or subassembly), Cost Insight Design creates a placeholder for the missing component. The placeholder is added to the Explore tab and, when the assembly is open to the Assembly Explorer, on the Evaluate tab.
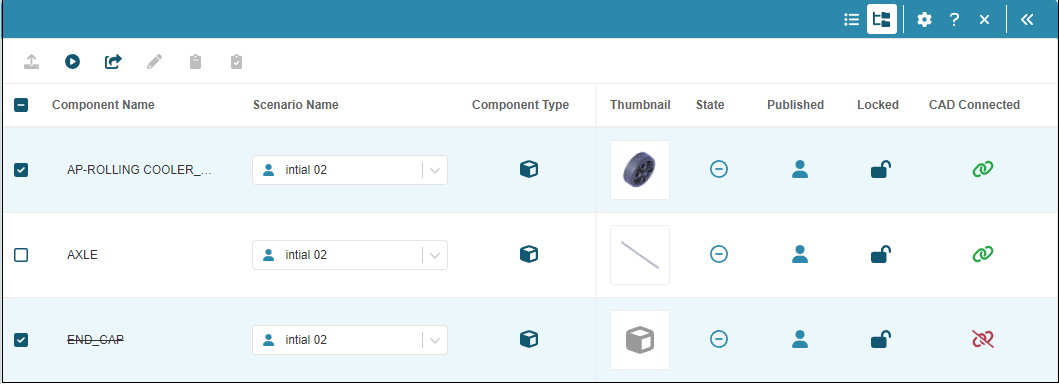
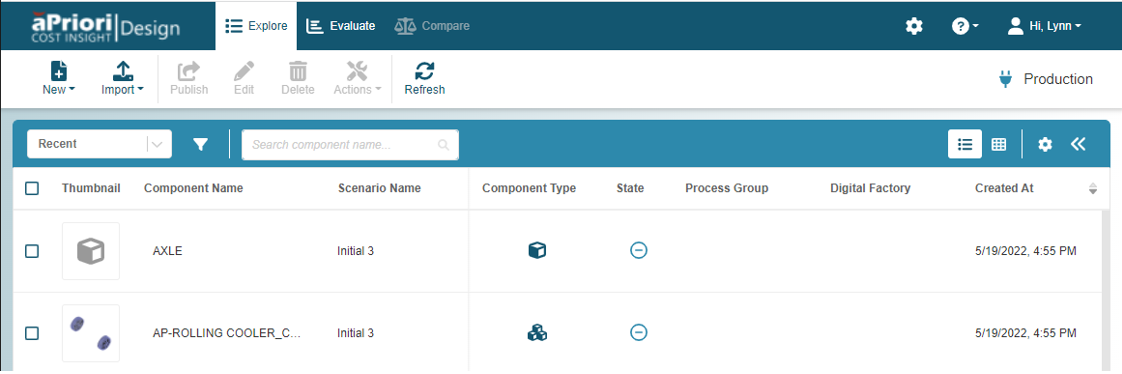
On the Explore tab, the Thumbnail in the placeholder displays an icon that indicates the component type (part or assembly) but does not include an image of the missing part or subassembly. For example, this figure shows a placeholder for an AXLE that is a part in a wheel assembly. It also includes the wheel assembly (AP-ROLLING COOLER_C…) but the axle is not included in the Thumbnail of the wheel assembly.
You can open the placeholder to the Evaluate tab, but no image exists and you cannot set inputs because, as indicated by the icons in the scenario tile, the CAD file is not connected, , and the scenario is missing, .
If you open the assembly to the Evaluate tab, the placeholder is in the Assembly Explorer, but it is excluded, as indicated by the strike through in the Component Name. Therefore, the component does not appear in the representation of the assembly in the 3D viewer and it will be excluded from the analysis if the assembly is cost.
If you successfully update the CAD file for the missing component, Cost Insight Design automatically updates the Thumbnail for the component and includes the component in the Assembly Explorer. However, Cost Insight Design includes the component in the cost results and in the representation of the assembly in the 3D viewer, only after the assembly is cost.