Scenario Export Schedule tab
The Schedule tab (which comes up by default) allows you to define, modify, and delete export schedules.
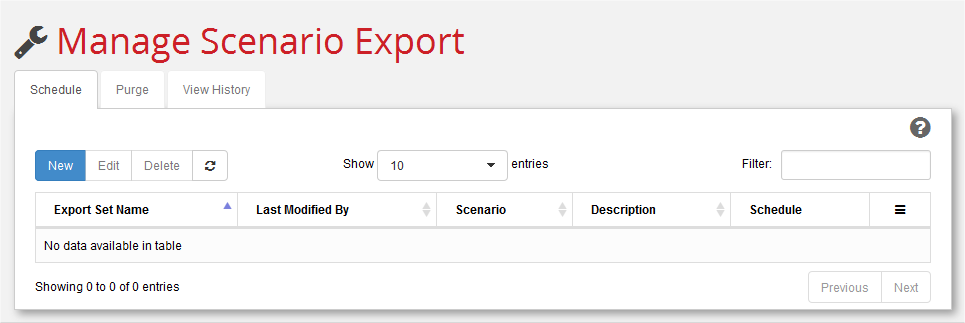
In this window you can:
- Define a New, or Edit or Delete a selected, existing export set.
- Limit the display of export sets by entering a matching string in the Filter field.
- Use the Show n entries pull-down menu to control the number of export sets displayed.
- Sort results by clicking on column headings.
- Perform an immediate, one-time export by clicking in the far-right column.
- Update the display by clicking .
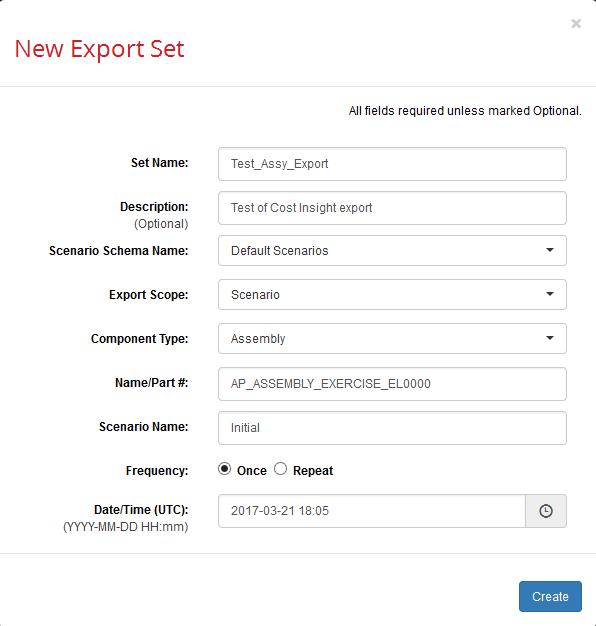
To Define a New Export Set
-
Click New to display the New Export Set dialog. This figure shows an example with fields populated.
-
Populate the fields which are described in this table.
Note:
Select an option for Export Scope first because it determines what other fields in the dialog are displayed and editable.
Field Description Set Name Editable only if Export Scope= “Scenario”. If Export Scope= “All” or “All Delta”, this field is populated with predefined export set names of the form “All.<schema>” or “All Delta.<schema>” where<schema>is specified by the Scenario Schema Name field below .
If Export Scope= “Scenario”, use this field to enter any descriptive, unique name that you wish to call this export set. If you are following the User Guide example, enter "Test_Assy_Export". If multiple people are following this example, it would be helpful to make your export set name unique and identifiable by appending your initials, such as "Test_Assy_Export_bf".Description Optional. Any arbitrary string that you wish to enter. If you are following the User Guide example, enter "Test of Cost Insight export" Scenario Schema Name This a drop-down menu as indicated by the downward facing triangle at the right of the field. Click this field to display a list of options.
The options here are defined by thesourceSchemaOptionsvariable set with the Source Schema Option field in the Installation Wizard. Unless you have been advised otherwise by your administrator (and for the purposes of the User Guide example), you should select "Default Scenarios".Export Scope This a drop-down menu as indicated by the downward facing triangle at the right of the field. Click this field to display a list of options.
Choice of:
All –Export the latest version of all scenarios from the schema specified by the Scenario Schema Name field. (Typically used to export all scenarios on a regular basis such as weekly.)
All Delta –Export only those scenarios modified since the last All or All Delta export. Rollups and assemblies containing modified scenarios are also exported. Deleted scenarios are only handled by All, not All delta. Dynamic rollups are exported only when the defining query is modified. Typically used on a daily basis to incrementally update a regularly-scheduled All export with just those scenarios that have changed in the past 24 hours.
Scenario –Export only component scenarios matching the criteria you specify in the next three fields (Component Type,Name/Part #, and Scenario Name).).Export Dynamic Rollups (Available only if Export Scope= “All”)
This checkbox determines whether export ignores dynamic rollups. When checked, dynamic rollups are included in the export. The default setting is UNchecked.Component Type This a drop-down menu as indicated by the downward facing triangle at the right of the field. Click this field to display a list of options.
(Available only if Export Scope= “Scenario”.)
Limited to the choices in the pull-down menu: Part,PCB Part Assembly,Roll-up,Dynamic Roll-up. If you are following the User Guide example, select Assembly.Name/Part # (Available only if Export Scope= “Scenario”.)
The exact name of the aPriori component that you are exporting. If you are following the User Guide example, enter "AP_ASSEMBLY_EXERCISE_EL0000".Scenario Name (Available only if Export Scope= “Scenario”.) The exact name (case-insensitive) of the scenario that you are exporting. If you are following the User Guide example, enter "Initial". Frequency Choice of:
Once –Perform a one-time export at the date and time specified. If you are following the User Guide example, select this option.
Repeat –Perform a series of exports at the time specified, on the dates or schedule specifiedDate/Time (UTC):
(YYYY-MM-DD HH:mm)
Time (UTC):
(HH:mm)Once –Use the time selection widget to select the date and time when you want this purge operation to run. Be sure to use 24-hour, UTC time, not local. For example, specify "15:04" for "3:04 PM" UTC (which would be "10:04 AM Eastern).
Repeat –Use the time selection widget to select the time when you want this purge operation to run. Be sure to use 24-hour, UTC time; for example, specify "15:04" for "10:04 AM Eastern".Interval: Repeat only–Re-run the export based on one of the following:
Minute –Run at the frequency specified in the Every: field 15,30, or 45 minutes. This setting only applies for the All Delta scenario export.
Hourly –Run at the frequency specified in the Every: field. For example, to run the job every six hours, specify 6 Hours. To run every hour, specify 1 Hour.
Daily –Run once a day. No further settings are required.
Weekly –Run once a week, on the days specified in the Days in Week: field. Note: Specifying Weekly and then selecting every day of the week is equivalent to specifying Daily.
Monthly –Run once a month, on the months specified, either on the Last Day of the month or on the Days: specified.Ends: Repeat only–Continue re-running the export at the specified time at the specified interval until the specified date (On YYYY-MM-DD) or until the end of time (Never). -
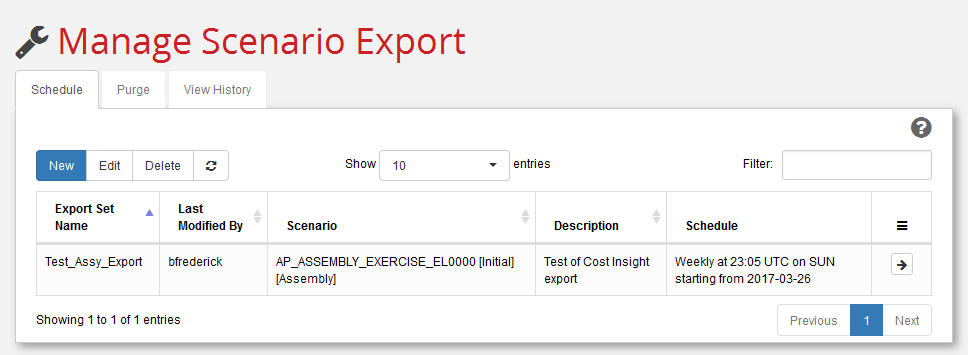
Click the Create button (you may need to scroll down to see it). A summary of the export set added to the window.
Note:
If there are any problems, an error message displays to the left of the Create button. View the log files for information that can help you to troubleshoot problems. (The Tomcat logs are located in <drive>:\apriori-platform\tomcat\logs.)
-
Once a scheduled export date/time has been reached (or is preempted by using the Execute Now arrow button), the export is executed. Use the View History tab to see the status of completed exports.
To Edit or Delete an Existing Export Set
- Select the Export Set row.
- Click the Edit or Delete button.
-
Follow any prompts displayed by Scenario Export.
Note:
Delete removes the export set schedule, it does not delete any export set data from the reporting database. To delete an export set data from the reporting database, use the Purge tab.