Adding Custom Fields
To add a custom field, complete the sub steps in each of these steps:
- Step 1: Create a Derived Table for Each Custom Field
- Step 2: Define a Join for Each Derived Table
- Step 3: Move the Derived Table Fields into the Display Area
Step 1: Create a Derived Table for Each Custom Field
Use the Data Management tab in the Domain Designer to add a derived table for each custom field.
This example uses the MySQL query syntax to create a string field for a user defined attribute (UDA) that is named costStatus.
The query syntax for numeric and date fields is included at the end of the example.
For the corresponding syntax for Oracle and Microsoft SQL Server databases, see SQL Queries for Different Types of Databases.
To define a derived table using MySQL query syntax:
-
On the Data Management tab for the Domain, in the Data Structure menu bar, click the + icon, and from the dropdown menu, select Create Derived Table. Alternately, right-click the data source node and then, from the context menu, select Create Derived Table.
 The New Derived Table window opens.
 -
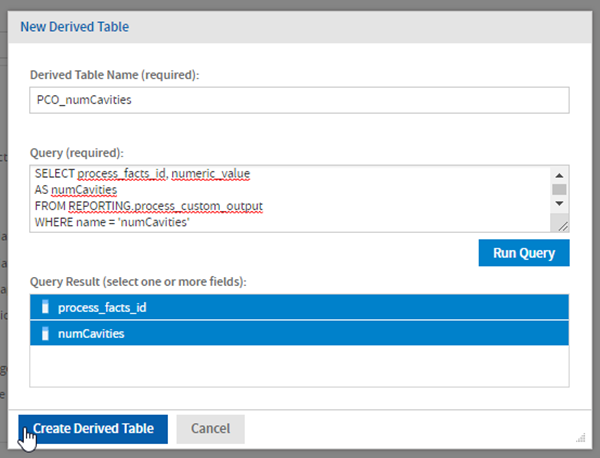
In the New Derived Table window, enter a name for the derived table in the Query ID section
-
Type the query syntax into the Query section
-
Note that
costStatusmatches the name of the UDA as displayed in the user_defined_attribute table. The figure shows the user_defined_attribute table, as defined in the MySQL database scheme.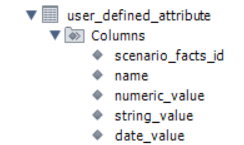
-
Since this field is for a string UDA, the string_value field is extracted from the user_defined_attribute table,
The scenario_facts_id field, which is required for defining a join, is also extracted.
-
REPORTING refers to the reporting database schema name for your installation.
Note:
REPORTING is optional in MySQL but required in Oracle.
Caution:
if you are using MS Word for cutting and pasting SQL statements you may run into errors because the quote (‘) character will be changed when entered in Word from what you need to enter in the QUERY section of the derived table.
-
-
To check that the query works, click Run Query. If successful, the query returns this window.
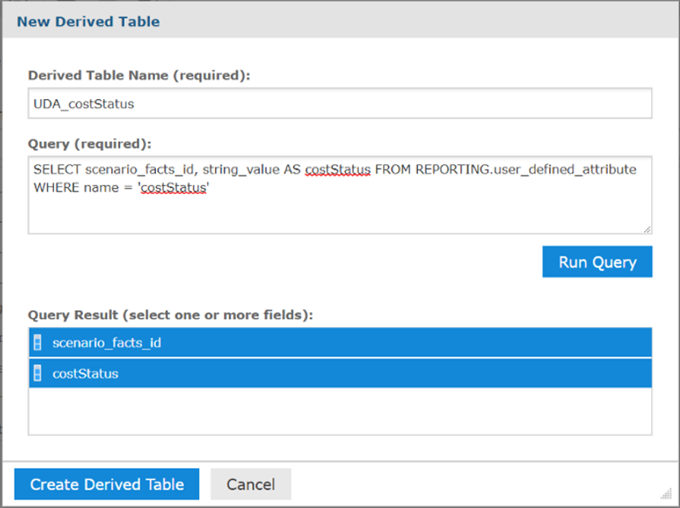 The window shows the Query syntax:
-
In the New Derived Table window, click Create Derived Table.
On the left-hand side of the screen, in the column of available objects, the new table appears .
To create other UDAs, follow the same steps, but with these changes to the query:
- The UDA name, which is entered after
WHERE name =) - The field from the user_defined_attribute table that corresponds to the type of field (string, numeric, or date).
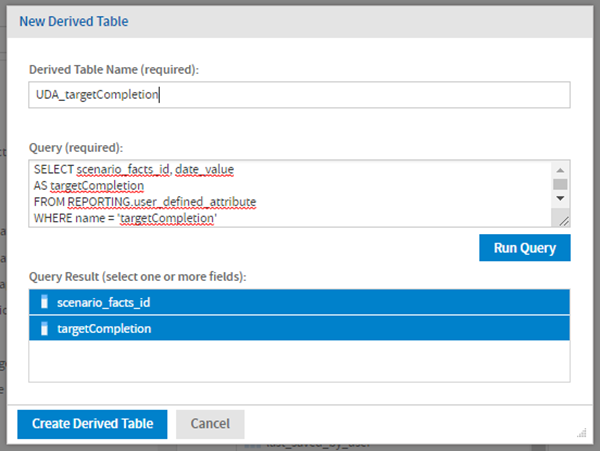
For example, to create a date field that is named targetCompletion, the query is:
SELECT scenario_facts_id, date_value
AS targetCompletion
FROM REPORTING.user_defined_attribute
WHERE name = 'targetCompletion'
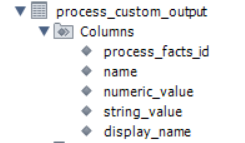
Other custom fields follow a similar format. For example, this is a query for a process custom output that uses a numeric field named numCavities.
SELECT process_facts_id, numeric_value
AS numCavities
FROM REPORTING.process_custom_output
WHERE name = 'numCavities'
This figure shows the process_custom_output table definition:
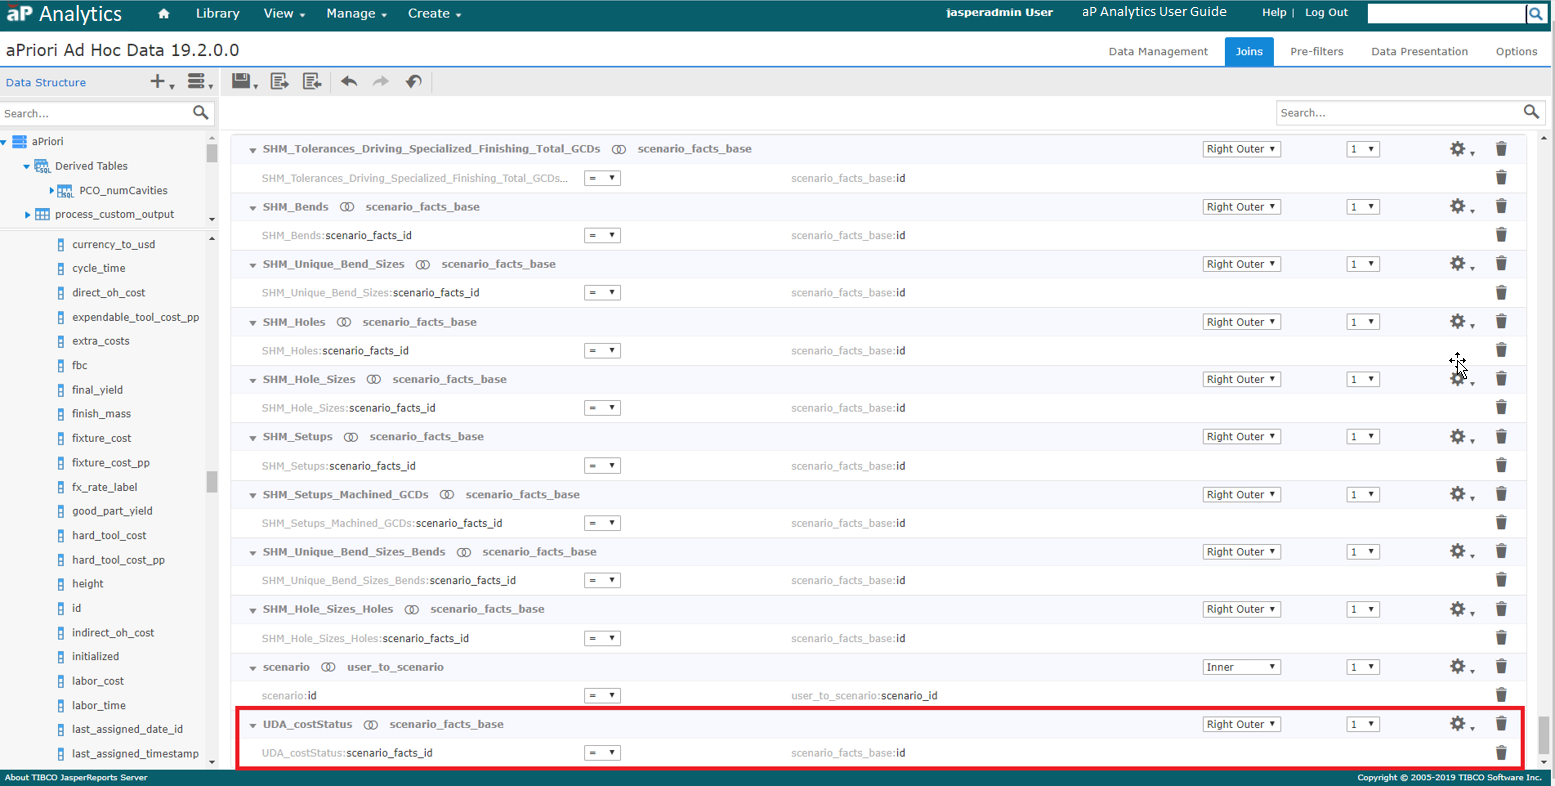
Step 2: Define a Join for Each Derived Table
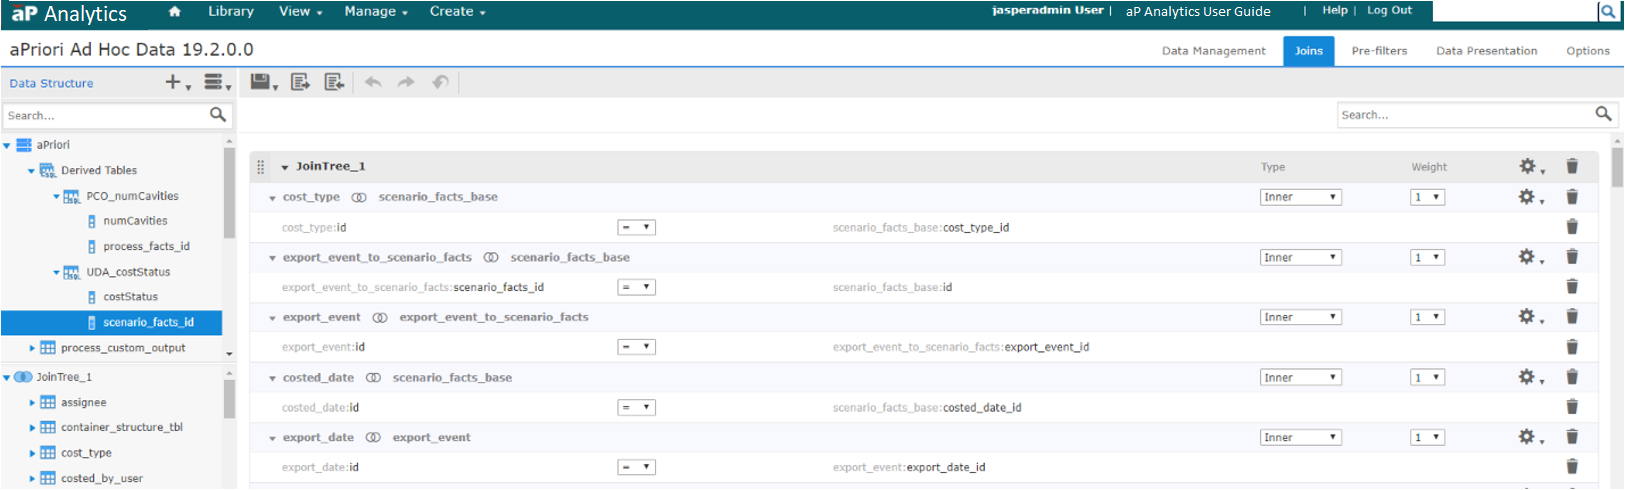
On the Joins tab, the Data Structure panel displays a tree view of the tables in your Domains. In this view, a single join tree contains a group of tables that are all connected directly or indirectly through joins. Unjoined tables and columns appear at the top (underneath the data source node) while joined tables and their columns appear at the bottom.
In order to create a join between two tables, both tables must each have a column that is compatible with a column in the other table. For example, the scenario_facts_id column in the UDA_costStatus table can be joined with the id column in the scenario_facts_base table.
To create the join, on the Joins tab, in the Data Structure panel, find the UDA_costStatus derived table, and then:
-
Expand the data source node to see the unjoined tables and columns in your Domain.
-
Drag the divider between the data source tables and the join trees.
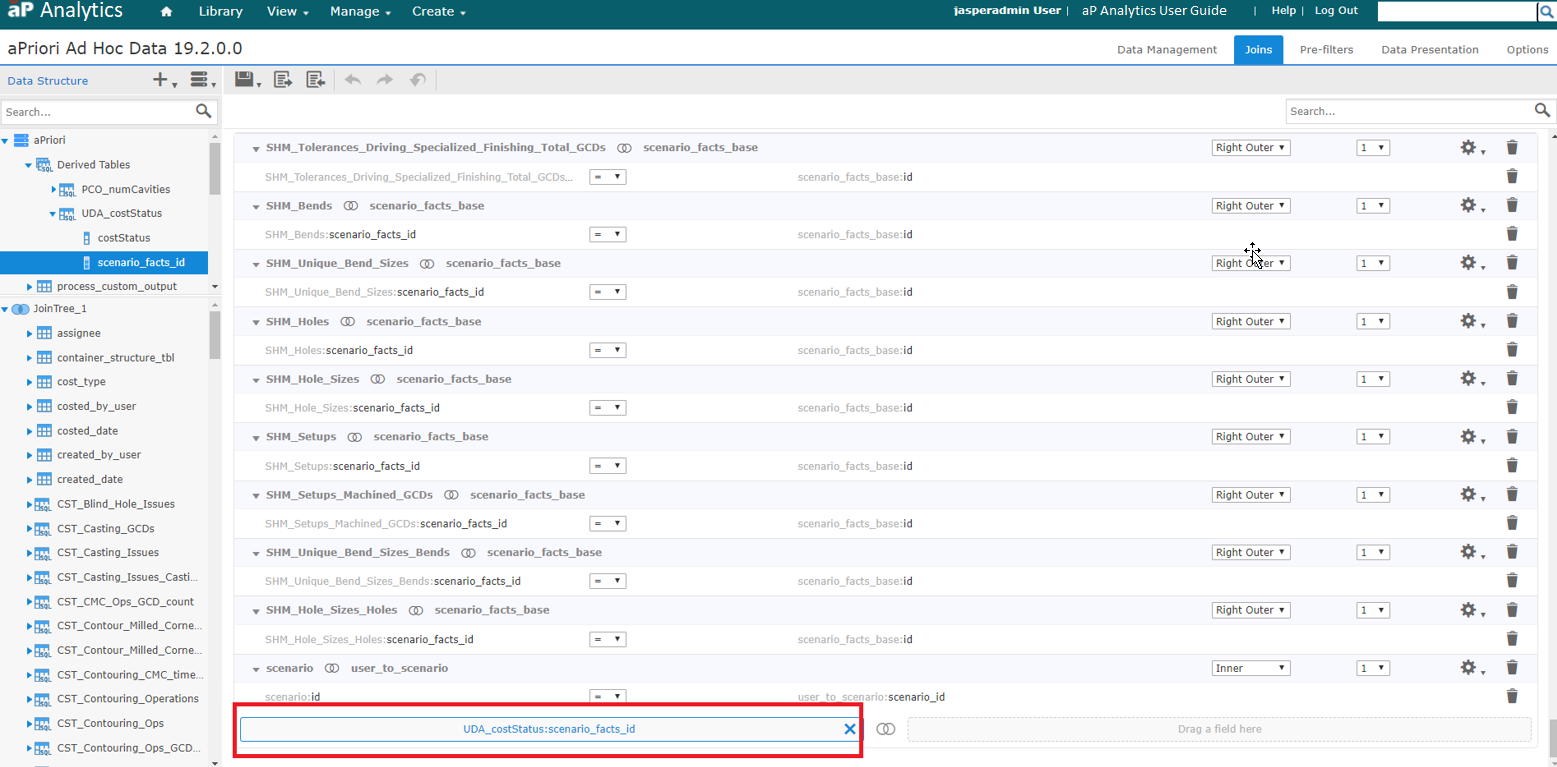
Drag the column to a blank space above, between, or below the existing join trees. The target area is highlighted with a thick blue line. A join is added to the Design panel. The column you dragged is added on the left, and the right join displays Drag a field here.
-
Expand the UDA_costStatus derived table to see the columns it contains.
-
In the Data Structure panel, find and expand the scenario_facts_base table. Drag the id column from the table to the Drag a field here box in the Joins design panel.
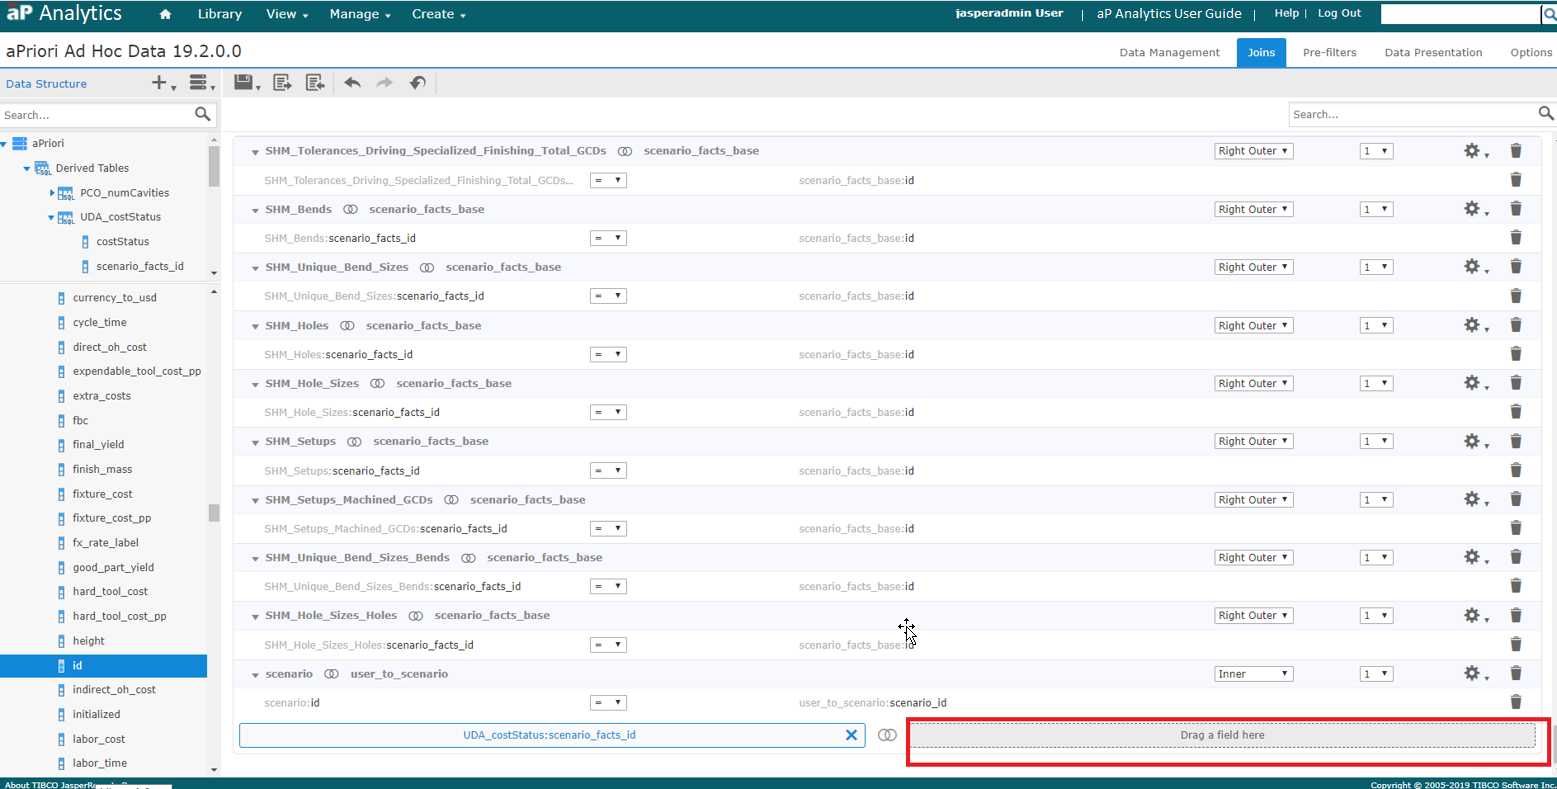
For the join type, select Right Outer.
For other custom fields you still choose the derived table that you created in the domain, but the Left table will be different.
For example, for PCO_numCavities the field is process_facts_id and the Right table is process_facts_base using the id field.

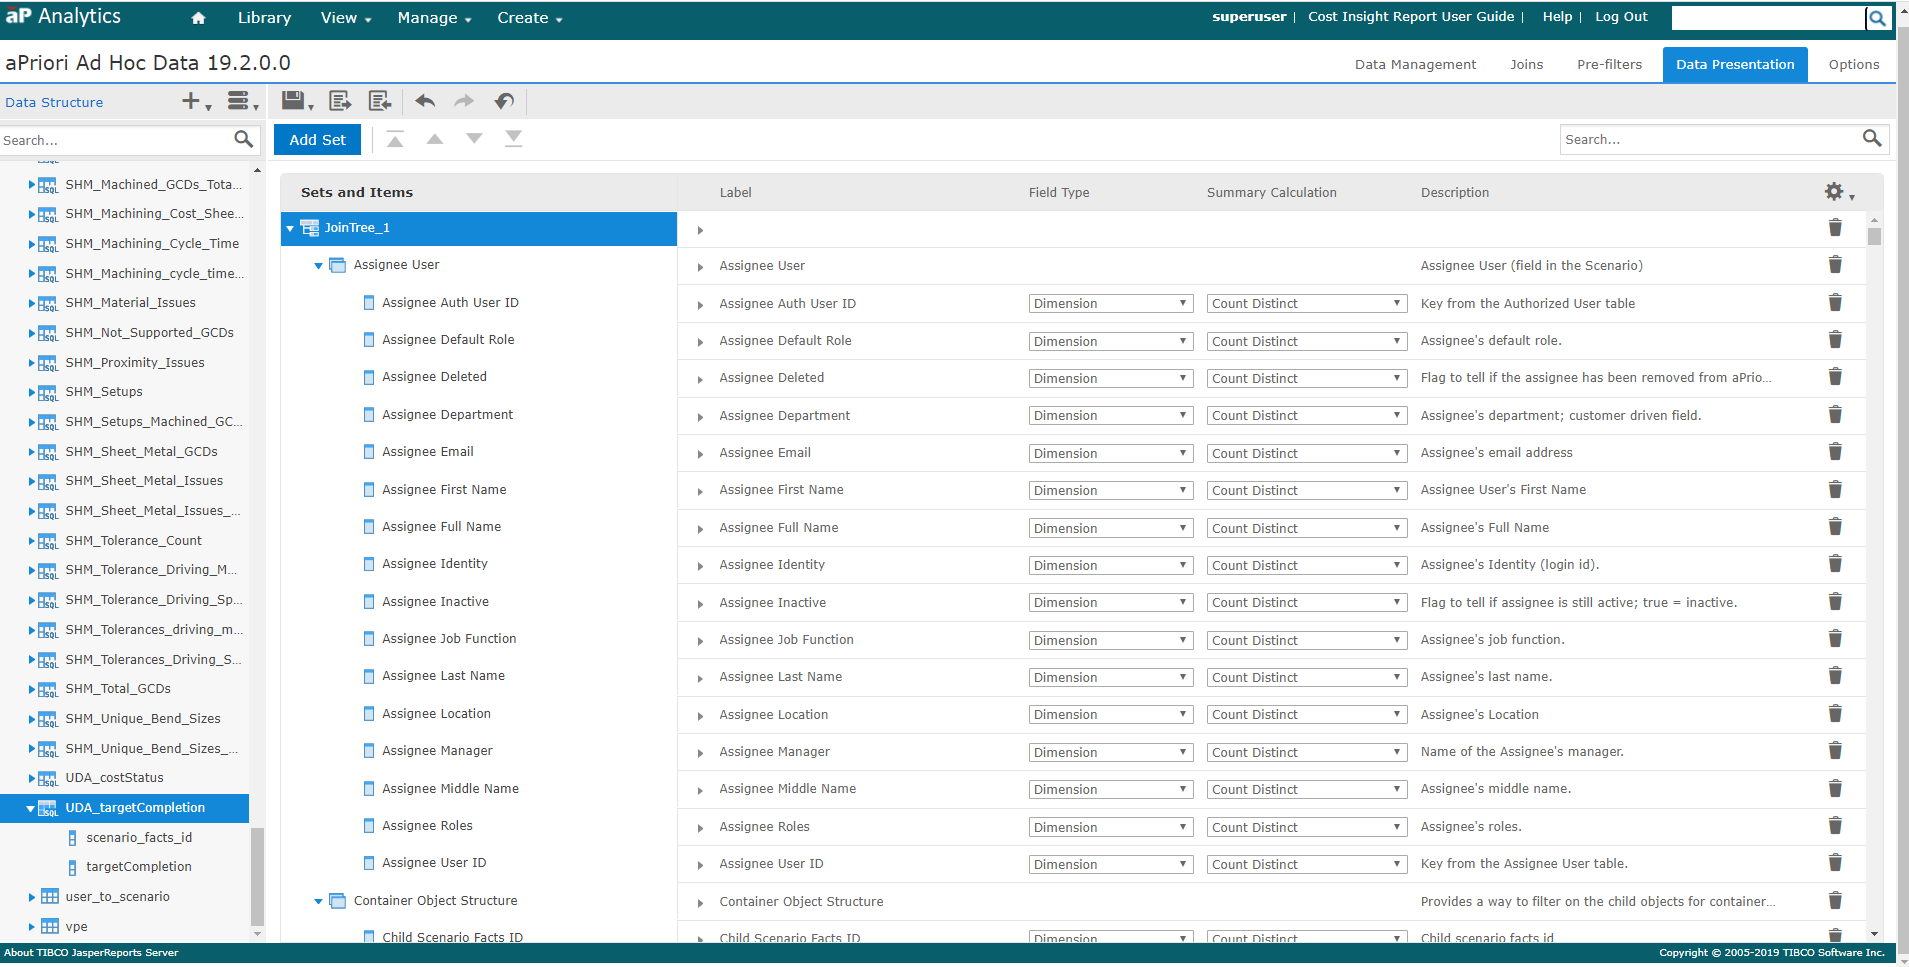
Step 3: Move the Derived Table Fields into the Display Area
The Data Presentation tab is used to specify the columns and calculated fields you want visible to users. You can also create user-friendly names and descriptions and set other column display properties. Typically, you expose only columns that are useful in building or filtering reports. Columns that you do not display are still part of the Domain and can affect the data retrieved.
The Data Presentation tab contains these elements:
- Data Structure panel – Displays available tables and fields for this Domain, including table copies, derived tables, and calculated fields. Joined tables appear as join trees. Dragging a join tree, table, or column from Data Structure to Sets and Items does not remove it from the Data Structure panel. In fact, you can add a Data Structure panel resource to more than one set.
- Sets and Items list – Lists resources that appear to report creators who use the Domain.
- Properties pane – Displays the properties of the associated set or item. This area can be expanded or collapsed.
The first step is to create a set in the display tab for each custom field. The example below shows how to create a new set and the appropriate items for the Target Completion UDA.
-
In the Sets and Items list, click JoinTree_1.
-
Click Add Set button. The new set appears at the bottom of the list.
-
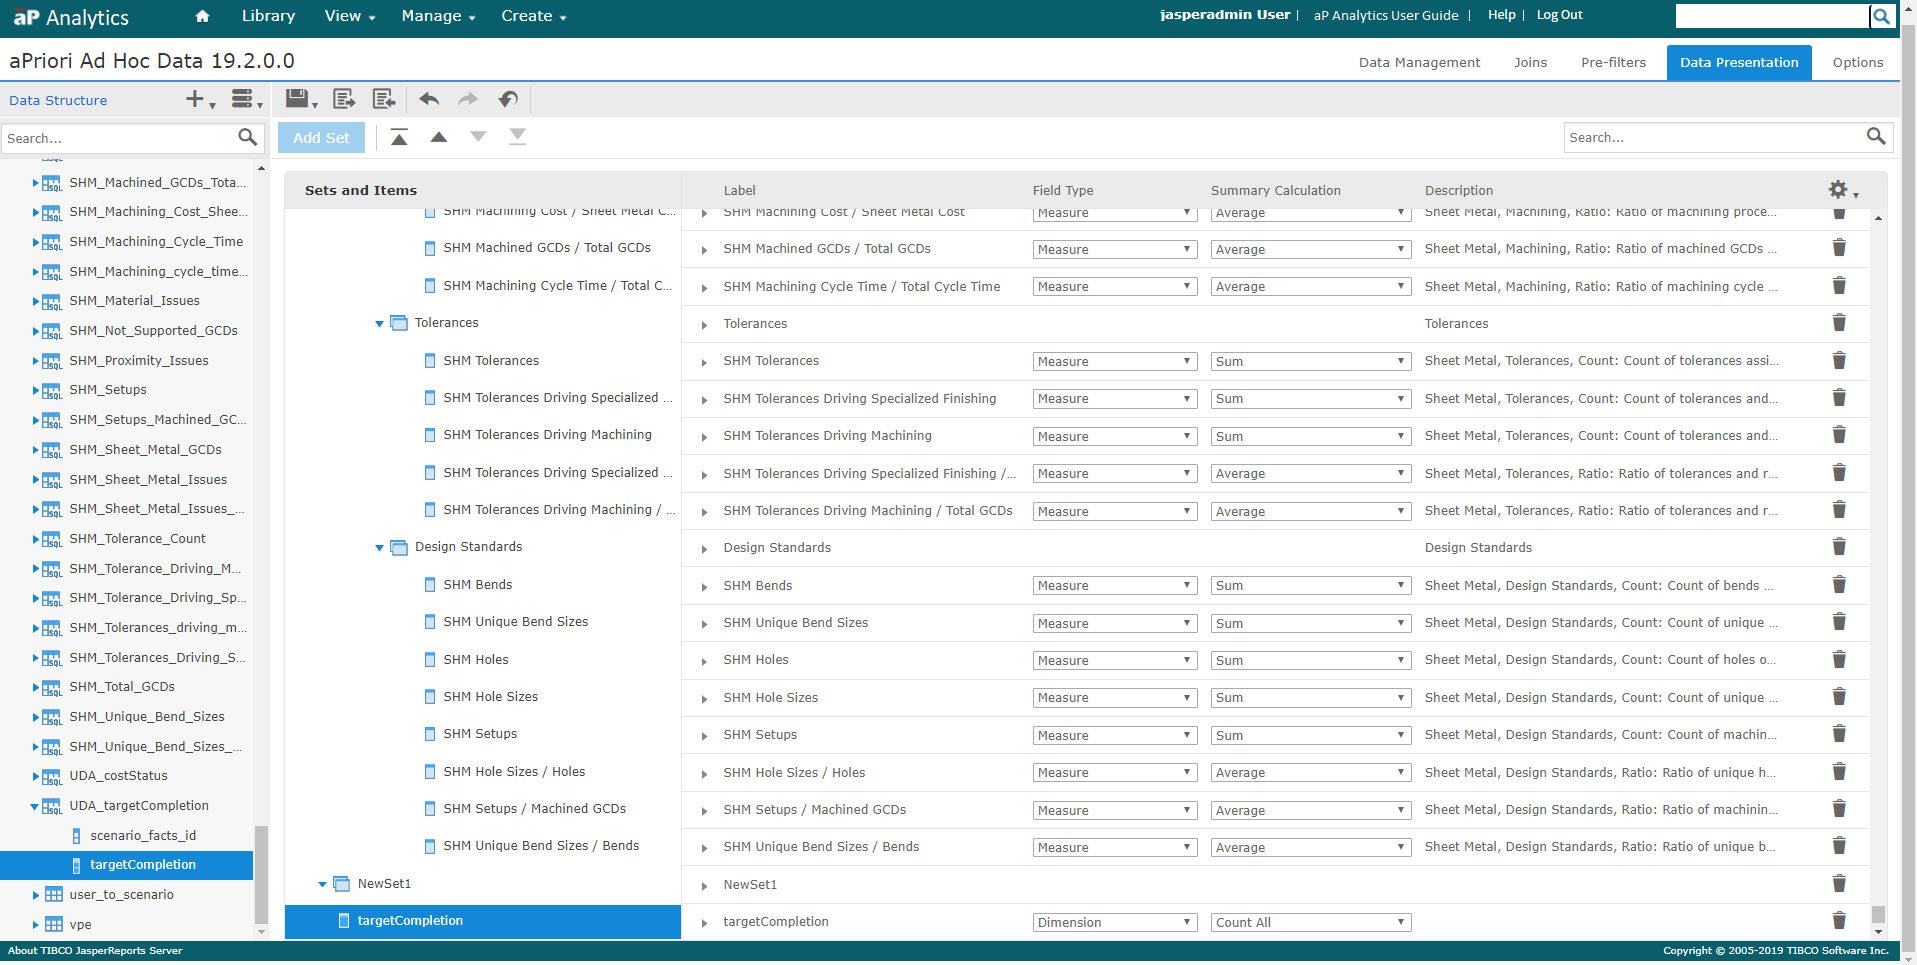
Drag the targetCompletion field from the UDA_targetCompletion derived table to the set.
-
To expand Properties pane, click the arrow near the NewSet1 label.

-
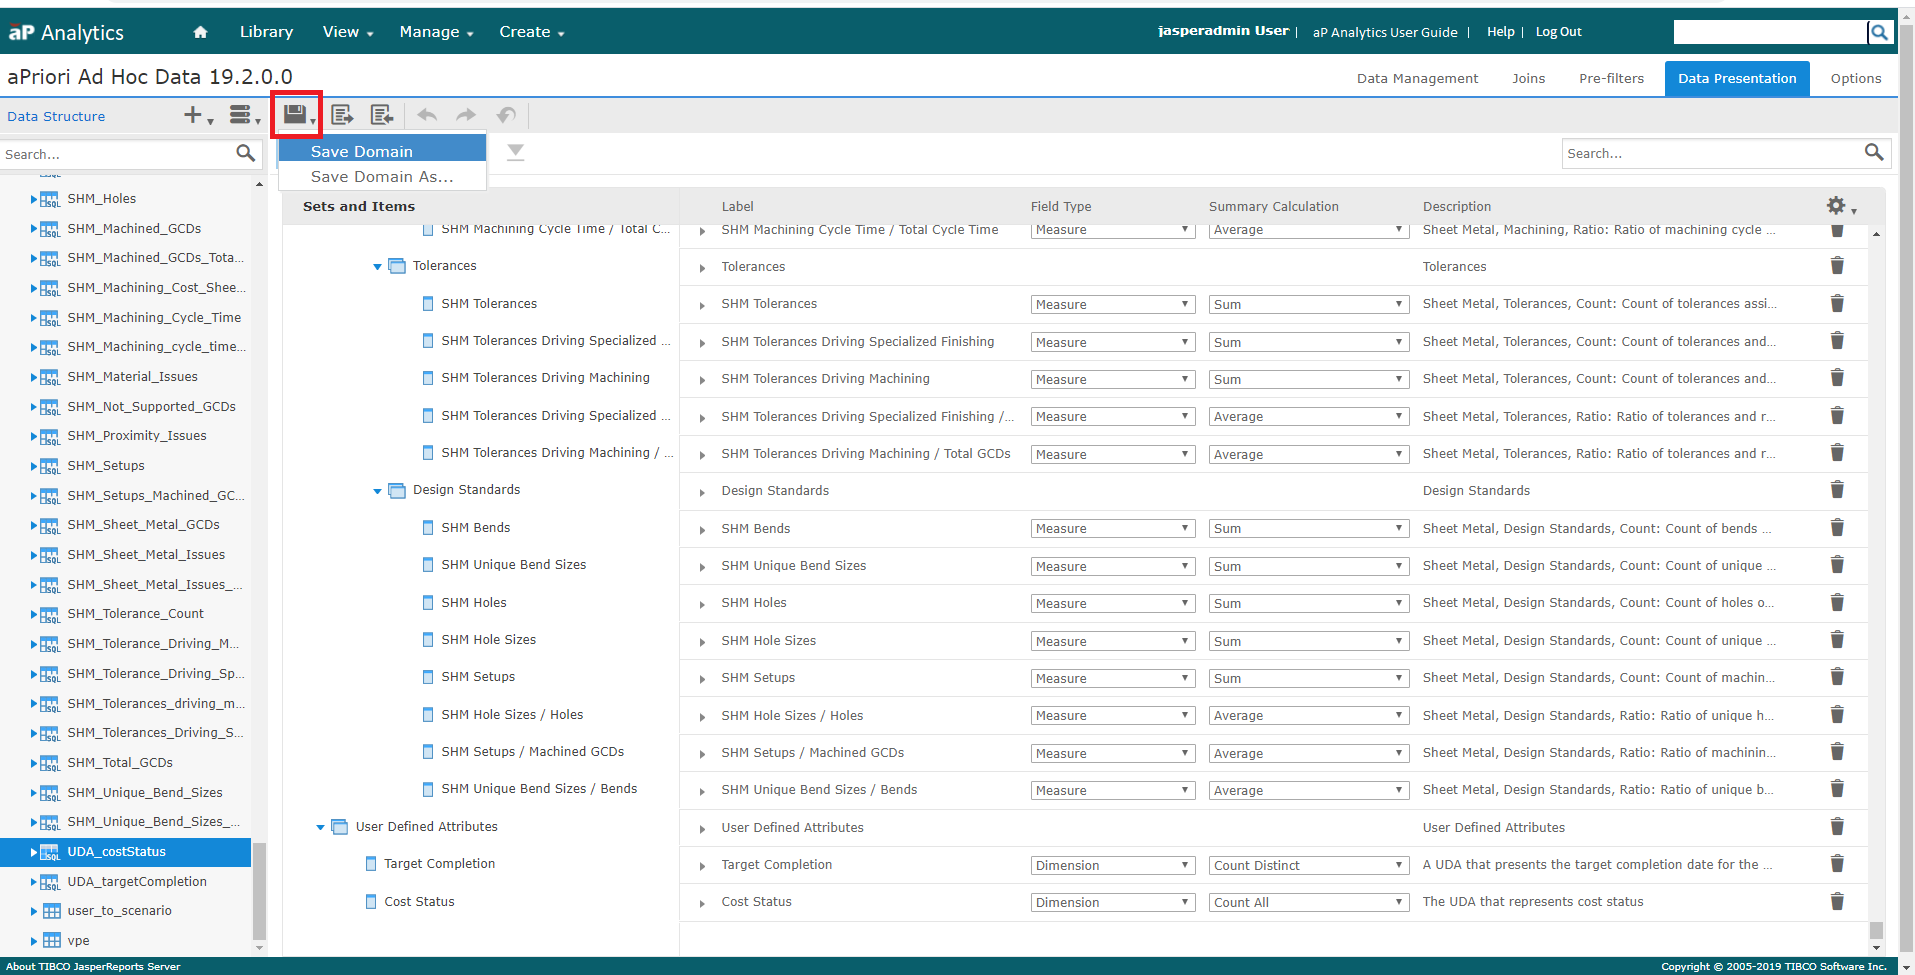
In the Properties pane, enter
User Defined Attributesfor the both the Label and Description, as shown in the figure.Then, to collapse Properties pane click the arrow next to Label.

-
Change properties for the targetCompletion field. Change the label and description fields as shown in the figure:
- Label –
Target Completion - ID –
Target Completion - Description –
A UDA that presents the target completion date for the cost estimation. - Field Type – Select Dimension.
- Summary Calculation – Select Dimension.
- Field Type – Select Dimension.
- Since this is a date field we have selected an appropriate date format in the Data Format area. Note that we have also changed the summary calculation to be “Count Distinct”. The Field or Measure setting has been set correctly to Dimension (which is a synonym for Field).
 Repeat the steps for each custom field that you have created. Once the edits are made, to update the Domain in the repository, select Save Domain from the menu.
- Label –