Editing Digital Factory data
The aPriori Digital Factory Manager supports several ways to edit Digital Factory data. You can:
- Edit individual data fields. We recommend this approach if you need to make changes to a single item.
- Edit data within the cells of a table. We recommend this approach for batch changes because you can view all the machines or materials requiring a change in one table.
- Export the data within a single Digital Factory machine or material folder to a .csv file, edit the data in Excel, then import the data back into the Digital Factory. This approach is efficient if you are editing a single machine or material table.
-
Export all the data in a Digital Factory to a set of Excel spreadsheets, where you can edit the data and then re-import it. This is useful if you need to edit a large amount of data across multiple process groups.
Note:
Do not edit the Cost Model Version without the support of aPriori Professional Services or aPriori Customer Support. Editing the version changes the Digital Factory’s process and cost logic and may change the behavior of your specific Digital Factory (that is, changing the cost model version can modify the Digital Factory configurations and cost model extensions made by your organization).
Editing individual data fields
-
Navigate to the display of a single page of information.
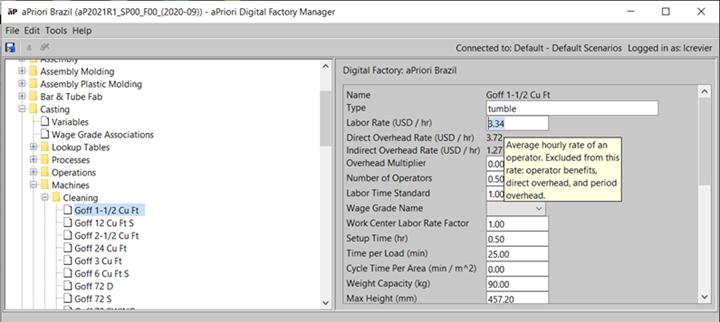
Figure: Information page for a Digital Factory -
Edit values as necessary within the data fields shown in the Data pane.
As you edit, an asterisk (*) appears next to the file in the Navigation pane and next to the row to indicate that there are unsaved changes.
-
Select File > Publish Digital Factory from the Digital Factory Manager menu bar or click
 in the toolbar to save your changes.
Editing data in tables
-
Navigate to the display of a table of information.
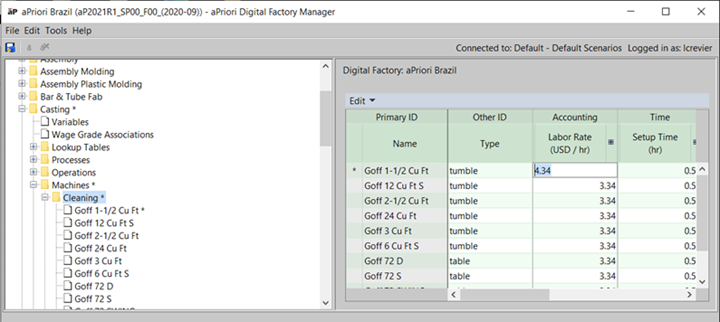
Figure: Information table for a Digital Factory -
Double-click non-gray cells in the table displayed in the Data pane to edit the values in those cells.
As you edit, an asterisk (*) appears next to the file in the Navigation pane and next to the row to indicate that there are unsaved changes.
When editing data in a table, you can:
-
To Verify Hover in the upper left corner of the table to display icons
 that allow you to expand, collapse, and resize columns.
 -
Click
 in the column header to expand the column and display its sub-columns. Click
  to collapse the sub-columns.
 -
Click a column header to sort the table by that column. Click again to reverse the sort.
-
-
Select File > Publish Digital Factory from the Digital Factory Manager menu bar or click
in the toolbar to save your changes.
Editing by exporting individual tables to .csv files
-
Navigate to a machine or materials table.
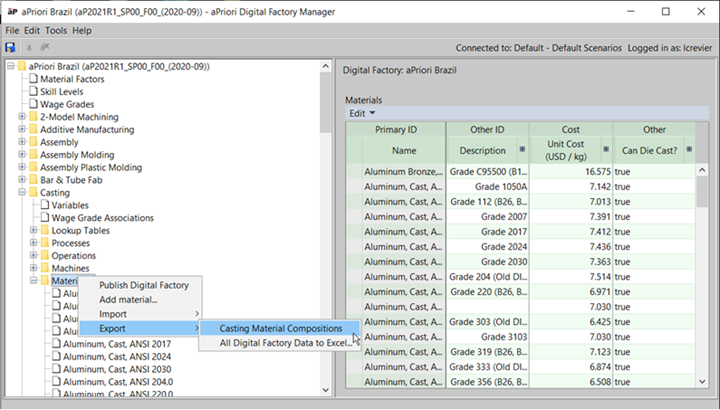
Figure: Exporting tables for a Digital Factory -
Right-click the folder in the Navigation pane and select Export > <table_name> from the context menu.
- In the resulting Select a File to Export window, navigate to the folder where you want to save the .csv file, specify a name, and click Save.
- Open the exported
.csvfile in Microsoft Excel. -
Edit the values in Excel.
The Name field in material and machine tables cannot be changed because it is the primary ID for the table. If you do edit this field, it will create a new machine, material type, or material stock and leave the original one as is when you import the data into the aPriori Digital Factory Manager.
You must delete items from within the Digital Factory Manager. They cannot be deleted in Excel. For more information, see Deleting machine and material data.
-
Save the edited file as a
.csvfile in Excel. - Right-click the folder you selected in step 1 and select Import from the context menu to display the Select File to Import window.
- Select the edited
.csvfile and click Open to update all the data within the folder with the edited data and display the details of the import in the Import Summary window. - Click OK to close the Import Summary window.
- Select File > Publish Digital Factory from the Digital Factory Manager menu bar or click in the toolbar to save your changes.
Editing by exporting data to Excel
aPriori's powerful Excel export/import capabilities are covered in the following sections:
- To export Digital Factory Data to Excel
- Exporting Digital Factory Lookup Tables to Excel
- Importing Digital Factory Data from Excel
- Importing Digital Factory Lookup Tables from Excel