Defining an LDAP connection
This page describes LDAP connections.
Displaying the LDAP Connections tab
- If the System Administrator window is not already open, click Tools > System Admin Toolset on the main aPriori client user interface.
-
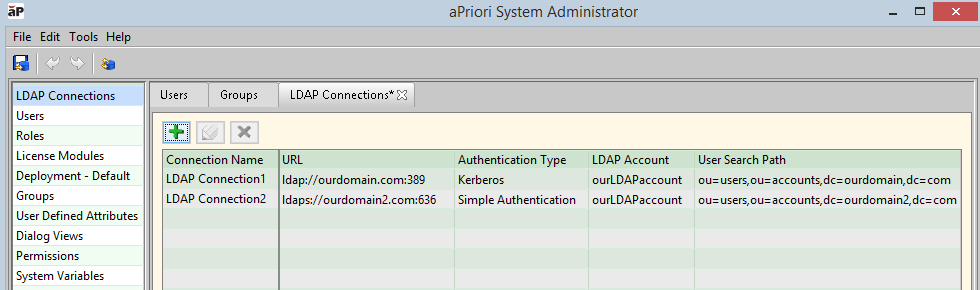
The LDAP Connections tab is displayed by default. If you are on another tab, click LDAP Connections in the Navigation pane to display it.
Adding a new LDAP connection
-
In the LDAP Connections tab, click
 to display the Required tab on the New LDAP Connection window.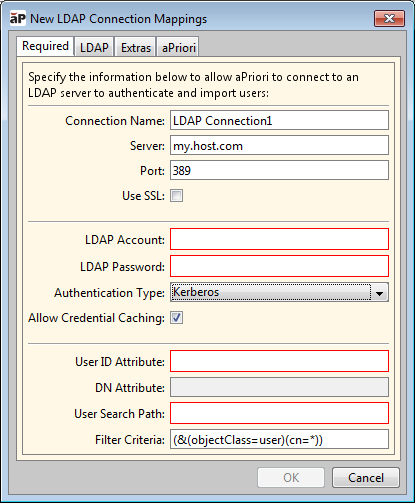
-
Complete the fields as described in the following table:
Column Description Connection Name Enter any unique string used to identify the LDAP connection. Server Enter the LDAP server URL. Port Enter the port number used by the LDAP server. The default port is 389, which is not a secure SSL port. Use SSL aPriorirecommends that for production work, you configure your LDAP server for SSL and specify a secure port such as 636. You must configure theaPrioriclient to work with an SSL server. See Configuring an LDAP SSL connection for more information. This checkbox changes the protocol from “ldap://” to “ldaps://”. LDAP Account Enter the user or account name thataPriorishould use to connect to LDAP for user authentication and importing. LDAP Password Enter the password thataPriorishould use to connect to LDAP for user authentication and importing. Authentication Type Select Kerberos(default) or Simple Authorization.
Note: If you select Kerberos, and you encounter difficulty getting it to work, try placing a Kerberos configuration file in theaPrioriJRE/lib/security folder or in the Windows system folder.Allow Credential Caching Check this box if you wantaPriorito remember the user login credentials used to authenticate a user. This allows users to be logged intoaPrioriwithout entering a user name and password if they are successfully authenticated.
You must select the Kerberos authentication type to enable this option.User ID Attribute Specify the name of the LDAP attribute representing the user login ID. Typically "sAMAccountName". DN Attribute Enter the LDAP attribute that represents the Distinguished Name (typically, "distinguishedName").
This field is not required if you are using LDAP for authentication only. It is ONLY required when an 'Org Unit' or 'Security Group' is selected as a Mapped Attribute on the Extras Field.User Search Path Specify the nodes of the LDAP tree structure that contain user objects. Valid entries must follow LDAP Search Path conventions and will depend on your LDAP implementation (for example, Microsoft Active directory vs. Open LDAP, and so on.) Filter Criteria Optional. Enter criteria using LDAP Data Interchange Format (LDIF) syntax to limit which users are imported from the LDAP server. For more information, see Filtering imported users.
Leave this field blank to import all the users in the specified user search path.Depending on your company's details, the Required tab may look like the following when completed:
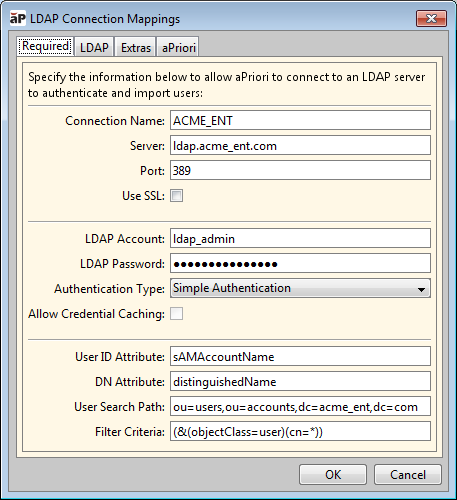
Note:
You must also provide settings for required fields on the aPriori tab (described below) before the OK button will be enabled.
-
(Optional) Select the LDAP tab to map LDAP attributes to fields in the aPriori user list. Common values are populated as defaults. For illustration purposes, the last field (Function:) is shown with an expanded drop-down menu.
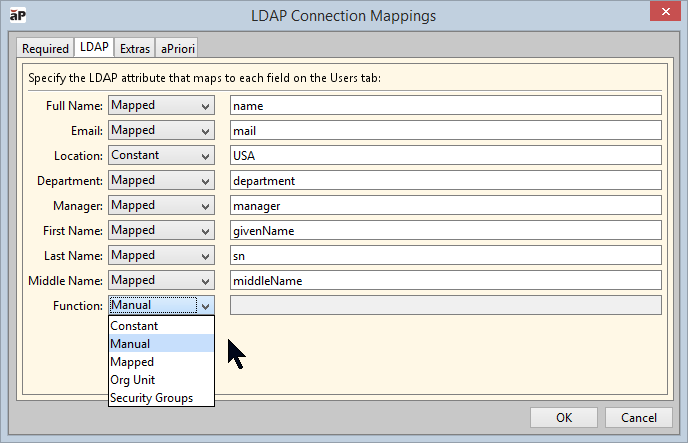
When you import users from an LDAP connection, these attributes automatically populate the mapped fields in the aPriori user list, which can be viewed in the System Administrator Users tab and dialogs.
-
Constant: Use this option when you want to set the field to a specific value. In the above screenshot example, the Location field has been set to a constant value of “USA” assuming that the LDAP connection is populating users from an LDAP repository that is location-specific.
-
Manual: Use this option when you want the aPriori attribute to be filled-in manually by an administrator for each user, either from the UI or from a spreadsheet import.
-
Mapped: Use this option when you want the aPriori user attribute to be set by the corresponding LDAP attribute. In the example screenshot above, the Full Name attribute field is set to “name” so that it is populated by the LDAP “name” attribute.
-
Org Unit: Use this option when you want to map an LDAP OU (Organizational Unit) to an aPriori attribute. For example, you might want to map the LDAP equivalent of the user’s Business Unit to one of aPriori ’s “Extra” fields. The input control for this option is a level number that indicates where the Business Unit is in the user’s DN (Distinguished Name path): the field prompt directs you to “<enter OU level>”. Note that there is no guarantee that each of the users being synced will have appropriate data in DN: for example, a user located on the 2nd level, for example, will have data for levels a and 2, but will not have data for level 3. Group membership will be determined based on the "member" group attribute which is (typically) not propagated in hierarchical group structure, so only groups where the user is a direct member are recorded.
-
Security Groups: Use this option when you want to store a list of security groups that the user belongs to. When this option is selected there are two input controls that you must input. Note that there can be more than one group returned so the value in this field is a string that has a comma separated list of group names.
-
The first field specifies the <group search path> to the LDAP object that the groups are organized under.
-
The second field is the filter criteria for the groups of interest.
-
-
-
(Optional) If there are additional LDAP attributes that you would like to capture when users are imported, you can specify up to 10 attributes on the Extras tab. In the following example, “Extra 1” extracts the top-level organizational unit (“OU”) out of the DN path, while “Extra 2” pulls all security group names starting with “aPriori ” for which the user is a member:
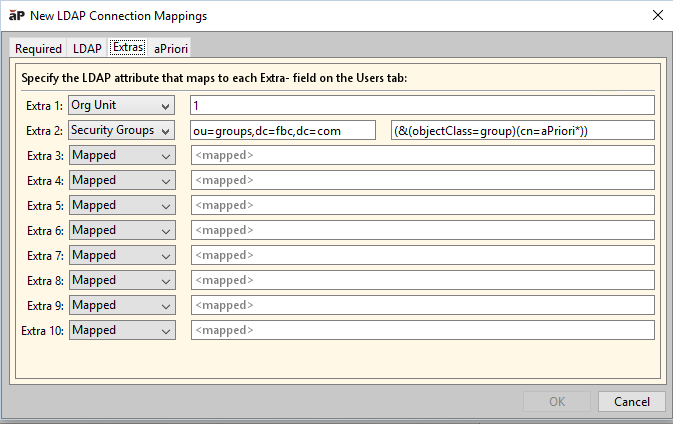
These Extra user fields map to the Extra fields visible in the Edit User dialog box. Note that these user fields can also be populated from that dialog box, or by importing data from a spreadsheet, in addition to importing from LDAP attributes.)
-
(Required) You must also specify other values that are typically set on the New User dialog box for imported LDAP users, as well as automatically assign these users to specific aPriori Access Control groups. These fields are required so that any new users that are created during a LDAP Sync event have the necessary settings to log into aPriori .
Click the aPriori tab:
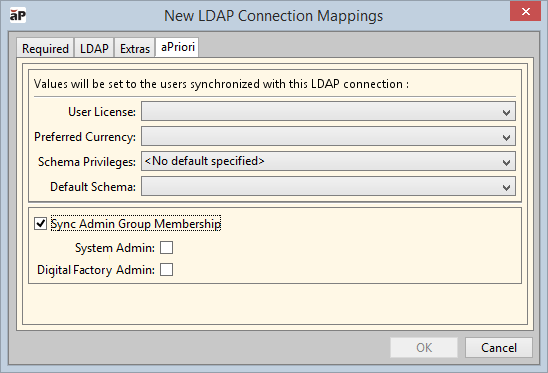
See the table under aPriori user password requirements for details about the User License, Preferred Currency, Schema Privileges, and Default Schema settings.
The following fields are required. The OK button will remain disabled until you provide values for these fields:
-
User License
-
Schema Privileges
-
Default Schema
The Sync Admin Group Membership options provide for automated insertion of users into the System Admin and Digital Factory Admin groups only. All other group membership must either be manually populated or managed through the Group Membership Process. Note that this is new behavior introduced in Release 2017 R1, to separate user definition and Access Control group membership.
The Sync Admin Group Membership checkbox enables the System Admin and Digital Factory Admin checkboxes if these groups are set to Manual in the Groups window (see Groups tab in the Access Control chapter).
-
-
If these groups are set to Automated or None, the corresponding checkbox will be shaded, and you will not be able to change its state. If the checkbox is available, checking it will cause all LDAP users for this connection to be made members of that admin group (or to remain in that group if already a member). Leaving the box unchecked causes any LDAP users for this connecting to be removed from that admin group to which they belong. Note that if you do not have a Super User defined, this might cause you to lose all of your admin users if the LDAP connection includes all of your admin users, and you publish the results of the LDAP operation without first carefully examining those results.
-
When you finish, click OK.
If the OK button is disabled, check that you have completed all the necessary fields in the Required and aPriori tabs.
-
Click File > Publish Changes from the System Administrator menu bar or click
 in the toolbar to save your changes.
Editing an LDAP connection
- Select LDAP Connections in the Navigation pane to display the LDAP Connections tab.
- Select an LDAP connection and click
 to display the LDAP Connection window.
 - Edit the various tabs and fields as described in the previous section and click OK.
- Click File > Publish Changes on the System Administrator menu bar or click in the toolbar to save your changes.
Deleting an LDAP connection
- Select LDAP Connections in the Navigation pane to display the LDAP Connections tab.
- Select an LDAP connection and click
 to display the Confirm Delete window.
 - Click OK to delete the selected LDAP connection.
- Select File > Publish Changes on the System Administrator menu bar or click in the toolbar to save your changes.
A warning is displayed if the deleted LDAP connection is referenced by a user’s Provenance field. If you receive this warning, update the user’s Provenance field to a valid LDAP connection.