Cost a PCBA
Tip:
See the Cost Model Guide > PCBA documentation for more details of the PCBA Process Group.
To import and cost a new PCBA assembly
-
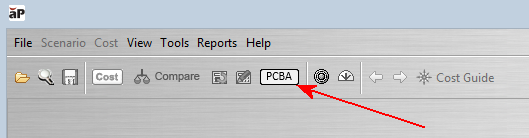
In the aPriori client, click the PCBA button.
-
This displays the PCBA Costing dialog, where you input important values that describe attributes of the PCBA which are not defined in the BOM:
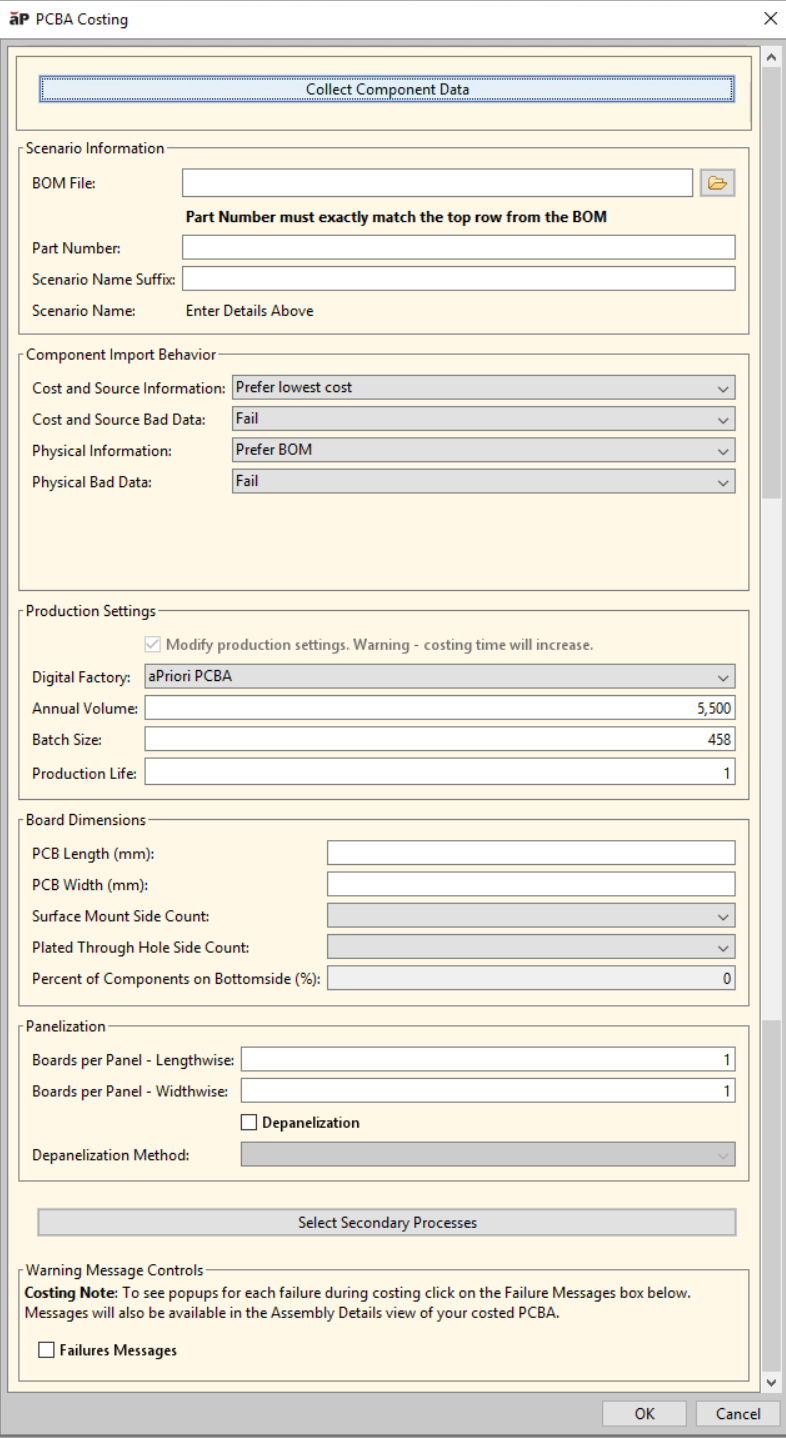
Use this dialog to define global inputs used by multiple processes, such as board dimensions. Enter field details for Scenario Information, Component Import Behavior, Production Settings, Board Dimensions, and Panelization - see PCBA Costing Dialog Parameters
-
To use the Electronics Data Collection service to match the parts in your BOM to parts in Silicon Expert and automatically add costing data from Silicon Expert to your Wire Harness BOM, click Collect Component Data. For more information, see Electronics Data Collection.
-
To prevent failure message windows from displaying during the costing process, select the Failure Messages check box.
-
-
Click Select Secondary Processes to show the Optional Processes dialog:
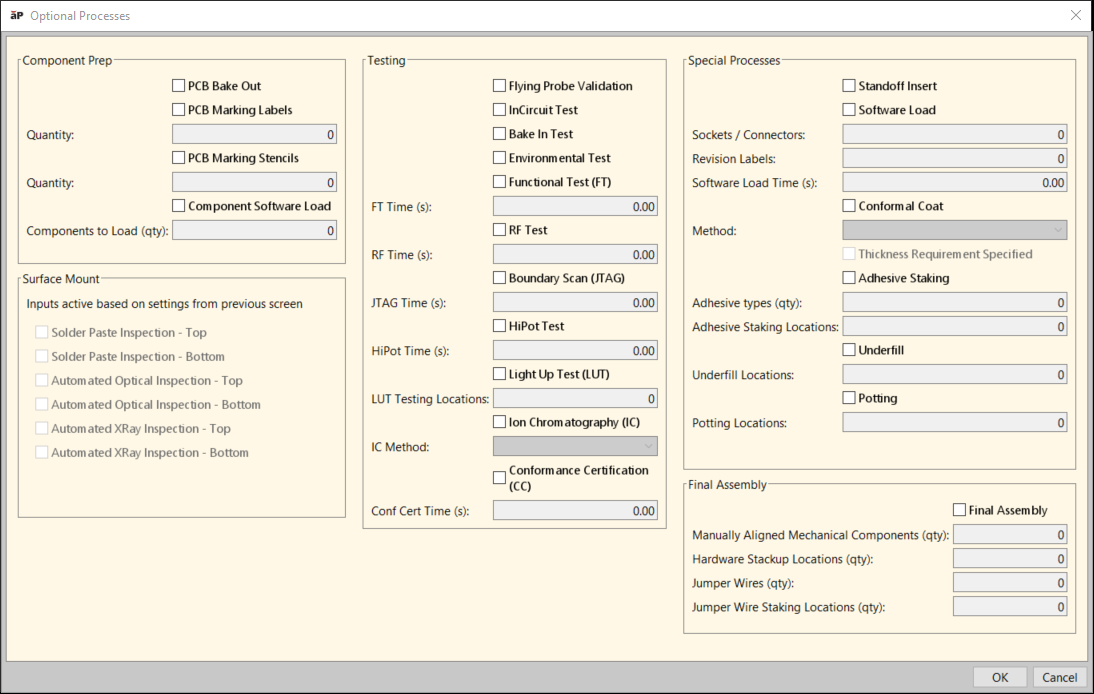
Use this dialog to indicate which processes should be executed for this PCBA. See Cost Model Guide > PCBA > PCBA Processes - Assembly for more details.
Click OK when done.
-
Click OK on the PCBA Costing dialog box.
- aPriori begins to cost the PCBA based on the inputs you have provided.
- You can now use your PCBA, as for a standard assembly and its component parts (see Analyze Assemblies).
Recost a PCBA
You can use the PCBA button to recost, selecting Modify Current PCBA when prompted, and following the process as described above.
However, to recost using different production settings (such as volume) without changing other PCBA settings, you use the Cost Guide - see Analyze Components with the Cost Guide. In this case, update the production settings, cost the assembly, copy the production volumes to the children, and then deep cost the assembly - see Deep Costing Assemblies.
Resolve Costing Errors
When using the PCBA model for the first time, you may see messages such as “Could not find a feasible routing”. This typically indicates that aPriori could not find a match between a part in the BOM and the Component Library. Read the following sections for information about how to proceed.
To validate your initial costing, aPriori recommends that you validate your results, especially when first getting started with PCBA costing. This means manually checking for feasibility or costing errors and checking the number of components in the assembly against the number of components listed on your PCBA BOM.
Common Errors
Common errors include:
- Something is not typed correctly.
- The component is missing from the Component Library (or it exists in the library but does not have a price or is missing a type designation).
- The inputs you provided in the PCBA Costing dialog conflict with the data extracted from the BOM and Component Library. This typically involves the settings of Surface Mount Sides and Plated Through Hole Sides. For example, if your BOM contains no surface mount components but you specify Single Sided or Double Sided rather than None. Or conversely, if you specify None, yet your BOM contains components of the specified type.
Add Operations
Another adjustment that you can make is to add additional operations that might not be called out explicitly on the original BOM. For example, labeling operations might not be in the BOM, and so do not automatically appear in the Assembly Details tab.
To manually add such an operation, bring up the Routing Selection editor by selecting the assembly and clicking Edit > Routing Selection in the Manufacturing Process panel). Add the missing process and adjust the quantity in the Process Setting Options.
See Select and Edit a Routing for more information.
Missing Components
If you get a failed costing due to a component or component cost missing from the Component Library, you can work around this failure.
For the short term, you can open the component and change it to a manually costed part and provide a material cost (if available) that will capture most of the cost impact of the missing component.
In parallel, you should contact your Digital Factory Manager who is responsible for maintaining and updating the Component Library to implement a permanent fix. See Digital Factory Administration Guide.