Import Spreadsheet Data to a Digital Factory
You can import previously-exported Digital Factory data from Excel Spreadsheets into your installation, including:
- Selected data
- Lookup tables
- Processes
You can use these import functions after you export this information (see Export Digital Factory Data to a Spreadsheet), then modify it in Excel; you can then import the modified data into the same or other Digital Factories. For example, you can make quick changes to labor rates and import these changes to Digital Factories.
Import Selected Data
You can import specific sets of Digital Factory data from Excel spreadsheets, such as materials, machines, plant variables, and tool shops.
- Open the Digital Factory to import the data into, and from the toolbar, click File > Import > Digital Factory Data from Excel.
- Navigate to and click the index Excel file. (This is the one without a process group embedded in its name. For example, if you had previously exported the data from the aPriori USA Digital Factory and kept the default name, the index file would be "aPriori USA.xls".)
-
Click Open.
If aPriori displays an error message when you try to import, double-check that you have not selected one of the process group files or another incorrect spreadsheet. You MUST select the index spreadsheet. The import can take several minutes if it consists of many process groups. Asterisks appear next to process groups in the Navigation pane if they have been modified by the import. -
[Optional] When prompted, either enter a description of your changes and click OK or click Skip Log.
-
[Optional] When prompted to publish the Digital Factory, click Yes. Imported data will not be available to other Digital Factory users unless you Publish.
-
In the Success window, click OK.
Import Lookup Tables
You can import lookup tables from Excel spreadsheets (see "Working with Lookup Tables" in the Cost Model Workbench User Guide).
For an example of how the aPriori Wire Harness Digital Factory uses lookup table import/export to maintain a Component Library of approved parts, see Updating the Component Library.
Note: When editing a lookup table spreadsheet, do not leave empty rows, as this will cause problems when you import the spreadsheet.
- Open the Digital Factory to import into.
- From the toolbar, click File > Import > Digital Factory Lookup tables from Excel.
- Navigate to and select the index Excel file for that Digital Factory - this file does not have a process group as part of the file name. For example, the index file for a previously-exported aPriori USA Digital Factory is aPriori USA.xls.
Note: if you select the wrong file, an error message appears when you try to import it. - Click Open.
- Using the usage notes shown, select either Replace or Add as appropriate.
The import can take several minutes if it consists of many process groups. Asterisks appear next to process groups in the Navigation pane if they have been modified by the import. - [Optional] When prompted, either enter a description of your changes for the log and click OK or click Skip Log.
- [Optional] When prompted to publish the Digital Factory, click Yes.
Import Processes
You can import Digital Factory process spreadsheets into a process group in a Digital Factory.
Note:
If a branch node has nothing defined in it (for example, no node attributes or process setup options), it is skipped/ignored during import..
- Open the Digital Factory to import processes into.
- From the Digital Factory Manager toolbar, click File > Import > Process...
- In the Import Processes dialog, navigate to and select the
.process.zipcontaining the processes to import. -
In the resulting Import Processes dialog, select the process group into which you want to import the process, then select the elements of the process which you wish to import, and leave unchecked anything that you do not want to import.
For example, importing all elements into the Casting process group: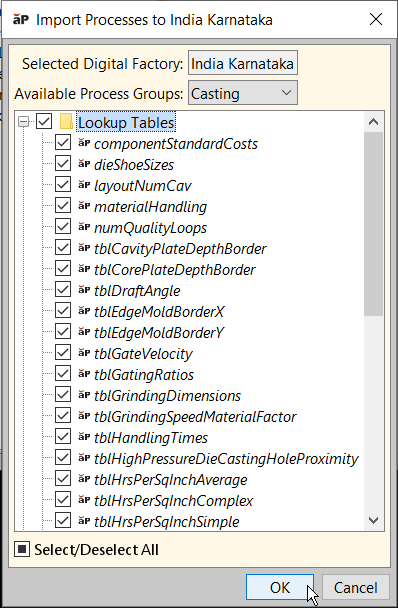
-
Click OK when done.
- In the Message window, click OK.
- You can modify this process as necessary (see the Cost Model Workbench User Guide).