Access Control user interface
You define Access Control from the System Administrator window, using the Groups and Permissions tabs.
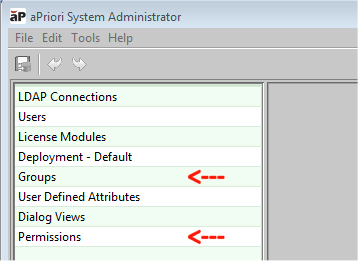
You may also access the Users tab for some purposes such as assigning users to groups from the Users tab as well as the Groups tab) but most Access Control configuration is done through Groups and Permissions.
Important:
For aPriori cloud users, the Permissions screen is view-only; you cannot add or edit. In addition, In the Groups screen, all panes except the Members pane are view only; cloud users can add and remove members for an existing group, but you cannot add or otherwise edit groups. You must contact your aPriori account team to request changes to Permissions and Groups. aPriori Services team members are able to make these updates on your behalf.
The following sections provide help with configuration.
Groups tab
Use the Groups tab to create or delete groups and subgroups, assign users to them, associate them with specific Access Control permissions, define group attributes, and specify group membership behavior. Groups are key to modeling your organization and granting or denying access to various resources to several users.
Group membership is handled separately from any LDAP Maps, except for the system defined special groups All Users, System Admins, and Digital Factory Admins. All other user-defined groups must be provisioned manually.
Group membership changes are handled by the Group Membership Process that automatically runs when you use the Publish command to commit your changes, or as the final process of an automated LDAP Synchronization job. The process runs only if a change has occurred on the Users, Groups, or Permissions tabs. It cannot be invoked or cancelled manually.
The following is how the Groups dialog might look at your site before any major Access Control configuration.
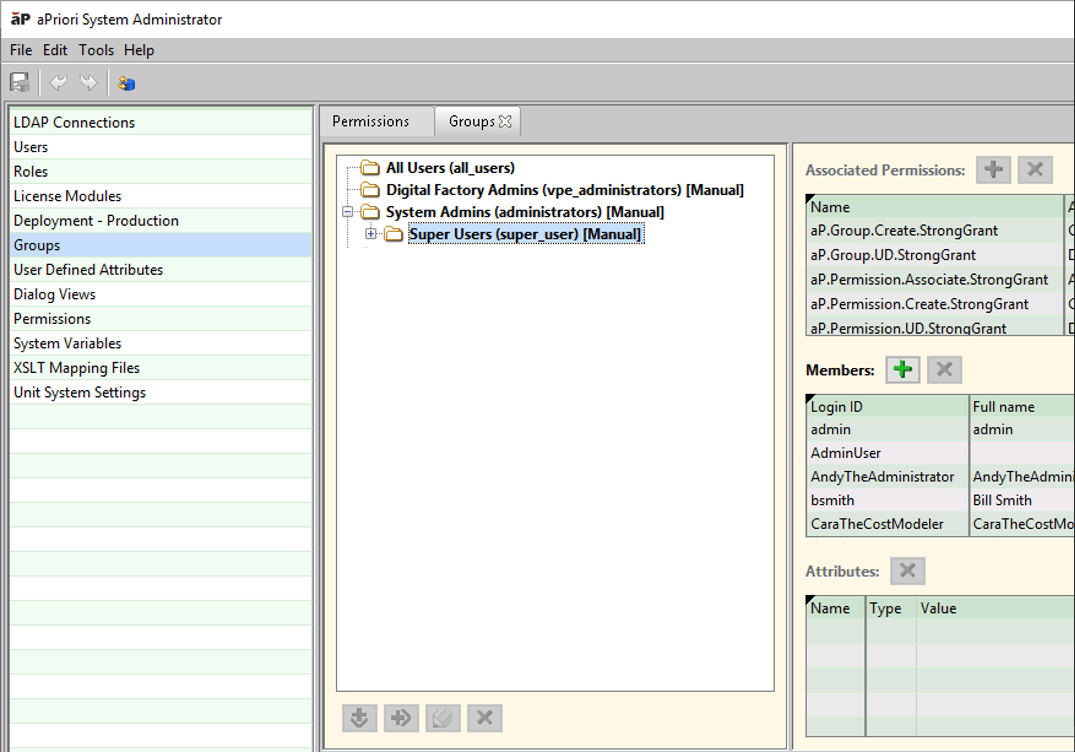
Out of the box, there are four system-defined groups:
- All Users
- Digital Factory Admins
- System Admins
- Super Users (a sub-group of System Admins)
The lower-case names in parenthesis are the system equivalent names that you would specify if importing/exporting groups via spreadsheet. ("Import and Export").
These system-defined groups have the following default settings:
- All Users: no type (nothing is shown in the UI; it is handled automatically by aPriori; the UI does not allow users to be added or removed)
- System Admins, Digital Factory Admins: Manual
- Super Users: Manual (and this cannot be changed).
When an admin edits the group membership type for an existing group and enters a different type, the following rules apply.
-
Old Group type: None, New Group type: Manual or Automated
Action: do not change the current group membership (note that the next Group Membership Process invocation will fix up the membership if it needs to change)
-
Old Group type: Manual, New Group type: None
Action: Remove current members (who are not populated by a child group)
-
Old Group type: Manual, New Group type: Automated
Action: Do not change the current group membership (the next Group Membership Process invocation will fix up the membership).
-
Old Group type: Automated; New Group type: None
Action: Remove current members (unless they are populated by a child group)
-
Old Group type: Automated; New Group type: Manual
Action: Remove current members (unless they are populated by a child group)
Add, Edit, or Remove groups or sub-groups
- To add a new group, click the New Group button:

- To add a new sub-group, select an existing group and click the New Sub-Group button:

-
To edit a group or sub-group, select it and click the Edit Group button:

Note:
You can only edit the name or the Group Membership setting with this button. To edit the Permissions, Members, or Attributes of a group or sub-group, select it and use the panes on the right side of the window. You cannot edit the All Users or Super Users groups, and only the Group Membership setting for System Admins and Digital Factory Admins.
-
To remove a group or sub-group, select it and click the Remove Group button:

Note:
You cannot delete any of the four system-defined groups (All Users, System Admins, Super Users, or Digital Factory Admins).
Group membership settings
This setting determines how users are associated with groups:
- None: The group contains only users from sub-groups. You cannot add or remove users from directly through the UI.
- Manual: The group contains users who are assigned through the UI, or by importing user/group associations (see Import and export).
- Automated: The group is populated by the Group Membership Process. These groups have a new memberOf permission associated with them.
Note:
For LDAP connections to have the System Admin and Digital Factory Admin options available for the Sync Admin Group Membership settings (see Adding a new LDAP connection), these groups must be set to Manual here.
Associated permissions, members, and attributes panes
The Associated Permissions pane displays the permissions that currently apply to the selected group. In the screen shot above, all permissions shown are the system-defined permissions available out-of-box , as identified by the "ap." naming prefix.
The Members pane displays the users who belong to the selected group.
The Attributes pane allows you to define, associate, and remove attribute/value pairs for the selected group. To create a new attribute, double-click the Name field for the first unpopulated row and enter a name for the attribute. Double-click the Type field to display a pull-down menu from which you can select string for text, double for numeric values, Boolean for true/false values, or list for semi-colon-separated strings. Double-click the Value field to enter the value of the attribute.
An example of using the list attribute is to create a list of Digital Factories to which the group should have access, such as setting attribute "AC_VPEs" to:
aPriori China; aPriori USA; aPriori Mexico
An Access Control administrator could write a rule like the following:
vpe.name in currentGroup.attributeValues.AC_VPEs
- When entering or editing attribute values, press the Enter key When you finish, and before clicking elsewhere in the UI. Otherwise, the value may not be saved.
- When you finish, click the Publish icon to save the new attribute and make it available to other groups.
UDAs and group attributes
Group attributes are separate from User Defined Attributes (UDAs) which apply only to component scenarios. However, you can manually coordinate group attributes with UDAs. For example, if you implement a region-based Access Control model, you might create both a group attribute and a UDA named "Region" and set them to values such as "NA" for "North America" or "EMEA" for "Europe, Middle East, and Africa". Once defined, you can then create permission rules that ensure that members of a group with the "Region" group attribute set to "NA" can only access component scenarios. You must ensure that you implement the names and values exactly so that rule comparisons return valid results.
Permissions tab
Use the Permissions tab to create, view, delete, or modify access rules. These permissions can then be associated with groups via the Groups tab (see previous section). The screen shot below shows how system-defined permissions appear Out-of-box , before any customization work has been done.
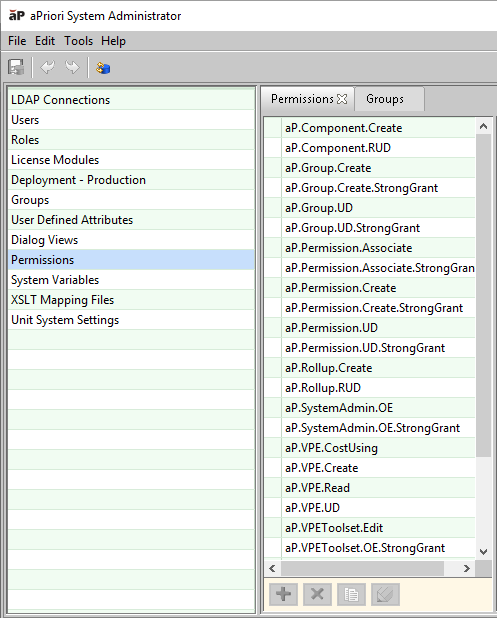
All aPriori-defined permissions have descriptive names starting with "aP." and an indication of their purpose. For example, "aP.component.RUD" is a system-defined permission that gives the user Read, Update, and Delete rights to components.
aPriori recommends that you define and implement a strict naming convention for any permissions that you develop for your site.
Note:
You need to use a single prefix such as "user." for all your own rules: Knowing that they do not begin with "ap." flags them as user-defined, so you can start your names with categories or some other organizational prefix.
The controls at the bottom of the permissions list allow you to add, delete, copy, or edit permissions:
| Control | Purpose |
|---|---|
 |
Add – Create a new permission from scratch. |
 |
Remove – Delete the selected permission. |
 |
Copy – Make a copy of the selected permission, typically to use as a starting point for a new permission, or to make a back-up of a permission prior to editing. By default, the new permission is created with the same name as the source permission, but with "Copy" appended.aPrioridisplays a dialog so that you can customize the name of the copied permission. |
 |
Edit – Make changes to an existing permission. |
When you finish entering or editing a rule, ensure that you click the pencil Edit icon ( ). If you try to go directly to the Publish icon, for example, you may get a message that no rule is defined, or your edits may not get saved.